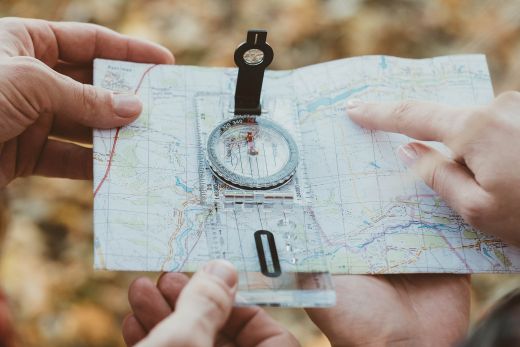
With GPS devices that can fit in your pocket or even on your wrist, it’s all too easy to believe that we can get by without the orienteering skills that pioneering outdoorsmen relied on. But what happens when your batteries die or you drop your Garmin off a cliff a hundred miles from nowhere? If you regularly push into remote and unfamiliar terrain, it’s best to know how to use a map and compass in case technology fails you. In the next few pages, I cover the most important of these skills so that when you next head into the great unknown, you know that navigation doesn’t depend on a functioning GPS.
Orienteering tools
A map and compass don’t require batteries or signal, and they’re light enough to fit into even the skimpiest running pack. While maps are simple tools, compasses can vary widely in their features and functions. It’s good to know the following before picking one.
Compasses
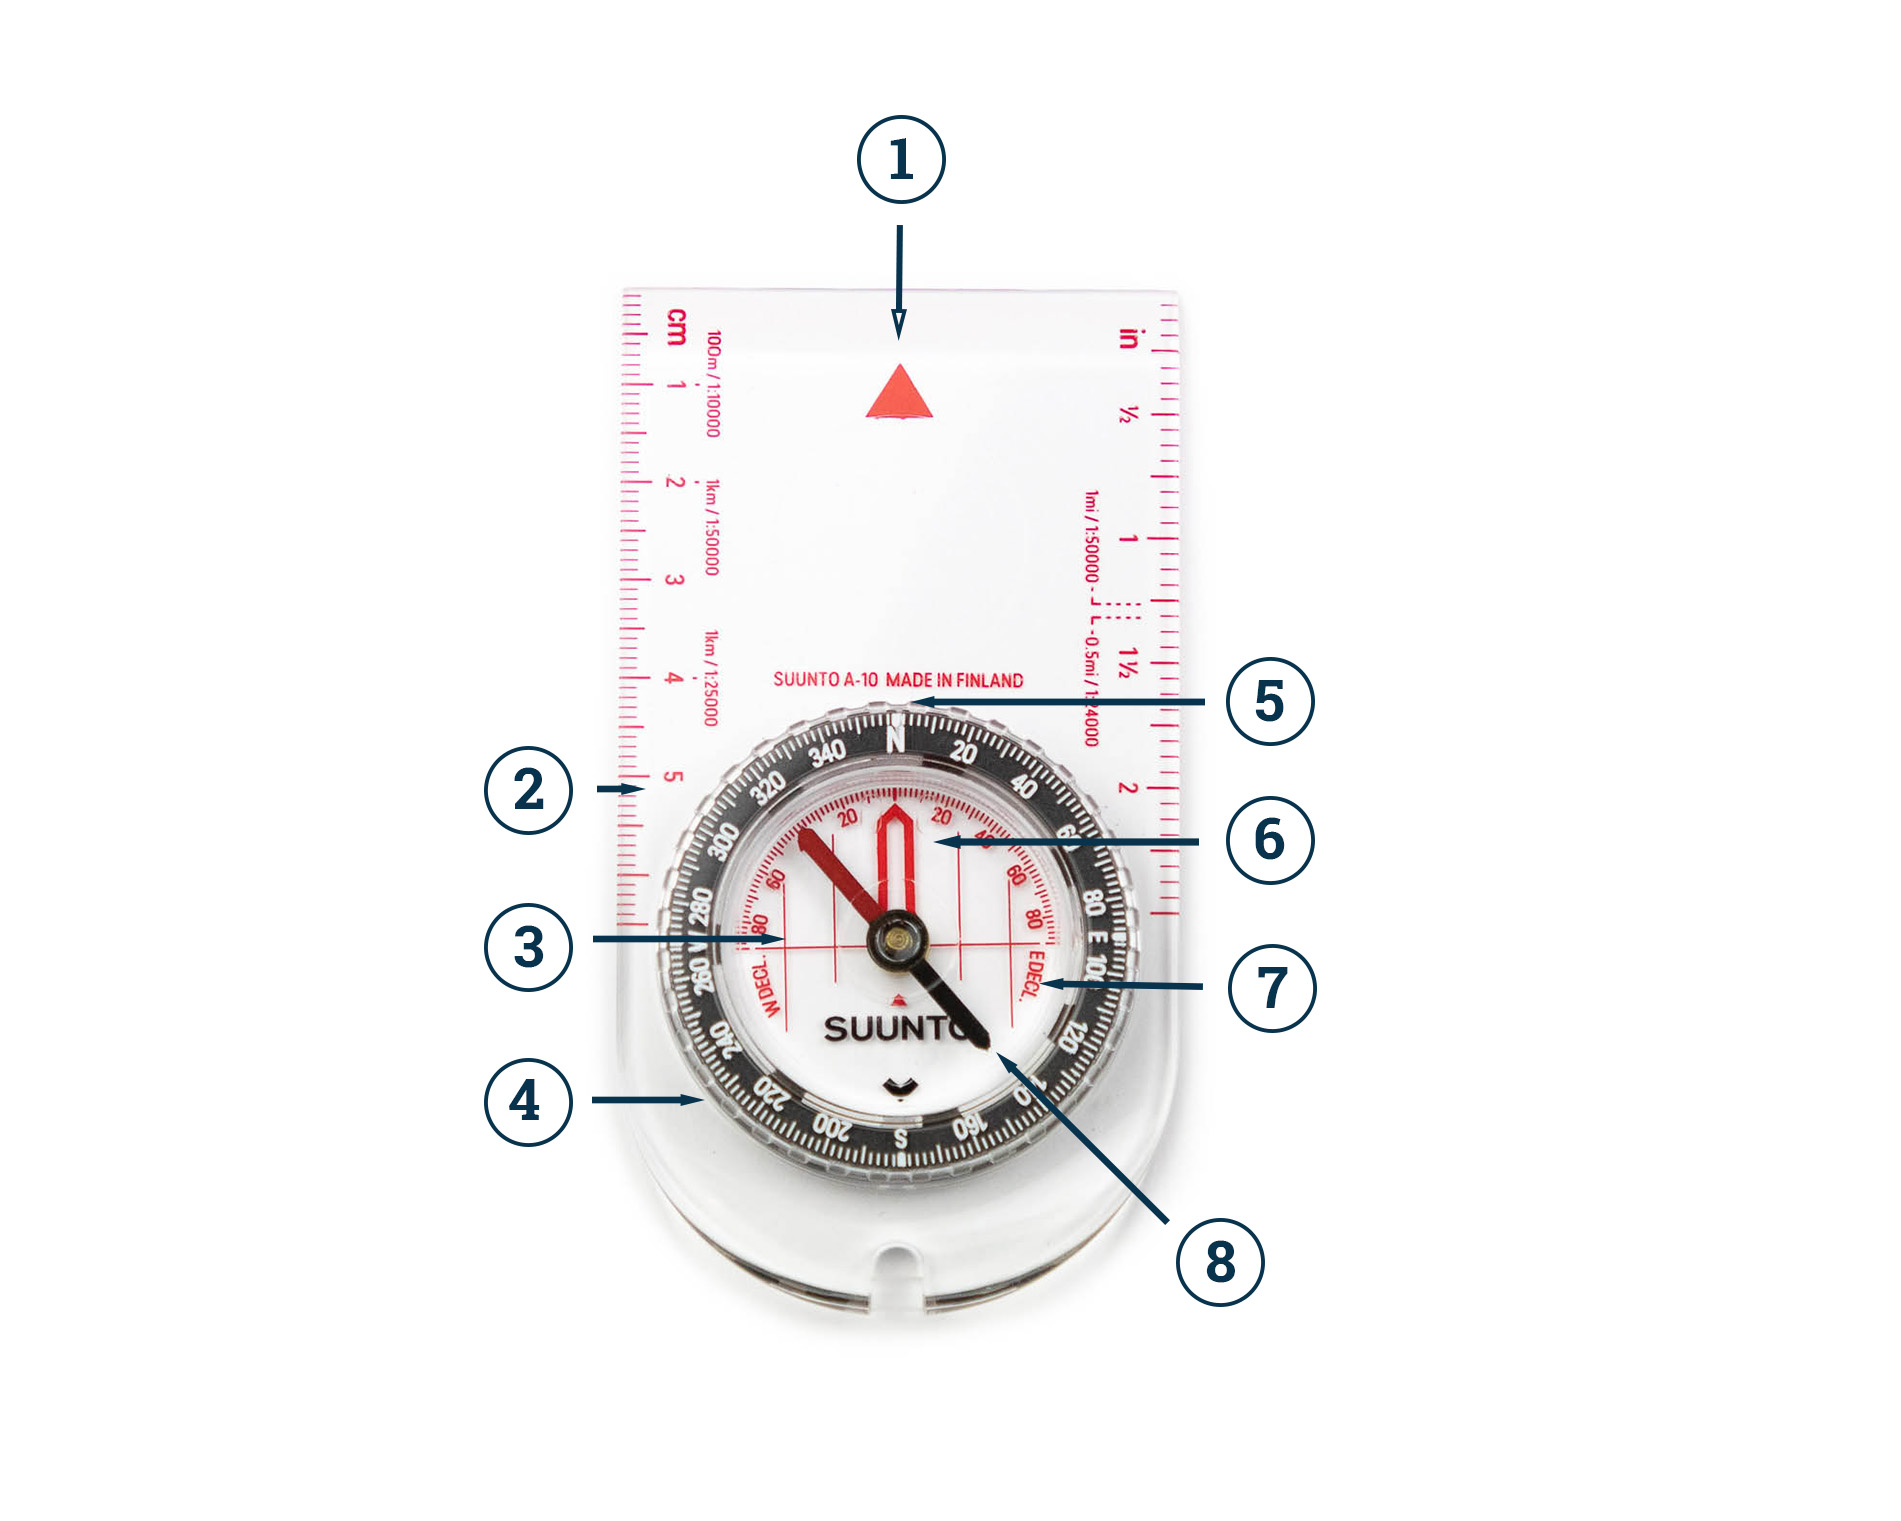
These range in size from the button sized fixed-dials that you find in first aid kits to the chunky lensatic compasses commonly used by the military. For navigating in the wilderness, it’s best to use an orienteering compass. These simple and relatively inexpensive tools typically feature a rotating compass housing and a transparent base plate that makes it easy to align the compass with the features on a map.
1. Direction of travel arrow
2. Base plate
3. Orientating lines
4. Bezel
5. Index line
6. Orientating arrow
7.Declination scale
8. Magnetic needle
Hemisphere-specific vs global needles
Compass needles are not only affected by horizontal magnetic pull but also by vertical magnetic pull, especially towards the poles. Towards the northern magnetic pole, the red end of a needle will be pulled downwards, while at the southern magnetic pole it will be forced upwards. If there is too much push or pull, it can affect the balance of a compass and its ability to give an accurate reading. The result is that compasses have to be designed to work in specific geographic specific zones. The exceptions are compasses with global needles (patented by Suunto), which perform perfectly in all five zones.
Fixed vs adjustable declination correction
The difference between Magnetic North and True North is called declination. Declination differs according to your geographic location and even over time. To be accurate when navigating over longer distances, you have to adjust for declination. On a compass with fixed declination correction, declination must be adjusted for manually every time you use it by realigning the needle with the correct degree of declination (a scale within the bezel). On compasses with adjustable declination, the correction is made only once for each new area by turning a declination scale on the back of the compass (This usually requires the use of a screwdriver that comes with the compass).
Mirror compasses
Some compasses feature a hinged lid with a mirror inside it. When titled to 45 degrees, the mirror allows the user to have sight of the compass dial even as she sights a landmark. This allows for greater accuracy but will likely be more than you need unless you are navigating over long distance. I prefer a much simpler and lighter fixed declination correction compass – the Suunto A-10. At a mere 30 grams (1 oz) I’m unlikely to leave it at home just to save weight.
Maps
A map needs to be of a scale small enough to be useful to hikers, skiers, and mountain bikers who sometimes have to match relatively small geographical features in the environment to those on their maps. If the map’s scale is too large, you’re not going to see these features in clear relief. Ideally, you’d use a map with a scale no bigger than 1:50 000. At that size, a map measuring 80 by 50 centimeters would cover an area of 40 x 25 kilometers, or twice that if double sided.
1. Contour lines
2. Spot elevations
3. Scale
4. True North and Magnetic North
4. Declination
5. Location
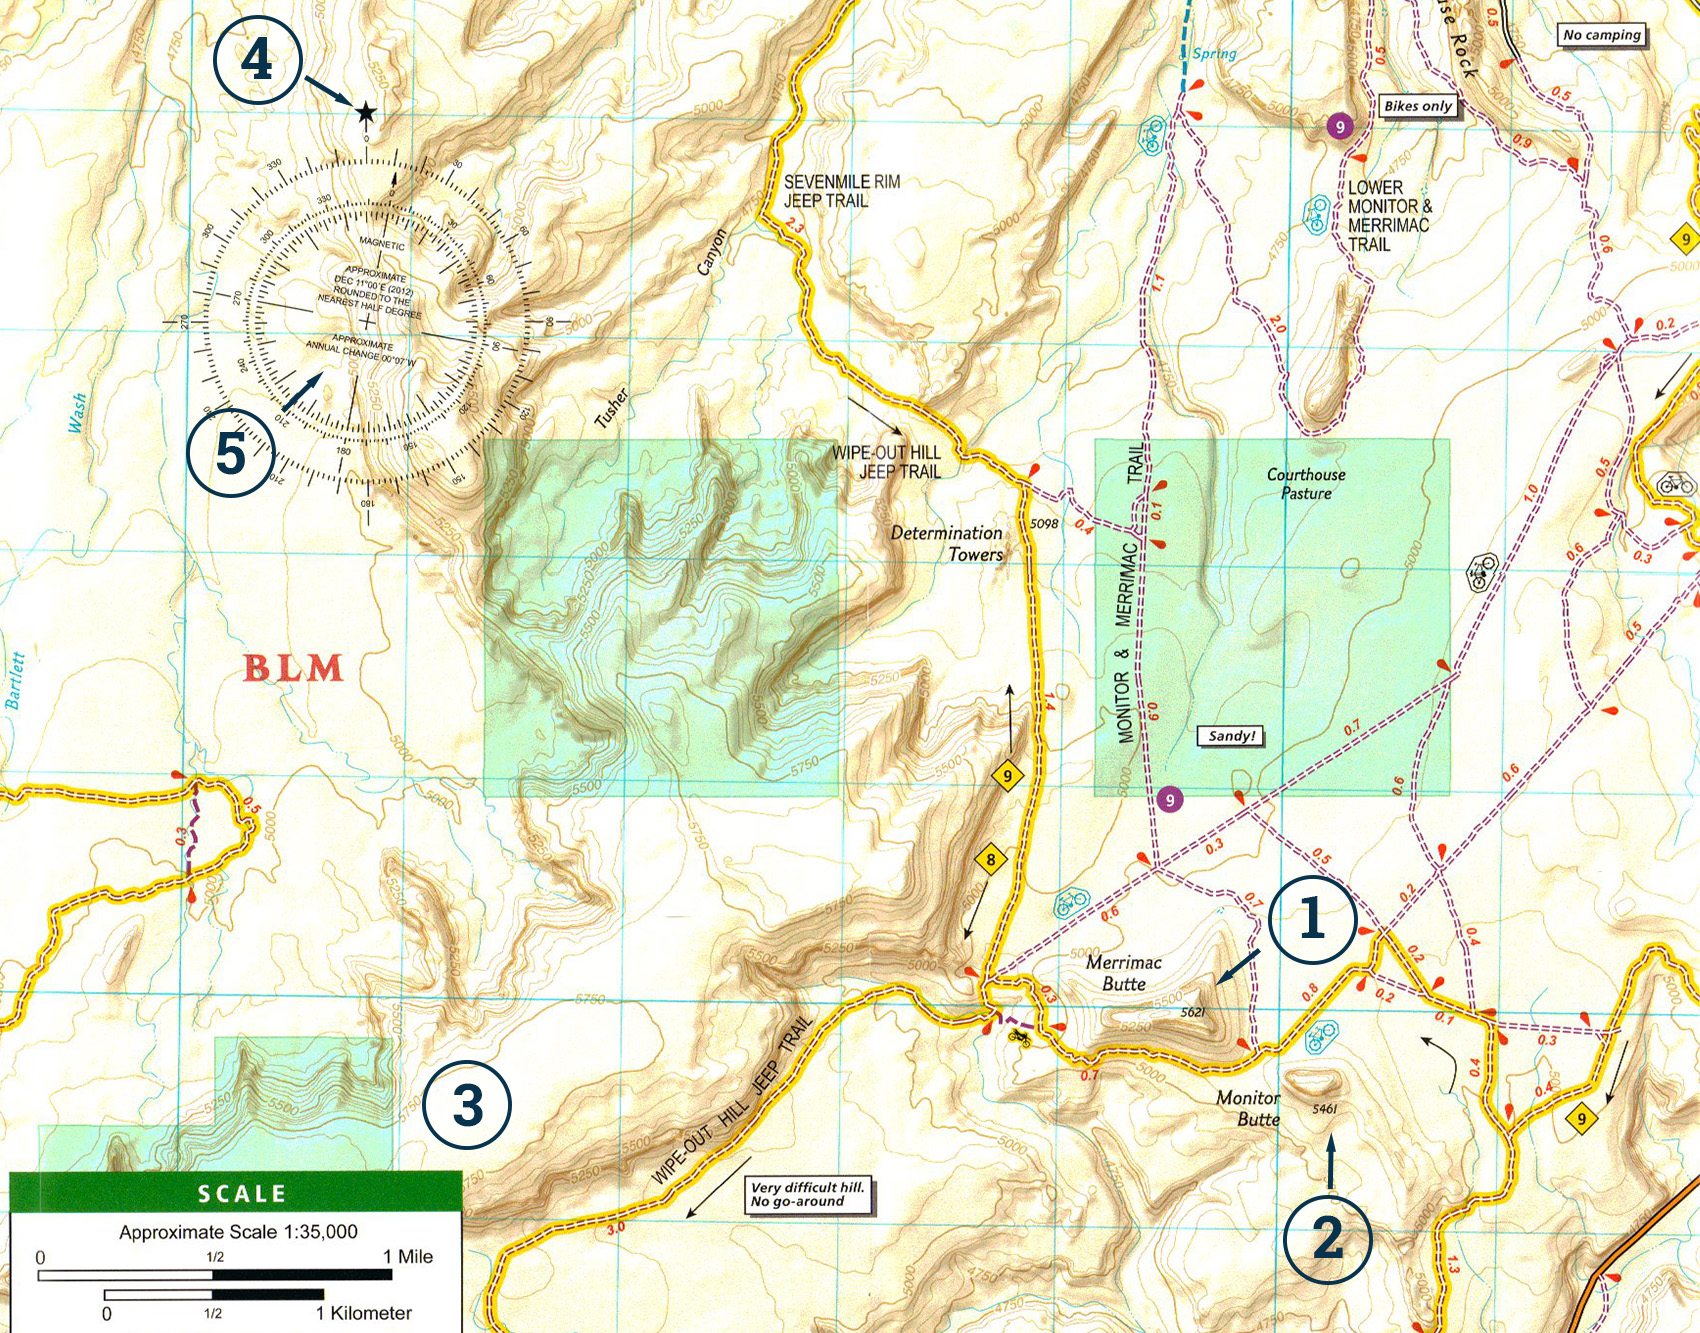
A good topographical map will also include contour lines, the elevation of peaks, and a legend including the symbols used in the map and the declination for that area (more about that in a minute). Lastly, a hiking map should be made of a material that is at least slightly water resistant (many store-bought maps are). A map printed onto regular printer paper will fall apart even if it’s slightly damp. Regardless of the material, it’s best to store a map in some kind of waterproof folder.
The basics
Before we can get to the really useful stuff, we need to go over a few orienteering fundamentals.
Understanding declination
Maps are typically oriented to True North (the North Pole), but a compass needle will always line up with Magnetic North. This difference accounts for declination, the angle you have to correct for every time you use a compass with a magnetised needle. To set the correct declination for your location, you need to know the declination value for that location. This is published on most high quality maps, but if your map is several years old, it would be best to check a website like magnetic-declination.com for the current declination of your area.
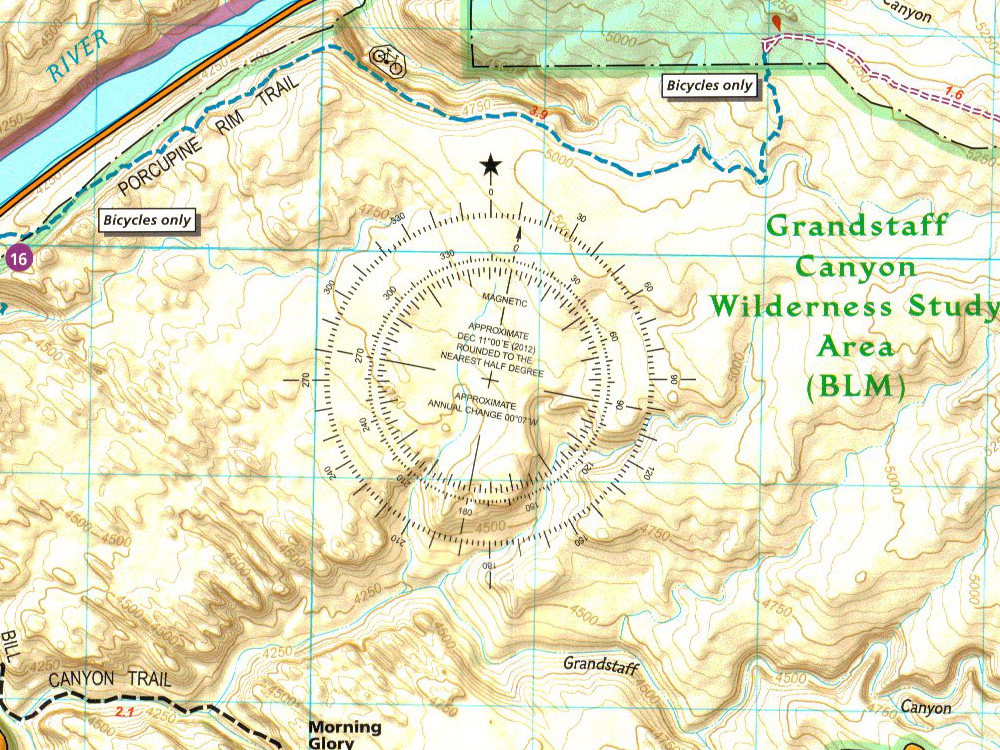
Declination correction is achieved in different ways by fixed declination correction compasses and adjustable declination correction compasses. But the outcome is the same. If your declination is 10 degrees East, a correction will position the magnetic needle to the east of the direction of travel arrow by 10 degrees, thus correcting for magnetic declination and pointing the compass towards True North.
Orientating the map
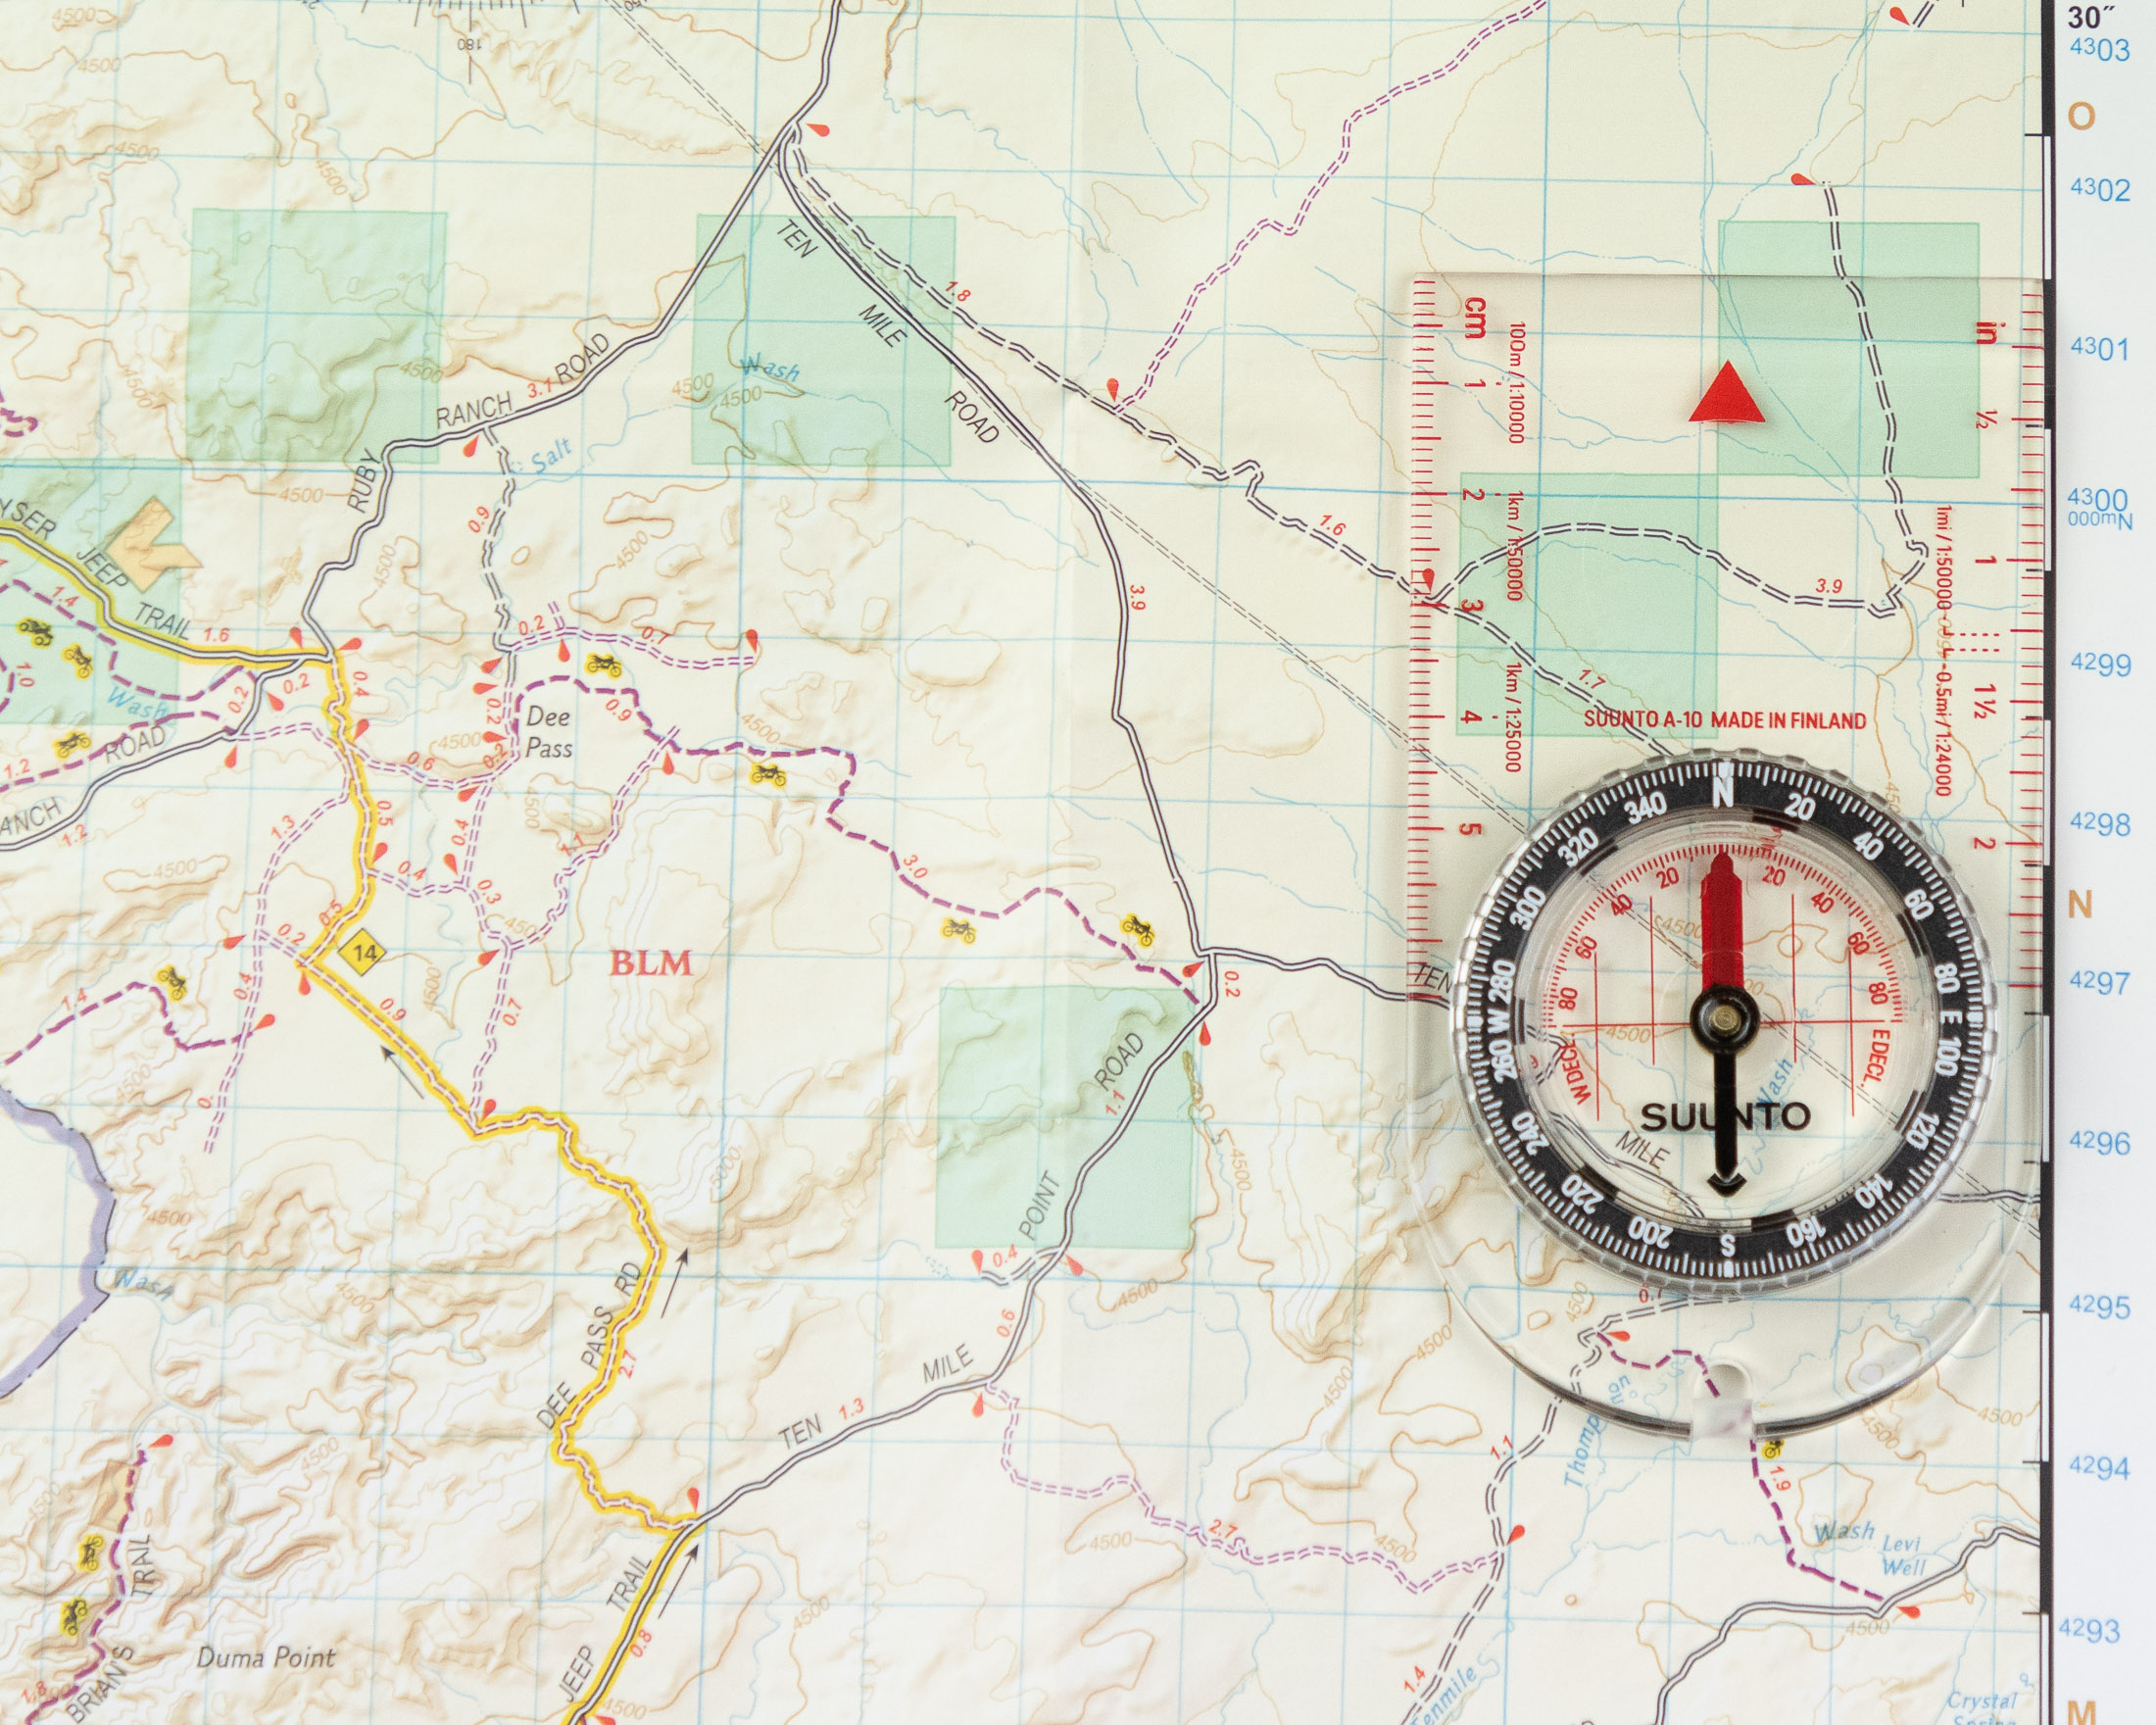
It helps to have your map facing the right direction when you’re trying to understand how depicted features relate to the landscape around you. Almost all maps are designed so that the top edge points towards True North. To get your map facing roughly in the right direction – in this case Magnetic North – follow the following steps. It’s not essential that you orient the map perfectly, so there’s no need to adjust for declination.
1. Place your compass on the map with the direction of travel arrow pointing toward the top of the map and the edge of the compass baseplate lined up with the right edge of the map.
2. Rotate the bezel so that N on the dial aligns with the index line.
3. Holding the compass in place on the map, rotate the map until the magnetic needle lines up with the orienting arrow (aligned with the index line). The map is now facing Magnetic North (not True North but close enough).
Taking a compass bearing
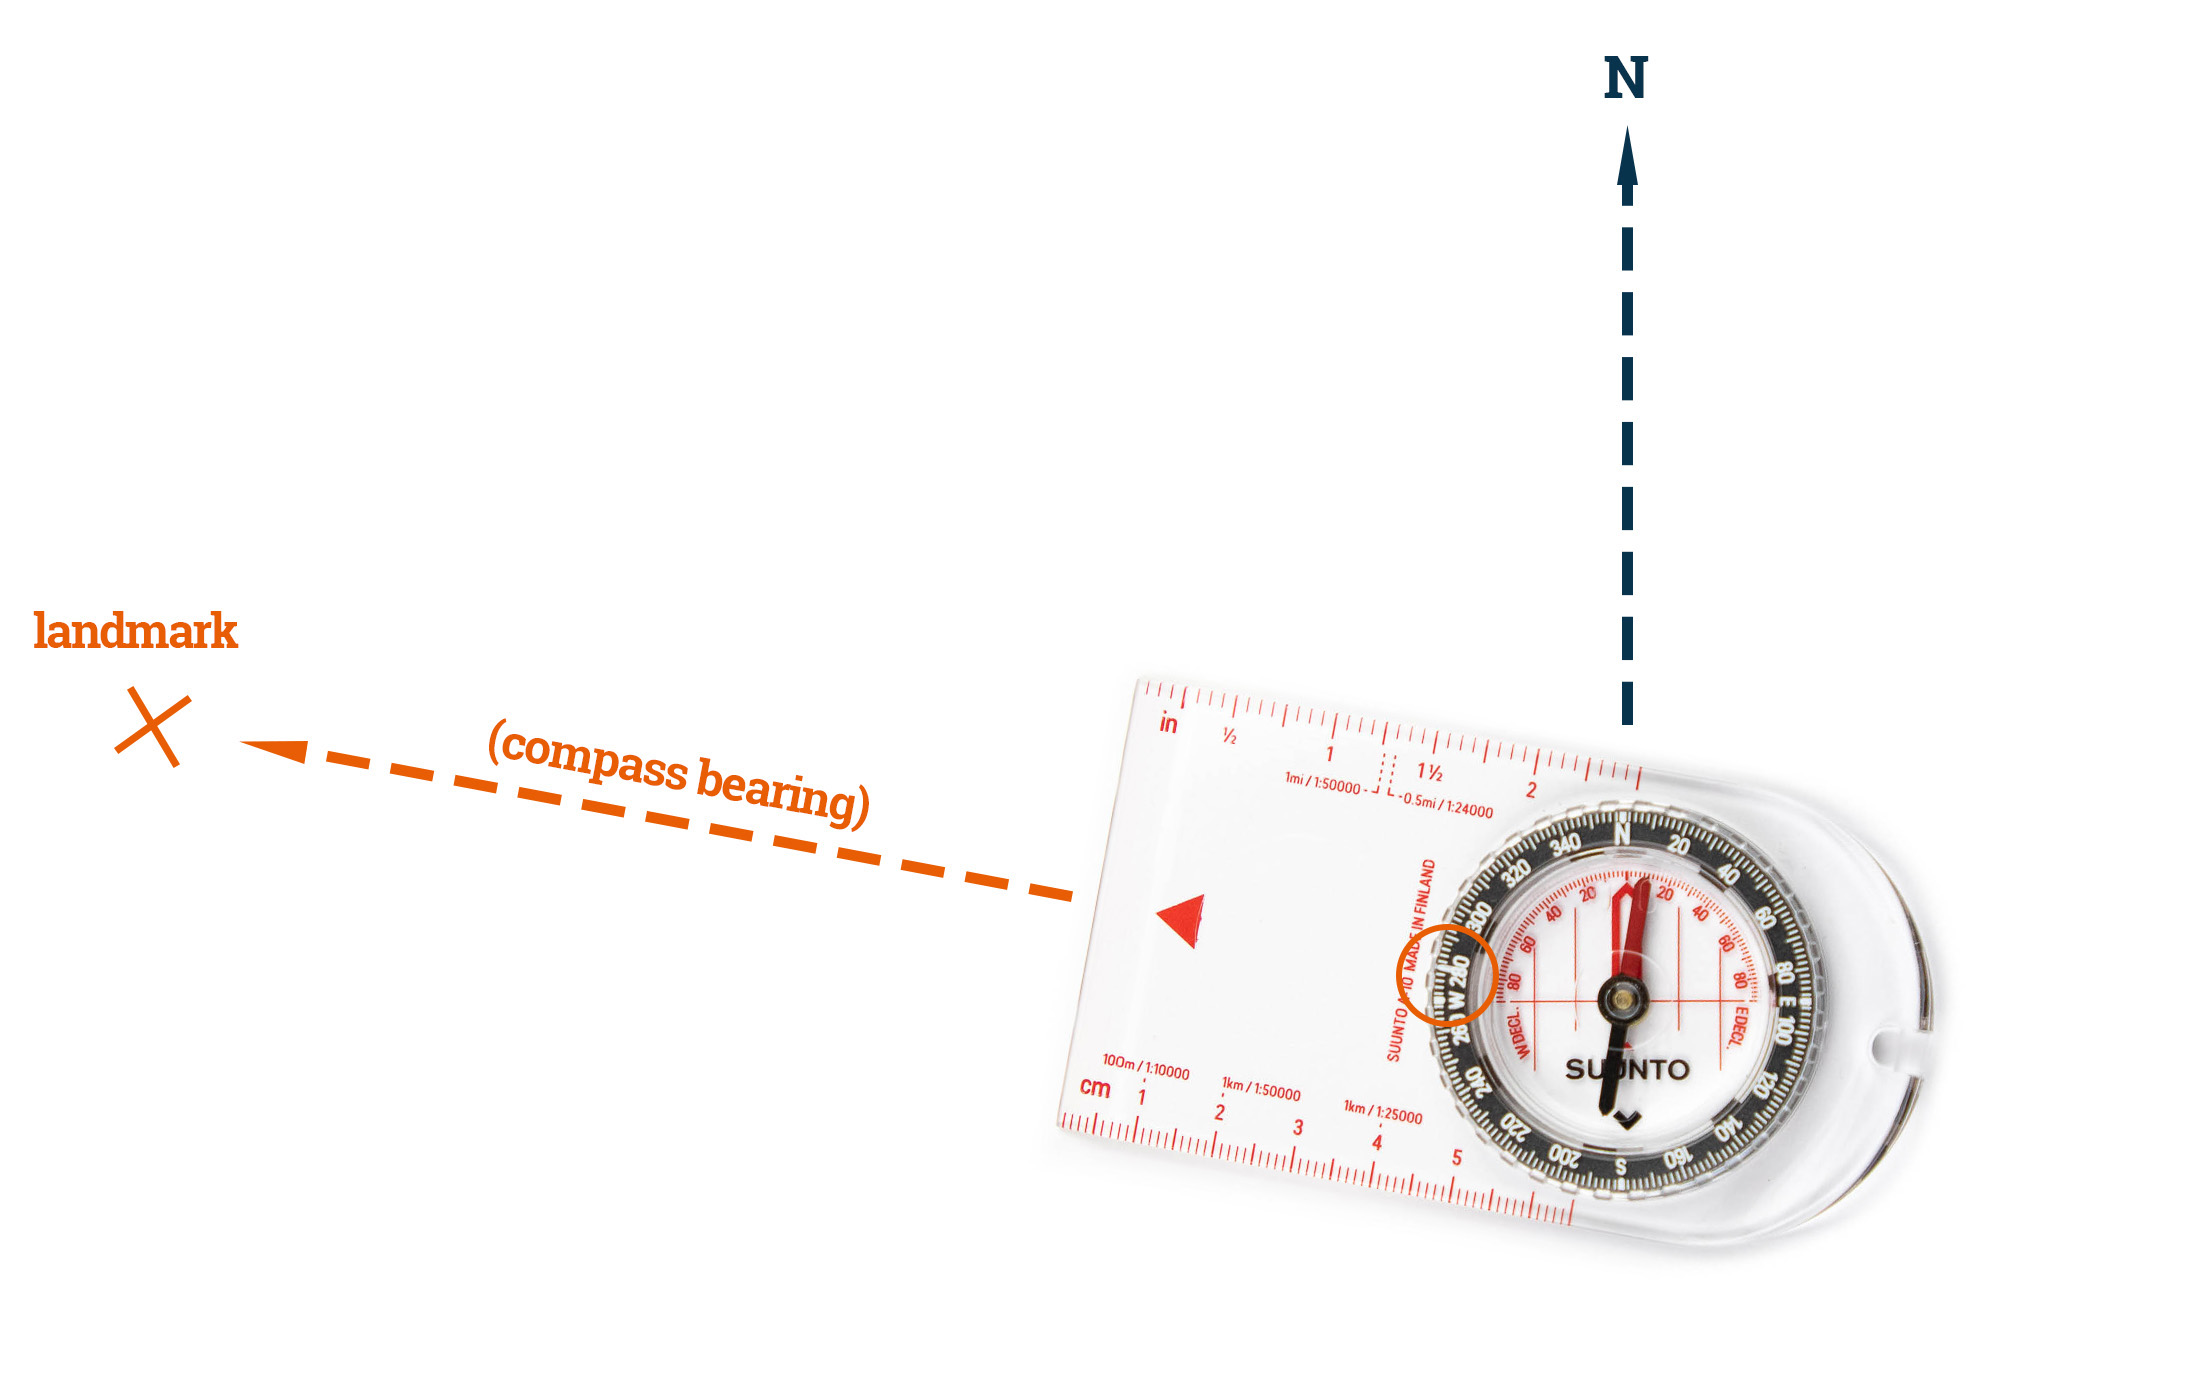
A bearing is the direction from one point to another (measured in degrees) with True North at zero. To take a bearing with a fixed declination correction compass, follow the following five steps. If you use an adjustable declination correction compass, you will set your declination correction before step one (usually achieved with a dial on the back of the compass) and skip step 3.
1. Hold the compass in front of you with the direction of travel arrow pointing at your chosen landmark.
2. While keeping the direction of travel arrow pointed at the landmark, rotate the bezel until the orienting arrow lines up with the red end of the needle.
3. Rotate the bezel again so that the magnetic needle lines up with the degree of declination (small numbers in red) specified by the declination diagram on your map (or current measurement).
4. Your bearing is the number read off the index line.
Finding your location on a map
Before you can figure out how to get to your destination, you usually have to determine where you are on your map. There are two ways you can do this.
Free triangulation using a line and landmark
If you find yourself on a line that appears on the map (a trail, stream or boundary) you can use a shortcut called free triangulation to establish your position. For this technique, you only need one other landmark, but you need to be able to identify this feature both in your environment and on the map. Orientating the map properly can make it easier to match a physical geographical feature to a feature on the map.
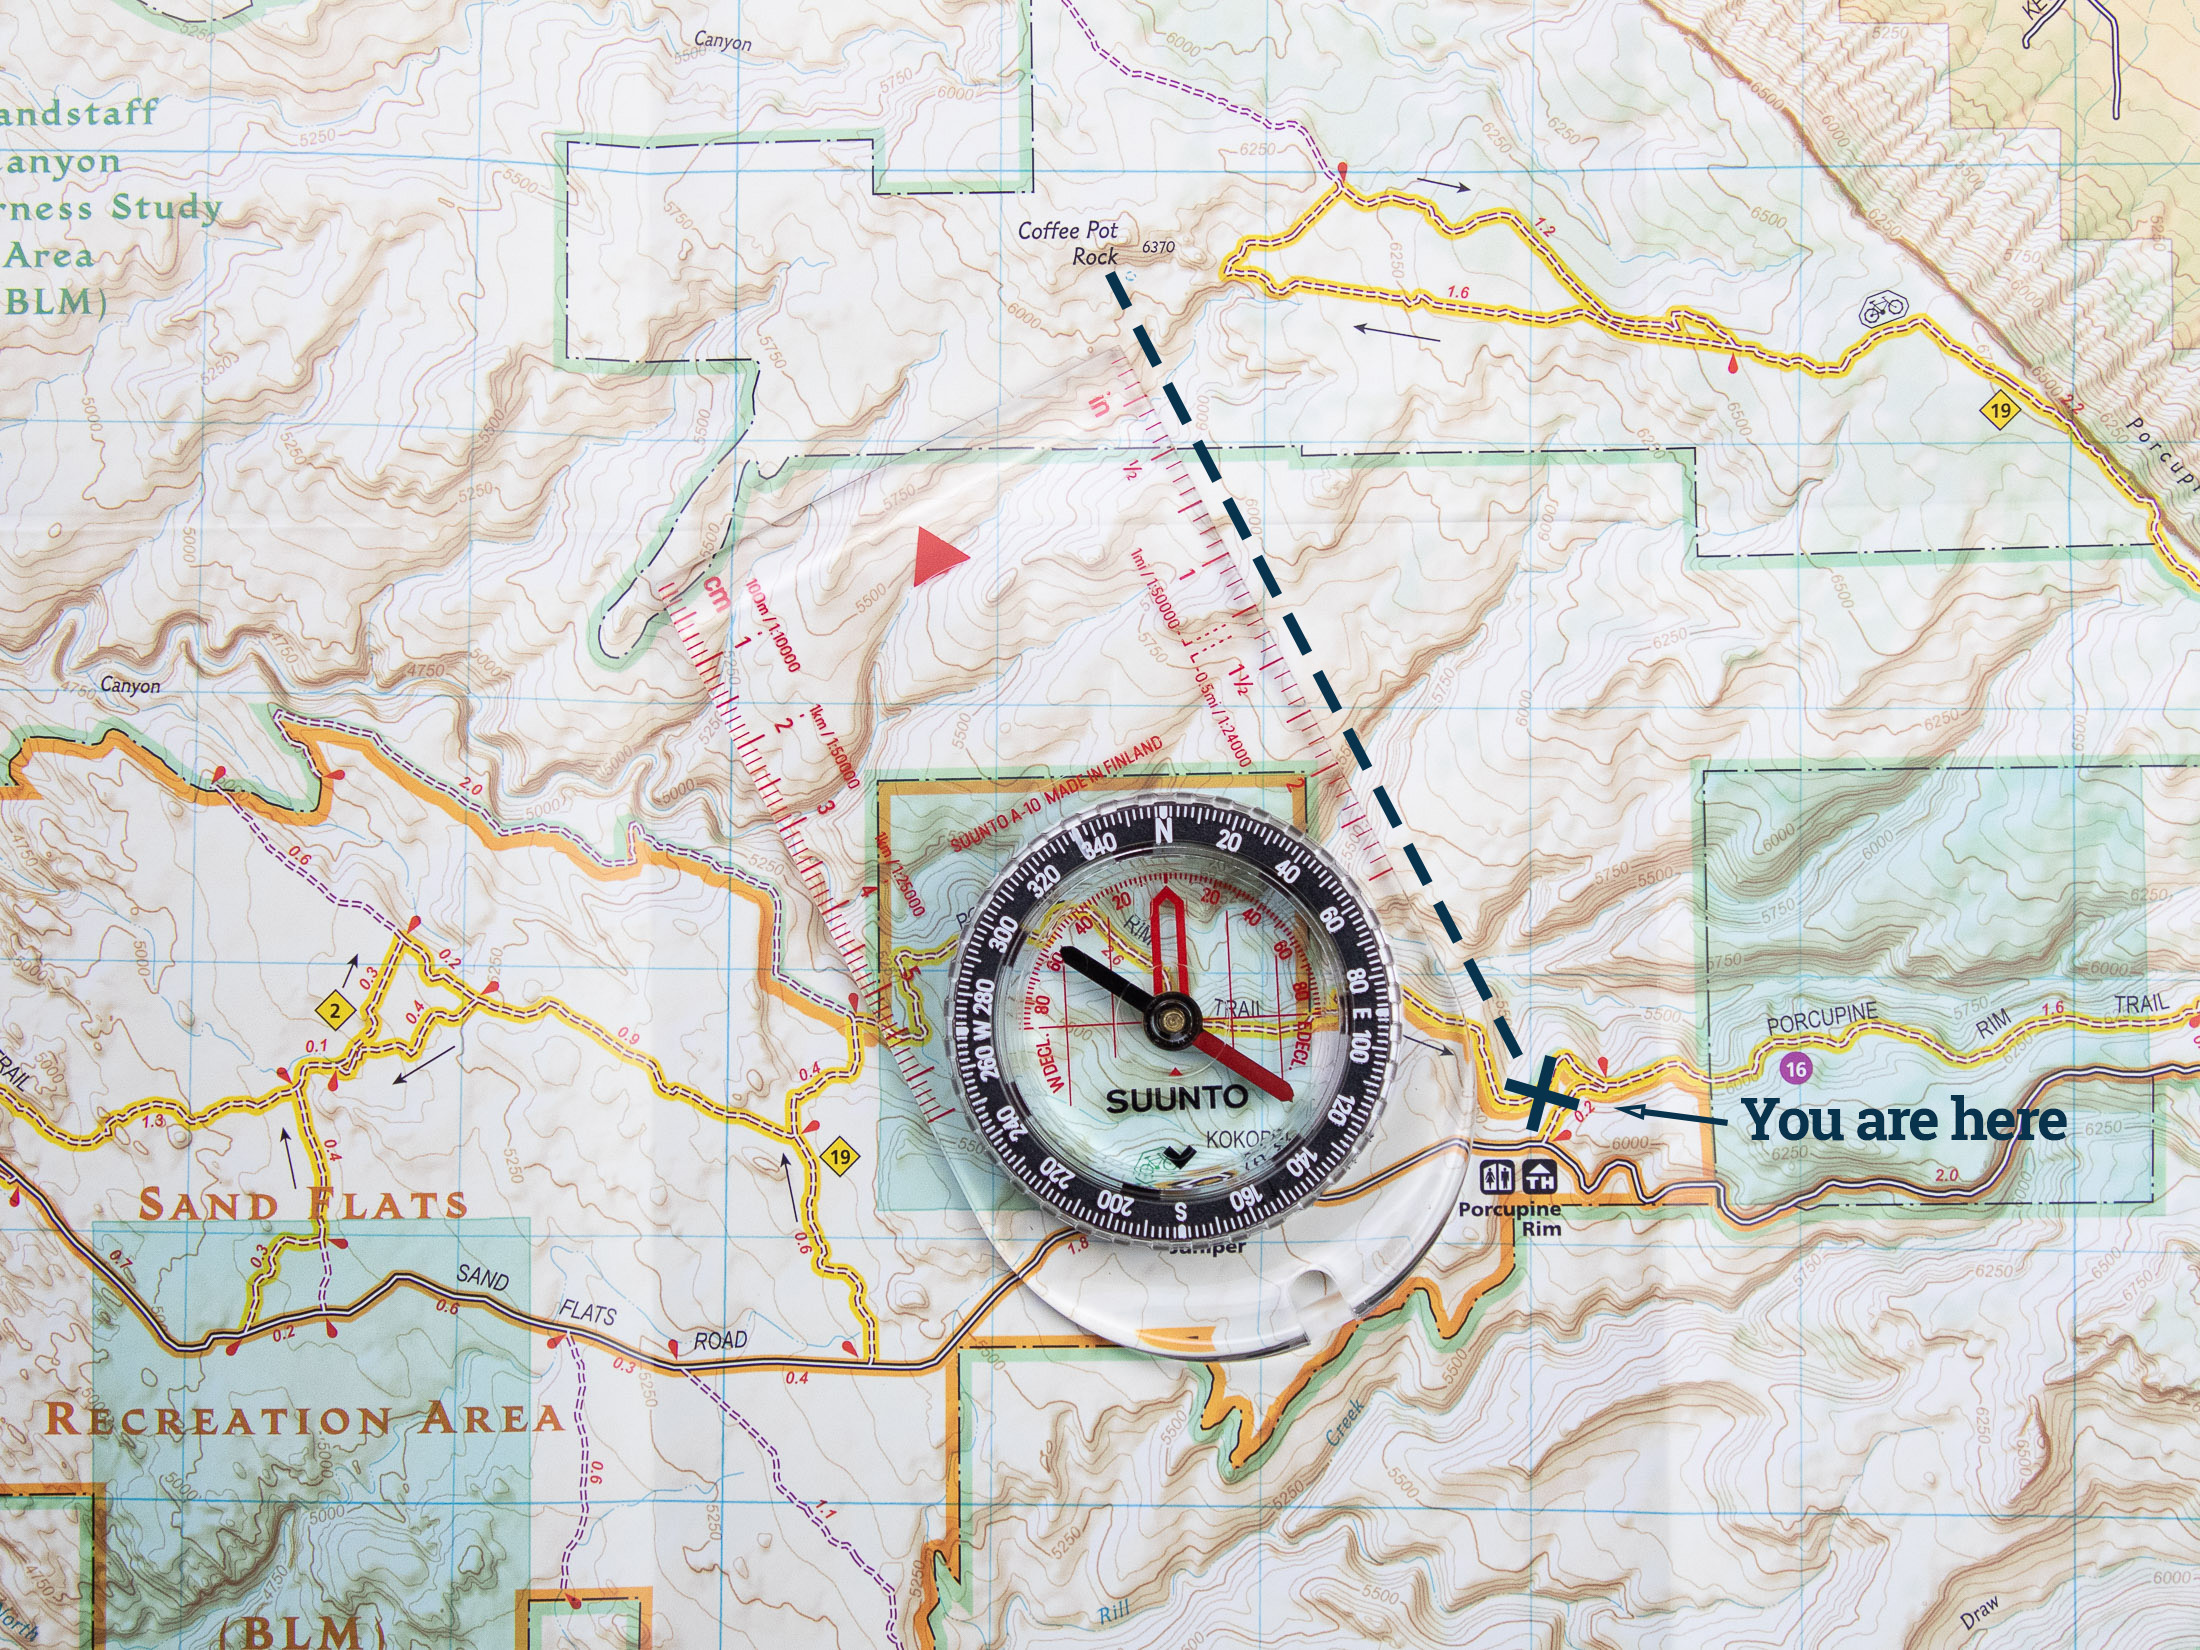
Once you’ve identified the landmark in your environment, take a bearing on it. Then, using that bearing, draw a line on the map from the landmark to the trail or stream. Make sure that the right number on the bezel (your bearing) is still lined up with the index pointer. Then, rotate the whole compass until N on the bezel points toward the top of the map. You can then use the side of the compass baseplate as a ruler to draw a line from the singular landmark to the stream or path. Where those two lines intersect is your location.
1. Position yourself on a line (trail, stream or boundary)
2. Identify and take a compass bearing on your chosen landmark
3. Without adjusting the bezel, position your compass on the map so that N on the bezel points to the top of the map. Lining up the orienting lines on the compass with the meridian lines on the map will ensure greater accuracy.
4. Keeping this orientation, position the edge of the base plate (one end of the ruler) on the landmark and draw a line from it towards the trail, stream, or boundary.
5. Your position is that place where the two lines intersect.
Triangulation using two landmarks
If you’re not on a path or river that features on the map, you will have to use triangulation to determine your position on the map. For triangulation to work, you need two landmarks that you can identify both in the environment and on your map. Once you’ve matched elements on the map to real geographic features you can take a bearing off each of these.
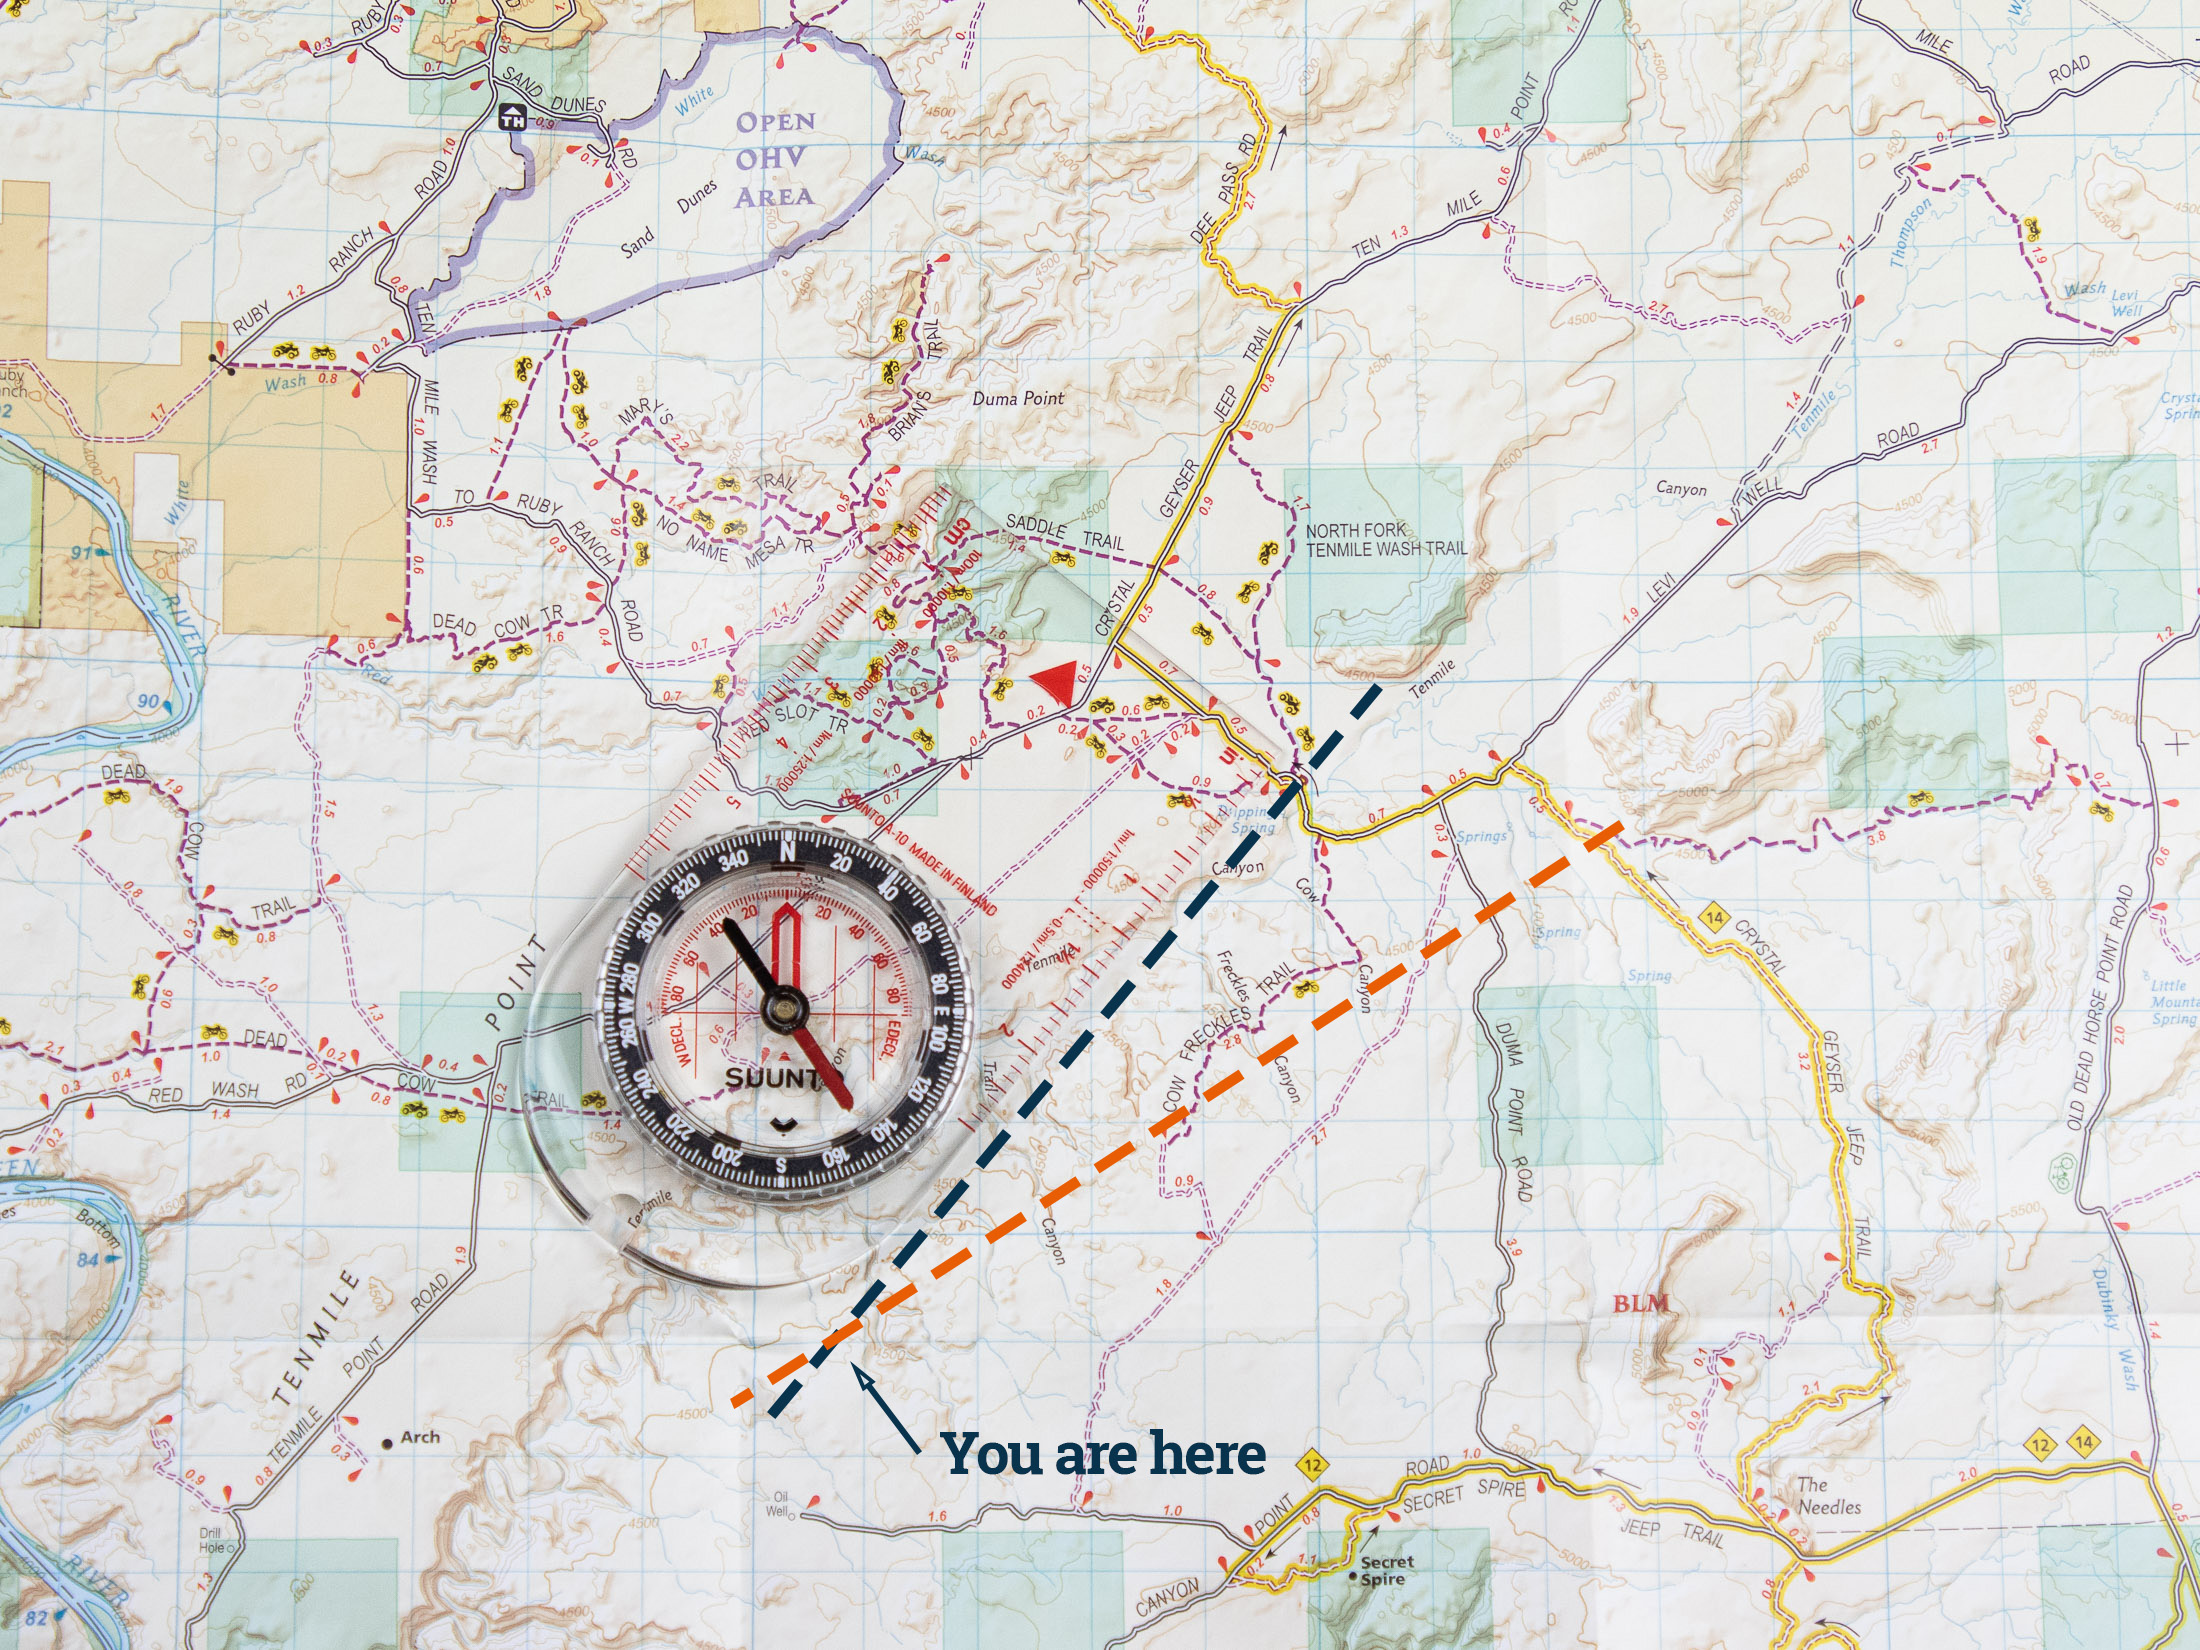
As with the first technique, you then have to translate these bearings into lines on the map. Only this time you’ll have two of them. Again, make sure that the right number on the bezel (your bearing) lines up with the index pointer, and then rotate the whole compass until N points toward the top of the map. Finally, use the compass base plate to draw a line from the landmark towards the edge of the map (or as far as you think will be necessary to meet the other line). Repeat with the other landmark. Where the two lines intersect is your location.
1. Identify and take a compass bearing on your first landmark
2. Without adjusting the bezel, position your compass on the map so that N on the bezel points to the top of the map. Lining up the orienting lines on the compass with the meridian lines on the map will ensure greater accuracy.
3. Keeping this orientation, position the base plate edge (one end of the ruler) on the landmark and draw a line from it towards the edge of the map.
4. Identify and take a compass bearing on a second landmark
5. Repeat step 2 for the second landmark so that the direction of travel arrow matches your compass bearing when placed on the map
6. Repeat step 3 for the second landmark, extending the second line until it meets the first line.
7. Your position is that place where the two lines intersect.
Navigating to your destination
Once you have located your position on a map, you might need to figure out how to get to your intended destination. To get yourself heading in the right direction, you’ll need to take a map bearing and then turn the map bearing into a compass bearing.
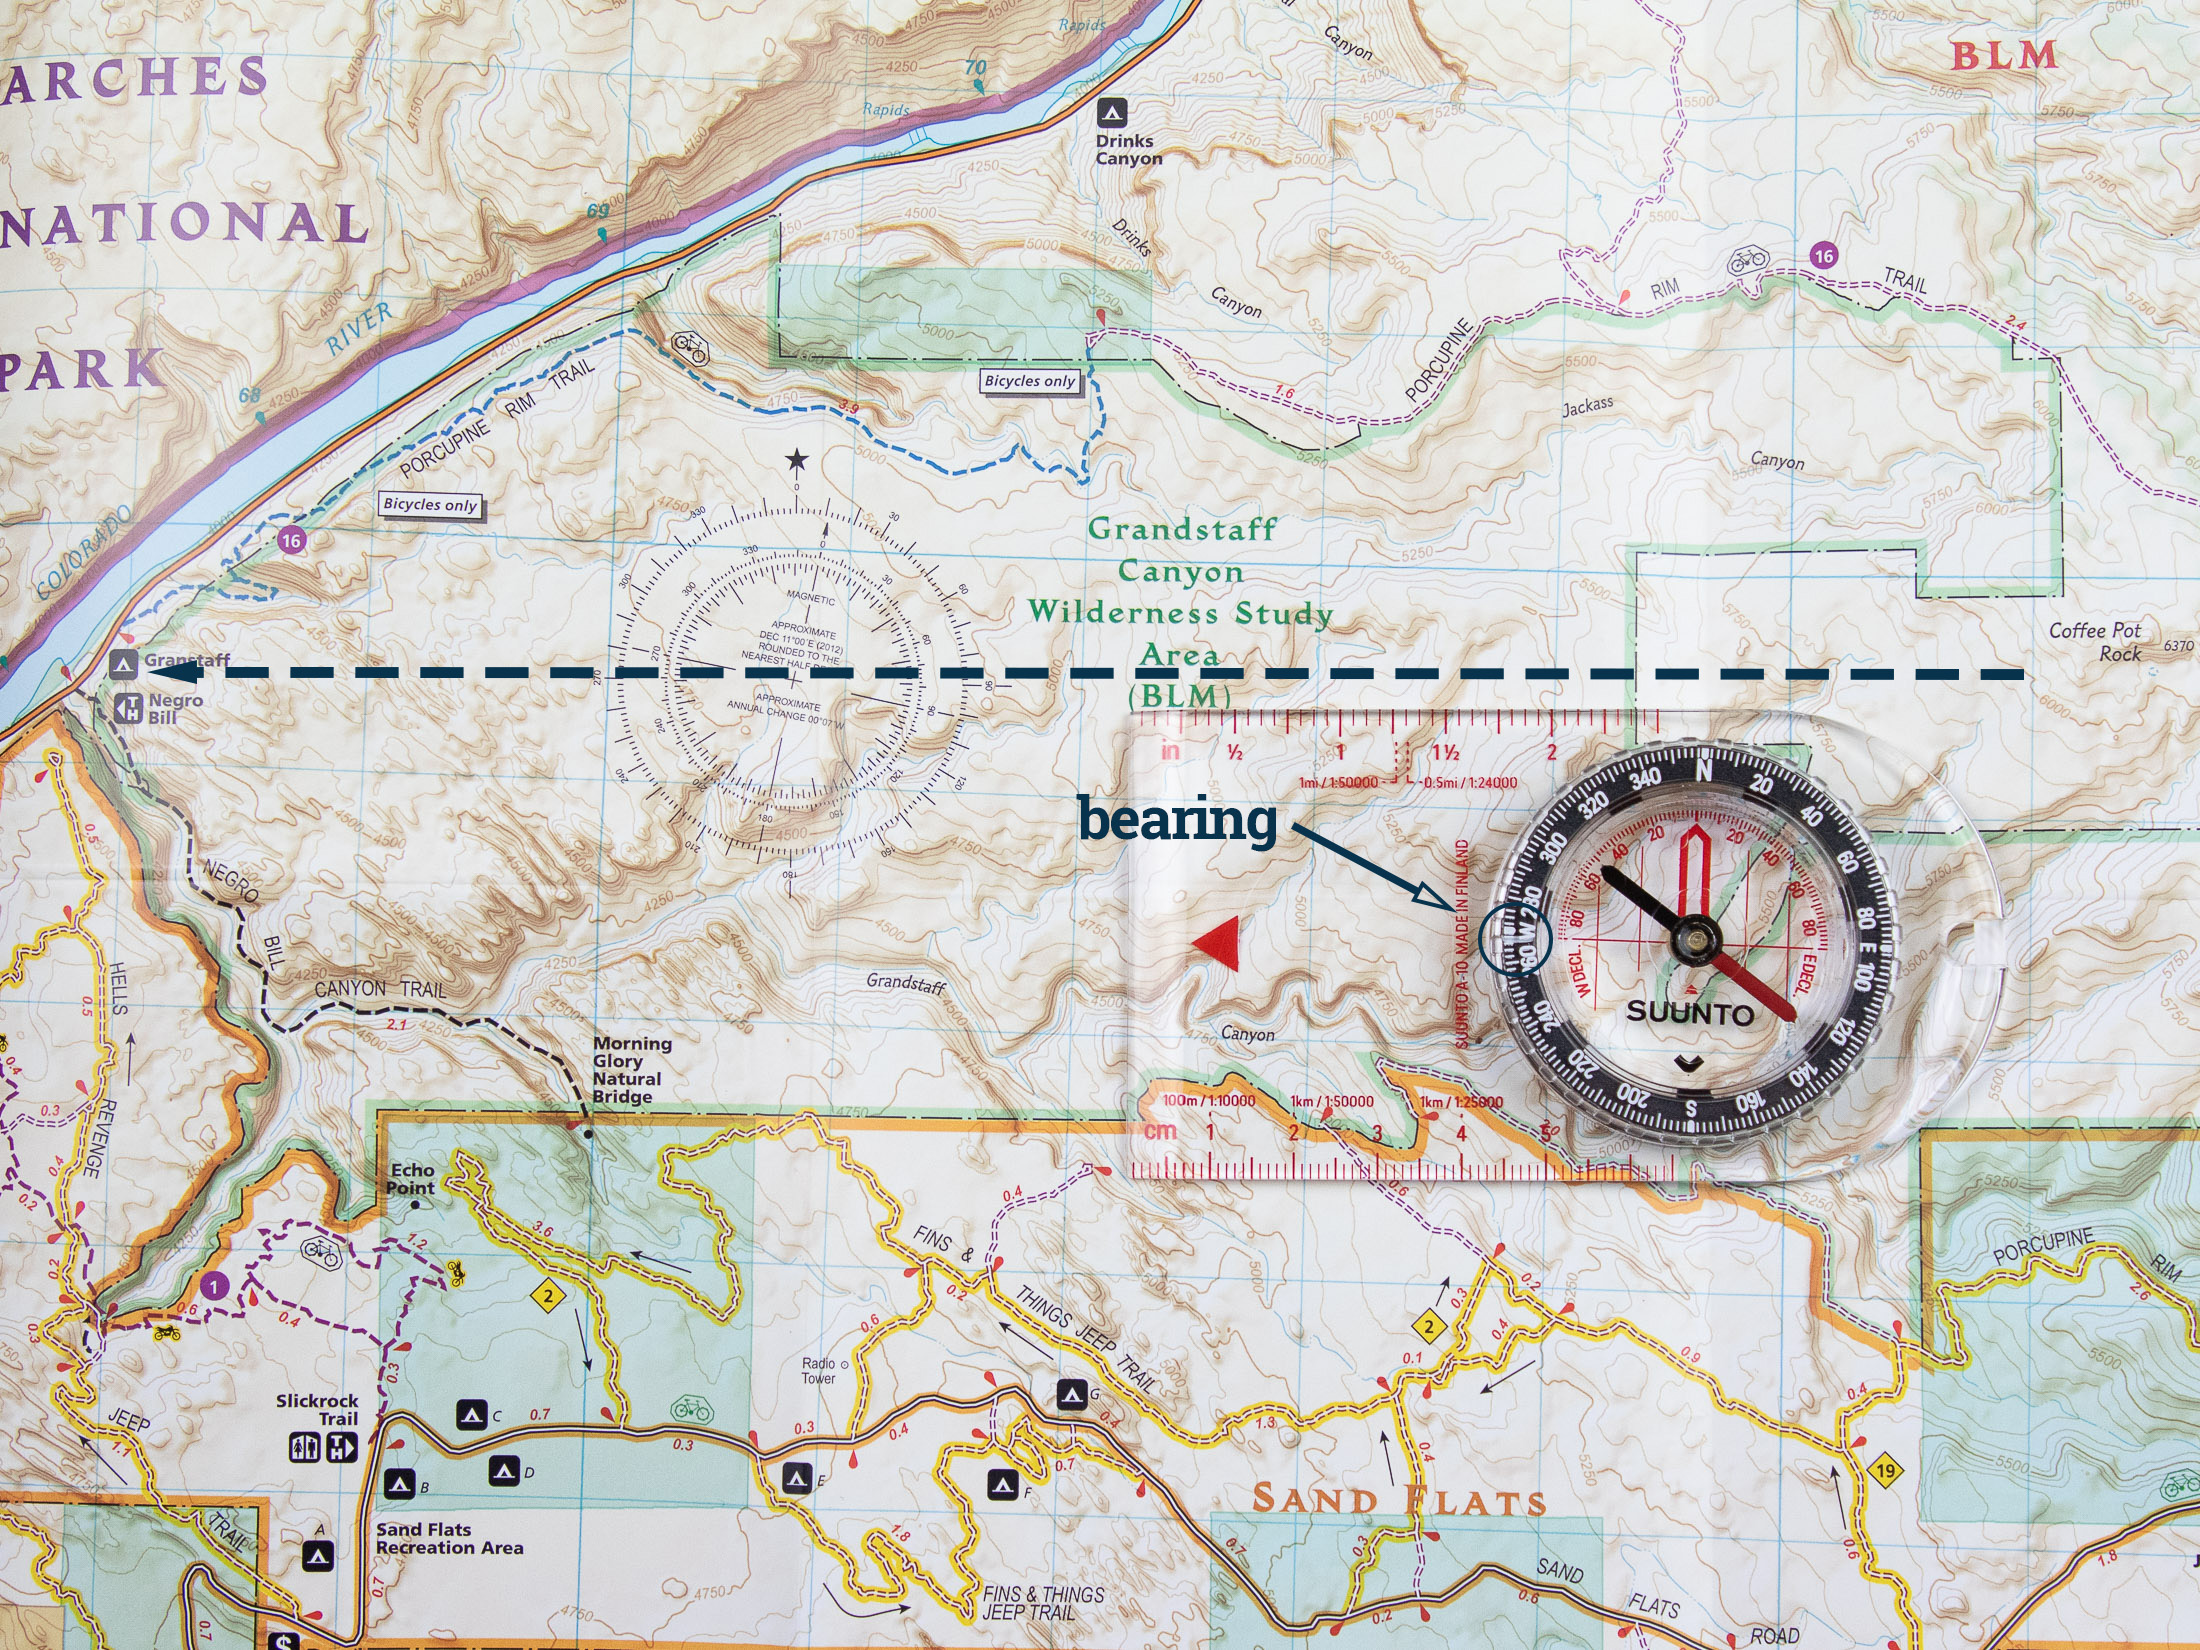
Taking a map bearing
For this exercise, you don’t need to be able to see your destination, and that of course is the point of orienteering – to get you heading in the direction of something you might not be able to see. Your map also doesn’t need to be properly orientated for this exercise although having the top of the page pointed north can help you make sense of your surroundings.
1. Draw a line between your current location and your destination. You can use your compass base plate for this.
2. With the edge of the compass base plate on this line, rotate the bezel until N points toward the top of the map. Lining up the orienting lines on the compass with the meridian lines on the map will make this more accurate.
3. Your bearing is the number aligned with the index pointer.
Converting a map bearing to a compass bearing
Once you have your map bearing, you need to convert it into a compass bearing. If you are using a fixed declination correction compass, follow the following four steps. If you’re using an adjustable declination correction compass, set your declination correction before step 1 (usually achieved with a dial on the back of the compass) and skip steps 2 and 3.
1. Hold the compass with the direction of travel arrow pointing away from you and rotate your whole body until the needle lines up with the orienteering arrow.
2. To correct for declination, rotate further so that the magnetic needle lines up with the degree of declination (small numbers in red) specified by the declination diagram on your map (or current measurement).
3. Without changing position or moving the compass, rotate the bezel so that the orienting arrow lines up under the needle.
4. You can now follow this bearing to your destination by keeping the needle aligned with the orienting arrow.
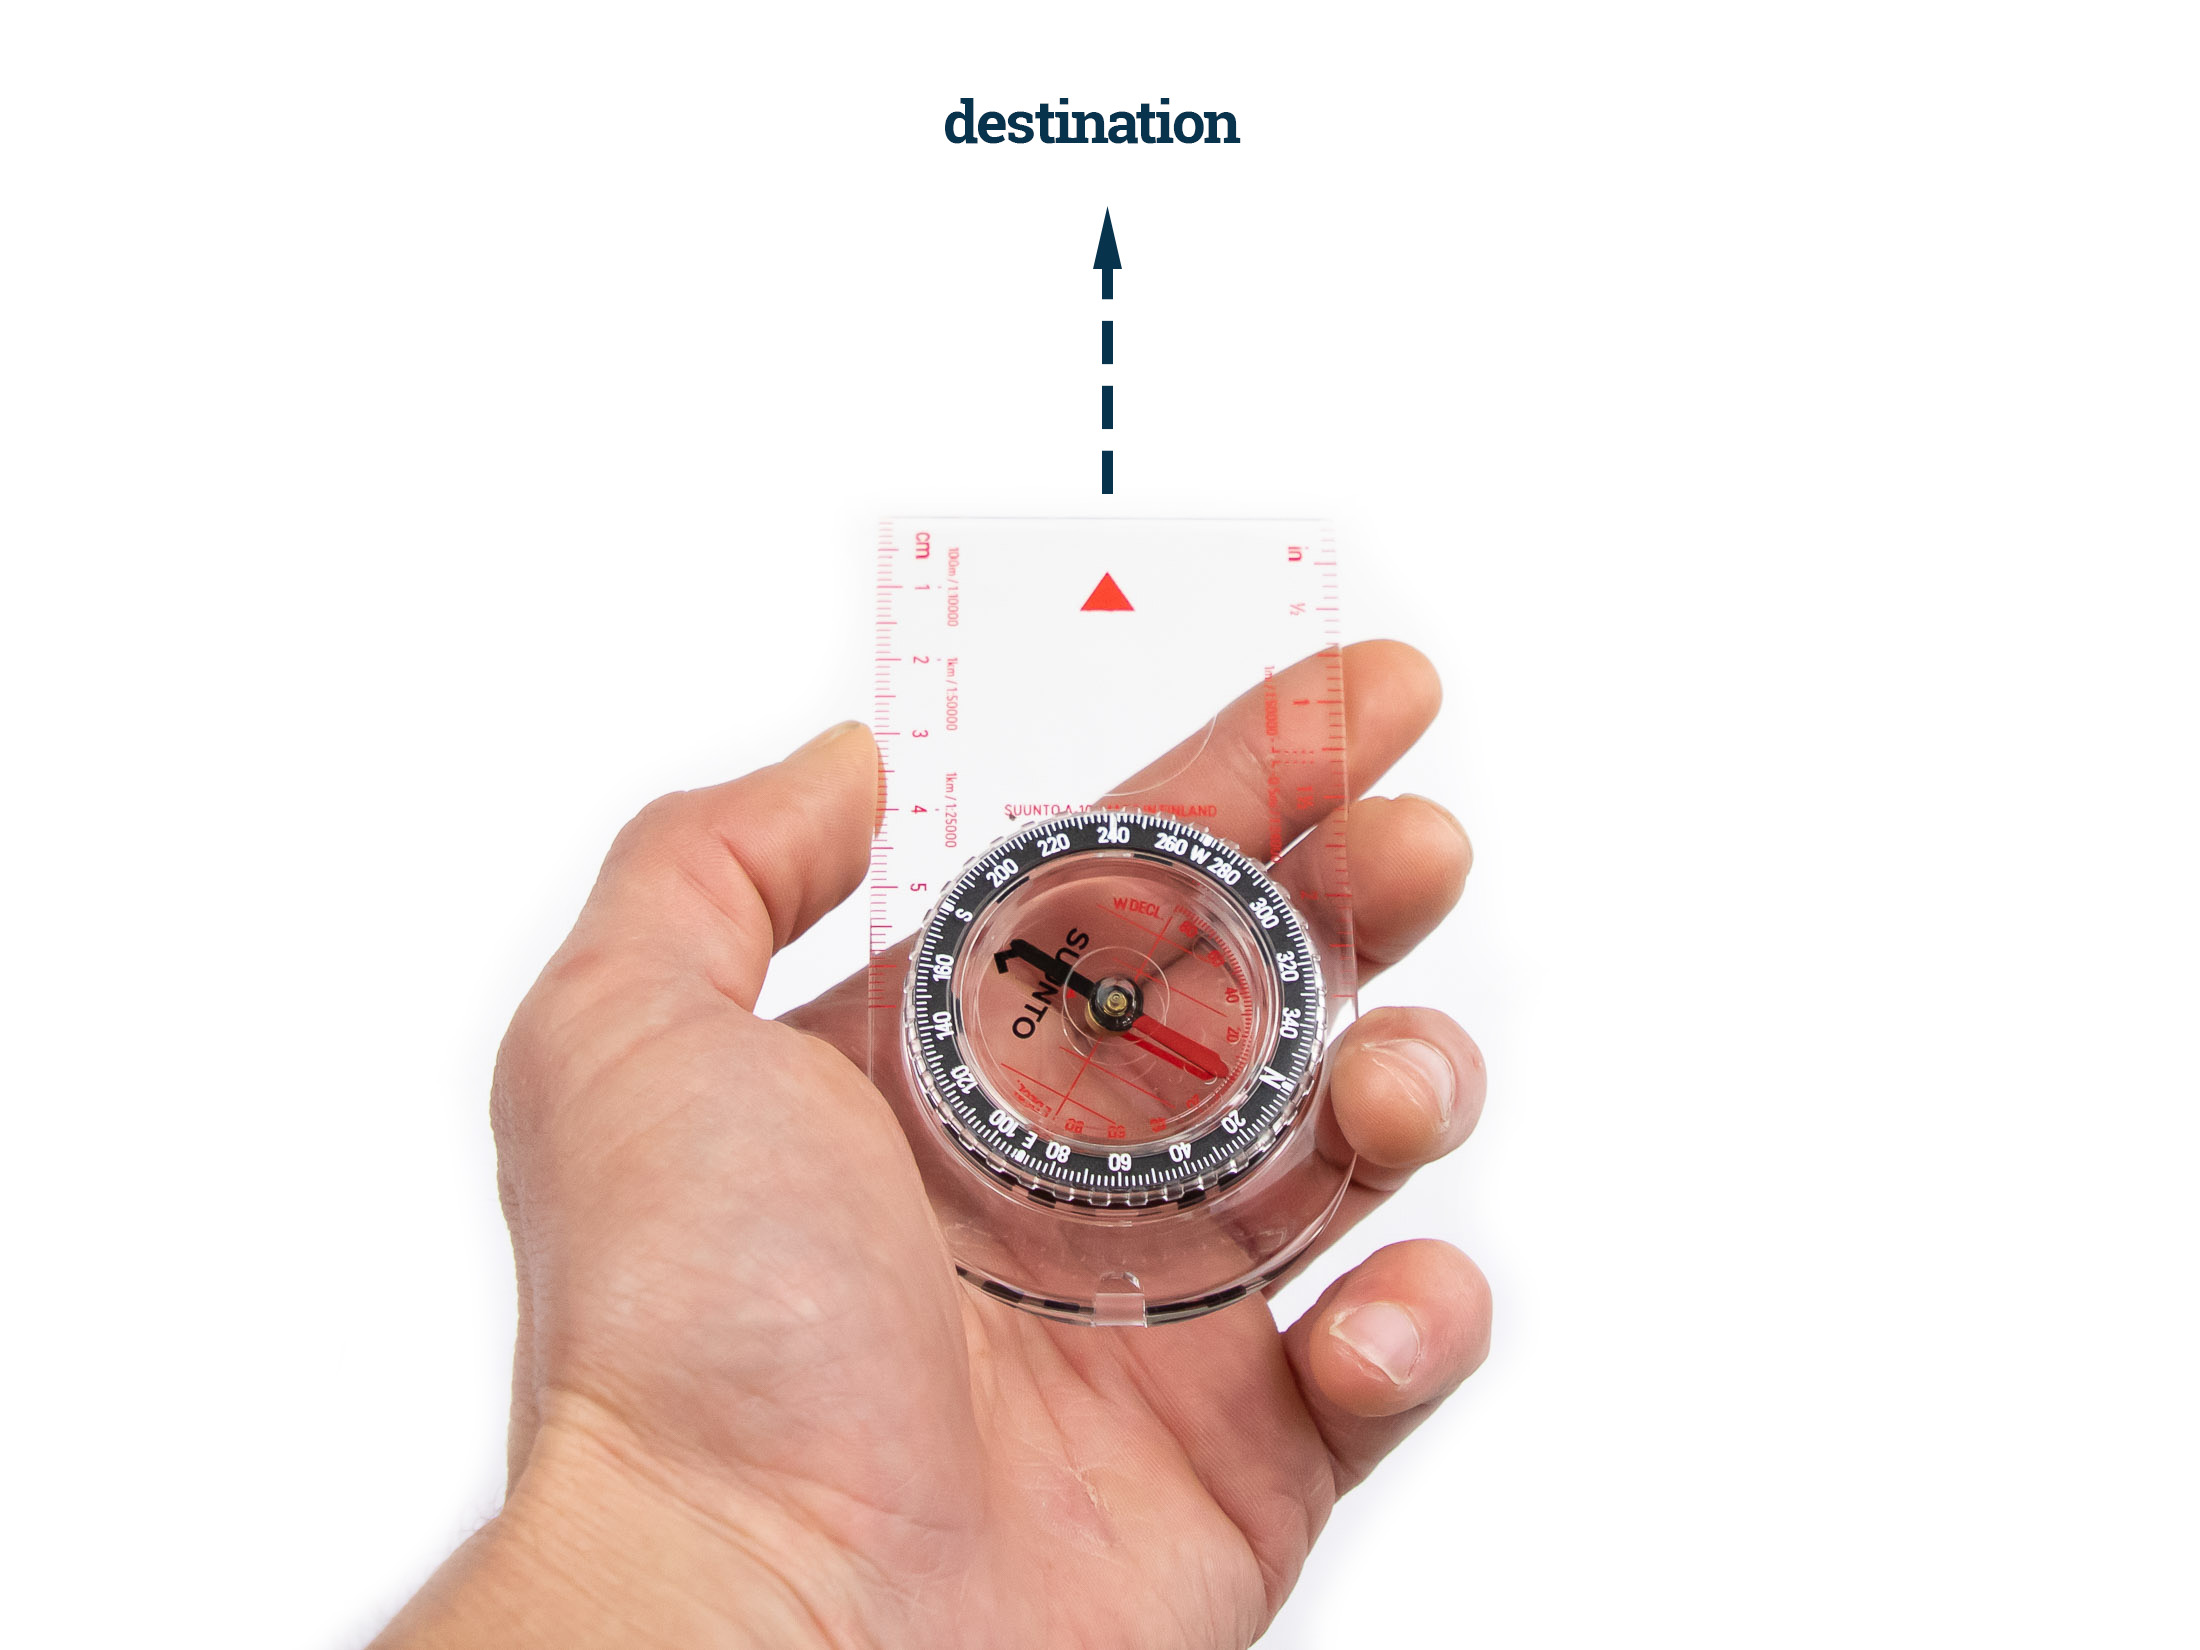
If your course doesn’t present any insurmountable obstacles, you can follow your bearing straight to your destination. But, what do you do if you have to go around something?
Going around obstacles
When faced with an obstacle, the simplest solution is to deviate from your course using 90 degree turns and counted steps. Just bear in mind that any losses and gains in elevation can affect your measurements.
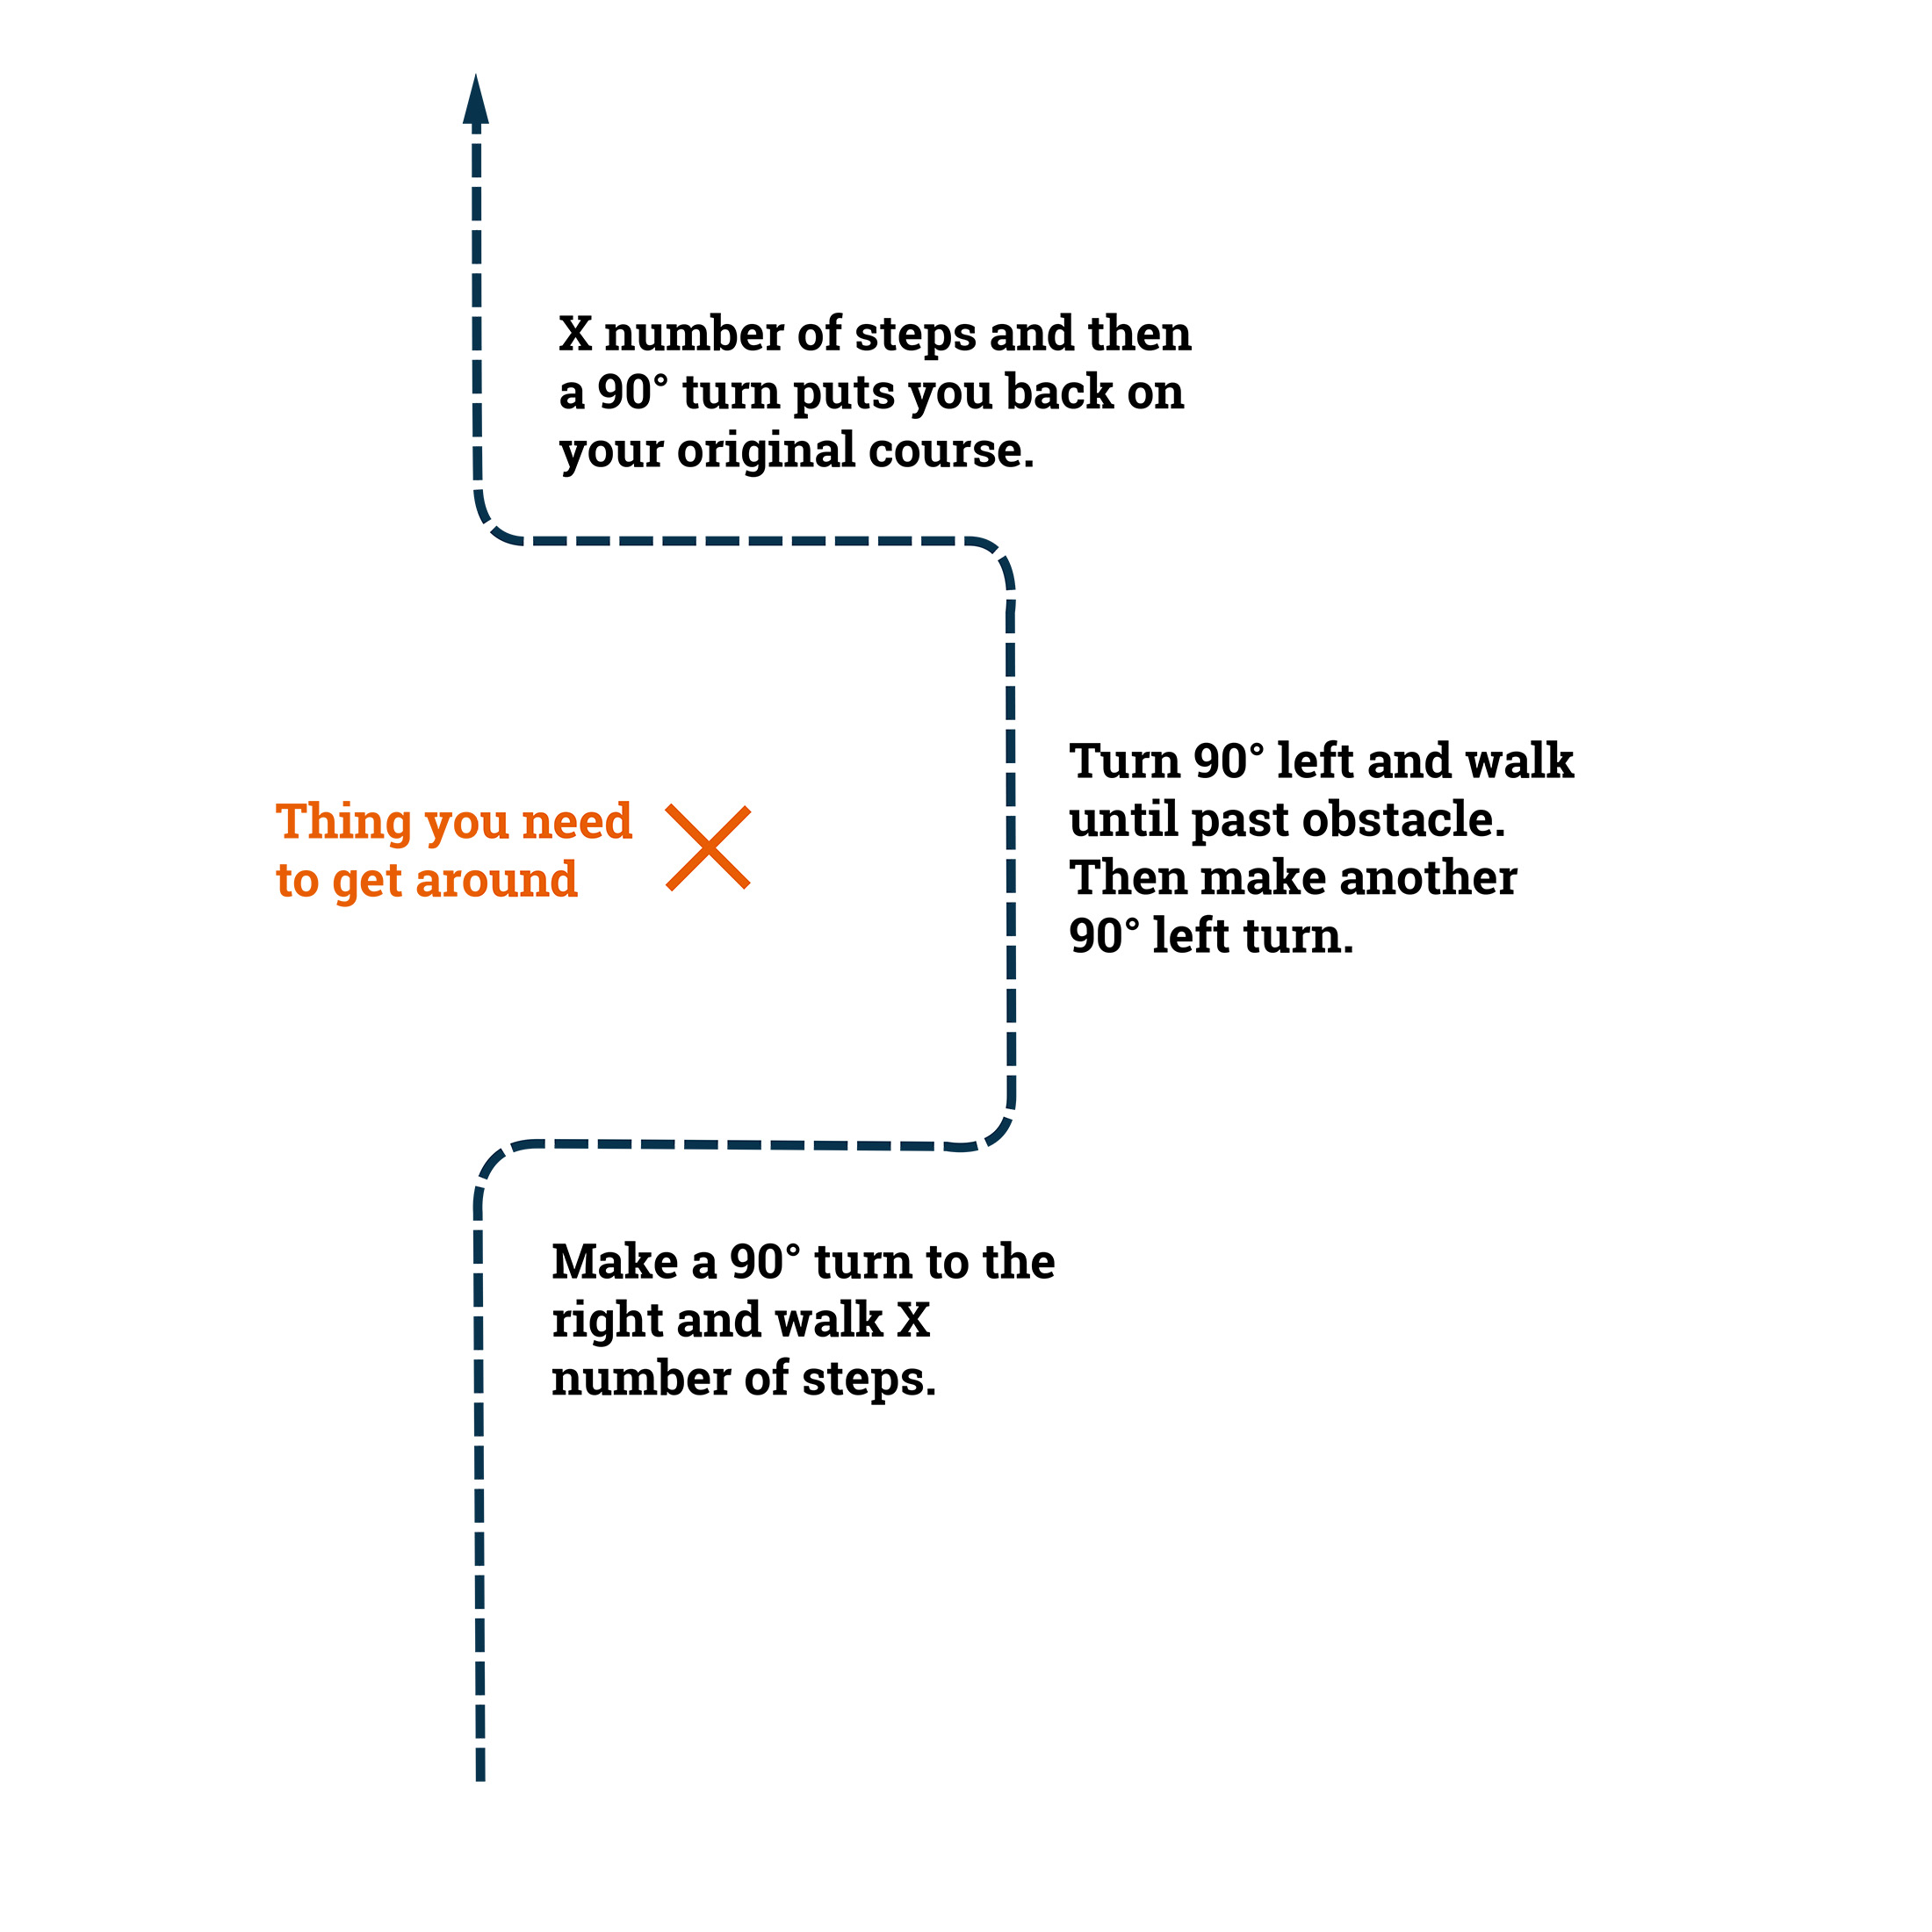
First, you turn right or left 90 degrees (whichever will get you around the obstacle in the shortest distance) and then walk a distance while counting your steps. Then, if you initially turned right, you turn left another 90 degrees and walk the distance needed to pass the obstacle (counting steps is not important for this step). To return to your original course, you then make another 90 degree left turn and walk the same distance (counting steps) that you took in step two. Finally, you make a 90 degree right turn, putting you back on your original course.
Get out there
The best way to hone your orienteering skills is to get outside and practice them. There’s a lot to take in here, so don’t expect to remember everything the first time. Practice a single basic skill like taking a compass bearing several times before moving onto something more complex like triangulation. With repetition even this will become intuitive. Happy exploring.
