So, you’ve got a summer climbing trip planned and need to be able to keep food chilled for several days between drives into town. No problem. Modern coolers can keep their contents chilled for up to five days. But they have to be packed right, and then you’ve got to keep a lid on things to slow the thaw. In this article I offer nine tried and tested tips for packing and using your cooler so that it keeps everything chilled for longer.
Chill your cooler before packing
A cooler that is already cold will keep ice and food colder for longer. Ideally, you’d have access to a commercial freezer or have a chest freezer big enough to put your cooler into. If you don’t, you can pre-chill your cooler by leaving a bag of sacrificial ice in it overnight – well worth the cost if you consider that it makes the difference between your cooler staying chilled for three days or four. If you live in a colder climate, you could also put the cooler outside overnight (lid off).
Freeze your food and drink
Freeze what you can. If you’re planning on having steak and chicken on the second and third nights, pack these frozen. They’ll help keep other contents cold and will be at least partially thawed by the time you want to cook them. You can do the same with non-carbonated drinks and even milk. As for food and drink that can’t be frozen, these should at least be chilled. Warm contents will only melt your ice faster, and you don’t want anything warmer than 4°C (40°F) in your cooler.
Use a combination of ice blocks and ice cubes
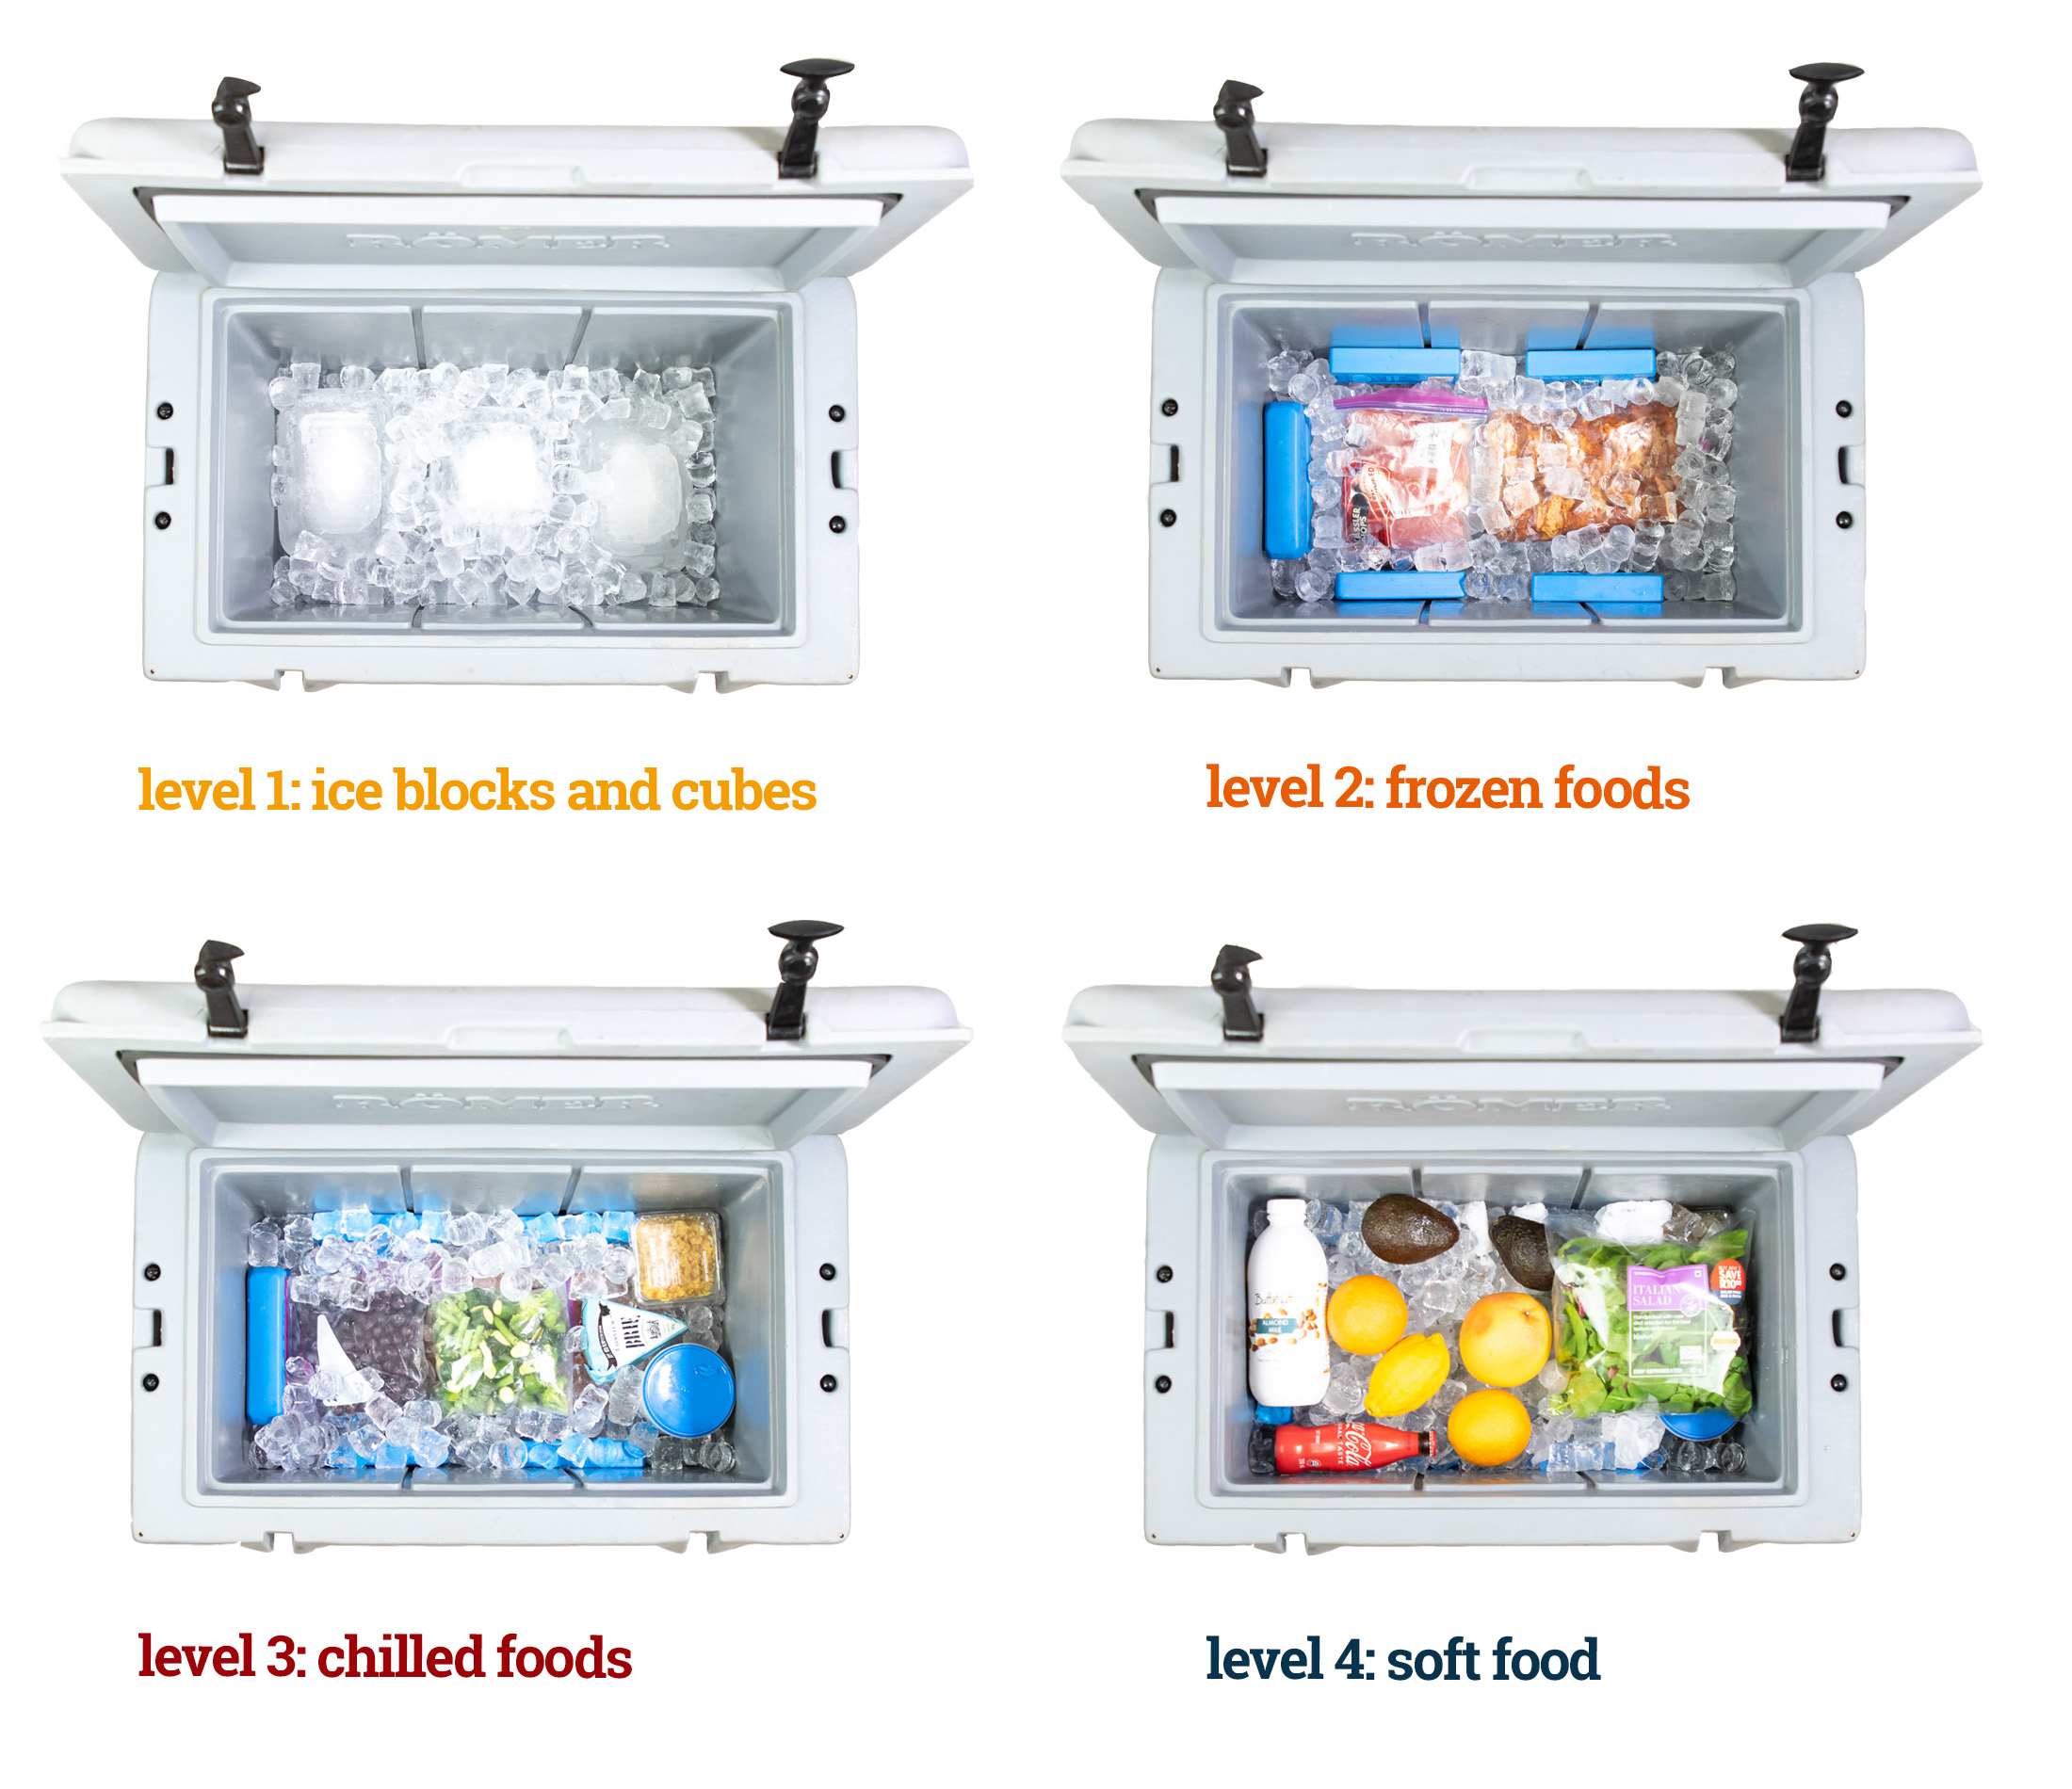
Ice blocks – frozen in tupperware at home – have an advantage of over regular ice cubes in that the bigger blocks don’t melt nearly as fast as smaller cubes. But that doesn’t mean you should do away with ice cubes altogether. You need the smaller pieces of ice to fill the gaps between the food and larger blocks of ice. Unless the ambient air temperature is near freezing, any spaces in your cooler will be filled with air warmer than it’s content. The best thing for filling those gaps is small ice cubes. Yes, that means a lot of ice – ideally even more ice than food.
Drain your cooler on longer trips
Fresh ice melt is almost as cold as ice itself and does a good job of keeping drinks extra cold, but when it warms up, water can speed up the thawing of ice and frozen foods. So, while it can be a good idea to put off draining water on shorter trips, it’s better to drain off water regularly if you need to preserve your ice blocks for several days. To prolong the life of your ice, it also helps to get the coldest ice possible – ice that comes out of a commercial freezer will be colder than that from your fridge.
Keep ice out of the water
One way to keep your provisions out of the ice melt is to create a grid for the bottom of your cooler – the side of a plastic milk crate cut to size works well. You can then use ice packs, like those made by Yeti, to raise the grid above the cooler floor. As long as you drain your cooler regularly, your food will stay high and dry. The same false floor can be used to support internal divisions. Cut a pair of dividing walls from the sides of the same milk crate and cable-tie these to your grid floor. Then you just need a way to secure them to the walls of your cooler.
Double-bag food that has to be kept dry
Most food packaging isn’t watertight, and even food that isn’t sitting in water can get damp if not properly sealed. This won’t completely ruin your day if it’s your broccoli that’s taken on a little water, but there’s little that’s worse than soggy tortillas. I remove most food from its original packaging and put it into tupperware or Ziploc bags. Besides safeguarding perishables against moisture, this makes it easier to reseal food that hasn’t been used, and reduces the amount of trash that has to be disposed of once you’re in camp.
Layer food strategically
If it’s important to keep frozen food cold for as long as possible, you should put it at the bottom of the cooler, right on top of your ice blocks (gaps filled with cubes). Besides putting it in contact with the pieces of ice that will last longest, placing your frozen food stuffs low in the cooler also ensures that the layers above it insulate it from warmer outside air when the cooler is opened.

Once you have filled any gaps around the frozen items with ice cubes, you can then create another layer with food and drink that has merely been chilled. As with the previous layer, you then add yet more ice cubes to level off the top of the layer before adding the final layer: soft food stuffs that might have been if placed under other layers.
Keep it closed
Opening your cooler regularly is a sure way to speed up the thaw. Try to limit the number of times you open your cooler as well as the length of time that the lid stays open. Before going into your cooler, make a quick mental list of everything you’ll need in the next few minutes and take it all out at the same time. And then do the same when you return items to the cooler. Lastly, it really helps to have a separate cooler for drinks, since this is one of the main reason people open the cooler – especially important if you have a thirsty crowd.
Pack a separate drinks cooler
Besides helping to keep the lid closed on your main cooler, a second cooler for drinks can free up more space for ice and food in your first cooler. And it allows you to use different ice preservation strategies for drinks and food. Drinks can be kept colder when sitting in ice melt, but you don’t want your food or the ice around it to be sitting in water. When you have two coolers, you can keep the one for drinks wet and the other drained. The ice in the drinks cooler won’t last as long, by then warm beer is far preferable to salmonella.
Get more advice from this gearhead
You now know everything you need to about keeping your cooler chilled for longer. But don’t stop here. On this website you’ll find many more in-depth gear guides on everything from backcountry cooking to choosing a stove. Look for related articles in the Outdoor Life section, or better yet, sign up for my newsletter to get all the latest from Trail & Crag delivered straight to your inbox.
