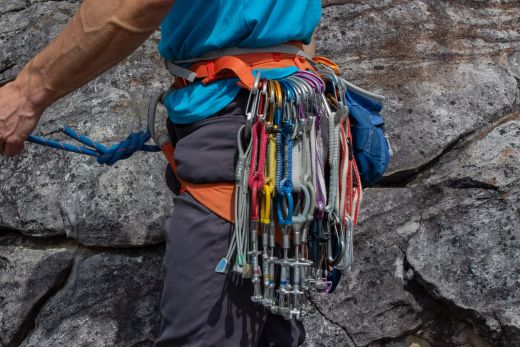
To climb efficiently on trad, you have to be able to retrieve gear from your rack quickly. That means having a system to stay organised so that you don’t have to fumble around for a critical piece while you’re getting pumped and greasing off those oh-so-tiny holds. To rack cleverly, a climber has to consider competing priorities like ease of access, frequency of use, and the dexterity of the closest hand, all of which can make things a bit complicated. It’s a good thing then that you’ve found an article that outlines a tried and tested method for racking efficiently and keeping your S#&% together.
Note: Gear manufacturers use different systems for denoting gear sizes, and a #1 Black Diamond C4 is not the same size as a #1 DMM Dragon. For simplicity’s sake, I’m going to refer to the sizes of the cam that most climbers use – the C4.
Adapting your rack
You will need to adapt your rack according to the demands of each route. Some routes will require bigger gear, and others will require a lot of smaller pro. Some lines will meander and require the use of several longer extensions, and other more direct lines will require nothing more than a dozen quickdraws to connect protection to the rope. Guidebooks will sometimes tell you what’s the biggest and smallest gear you’ll need, but for everything else you will have to rely on your own judgement – something that will improve with experience.
When you’re just getting into trad, I recommend taking more gear than you think you need (without absolutely overdoing it). As you clock up time on the rock, you’ll learn what you need under different circumstances, and eventually you will be able to look at a route description and topo and know what you will need to protect it. Until then, it’s better to err on the side of caution and carry more gear including that which you might only use.
Preparing gear to be racked
Before you can rack your gear, some of it first has to be shortened, clipped together, or put on carabiners.
Alpine draws
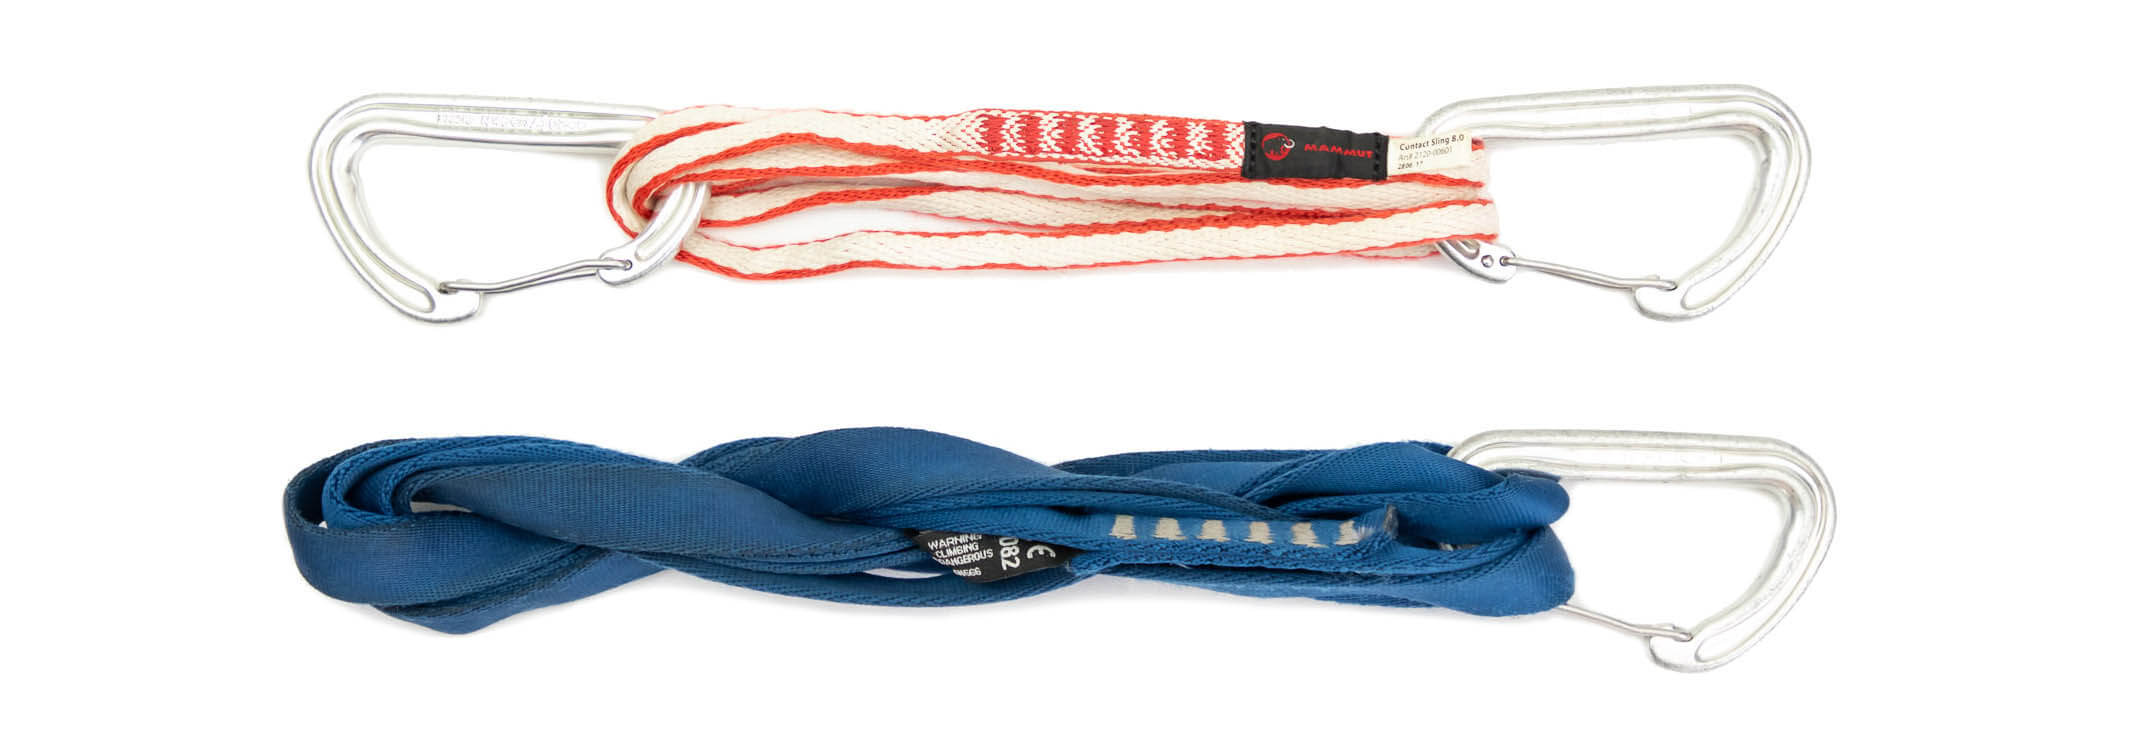
The best way to rack single-length slings is to turn them into alpine draws, which can be used in their short form or fully extended form (60 cm). To create an alpine draw, clip two carabiners to a single-length sling (one at either end), and then pass one end of the sling (with its carabiner) through the carabiner at the other end. Carry on pulling the sling through the threaded carabiner until the biner on the far end and be clipped to the bottom of the loop. To save space, some climbers then make tiered bundles with their draws (with a few draws clipped to the top biner of the first), but others prefer to clip every draw to a gear loop.
Double length slings
Double-length slings (12 cm) can either be racked over the shoulder or clipped to a carabiner and then a gear loop. Most climbers prefer to rack their gear on their harnesses, but there might be times when you’re short on racking space and a sling over your shoulder is the easiest solution. To do this, you simply put a half twist in the sling (creating two loops) and then fold one loop back over the other. The other more commonly preferred method involves folding the sling in half and twisting the bunch until it starts to twist in on itself. Once twisted into a tight clump, a sling can easily be clipped to a carabiner.
Cordelette
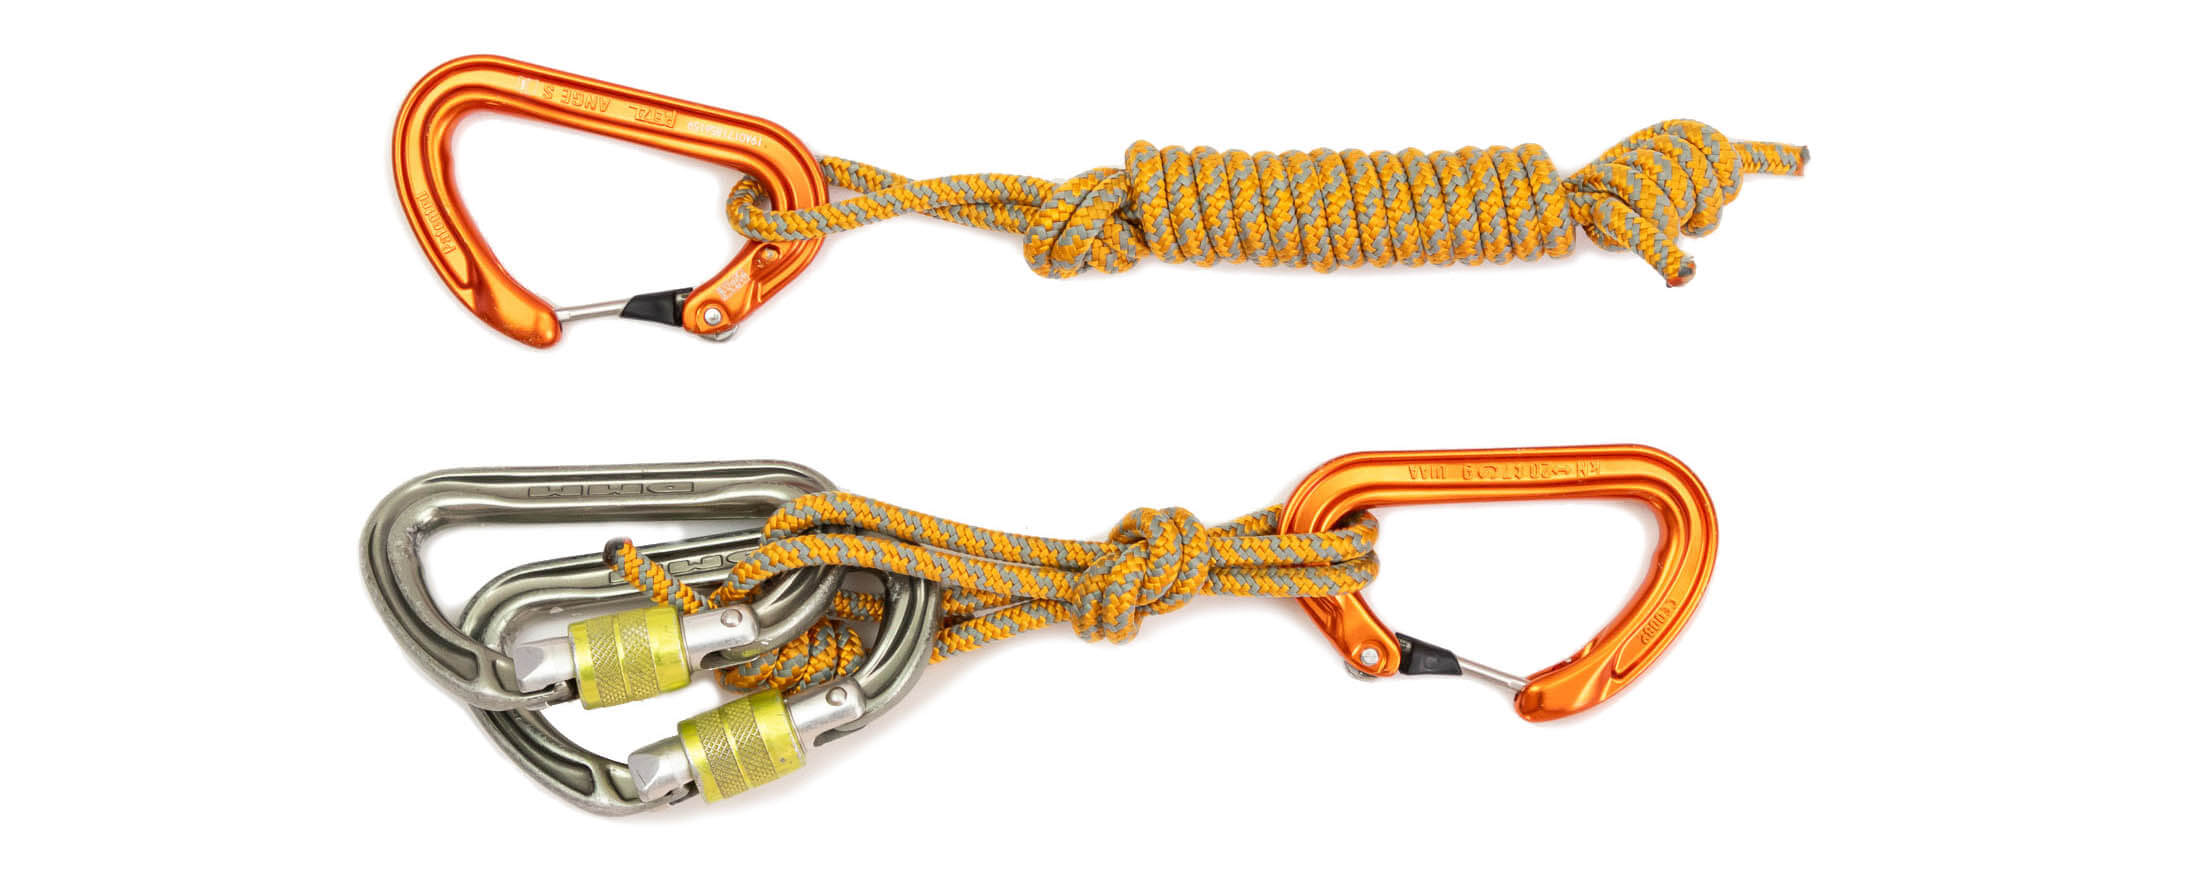
There are several ways to rack your cordelette. One way is to fold it in half twice and then twist it until it starts to twist itself together. It can then be clipped onto an HMS locking carabiner. This method is quick, but it has a downside: it’s a little messy, and strands can get caught on features in the rock. A second and neater way to rack your cord involves folding it in half twice (same as the first method) and then tying the bunched cord into an overhand knot. The downside to this method is that it can leave your cord dangling low from the carabiner.
Prusik loops
It’s useful to have two prusik loops – short and long – for backing up rappels, lowering a follower with a guide mode belay device, and prusiking up the rope if you find yourself hanging in space. The shorter loop can be girth-hitched directly to a gear loop, but a longer prusik loop first has to be shortened (by twisting or doubling it up and putting a knot in it) and clipped to a carabiner before it can be stored on the harness. I actually do the same for my shorter prusik, as the carabiner makes it easier to unclip from a gear loop.
Cams
When placing a cam, you don’t want to have to first get it off a carabiner that it shares with others. Save yourself the faff and give every cam its own carabiner. Ideally this will be colour-matched for easy identification. Also, if you have any of the larger Black Diamond C4’s (#4 and bigger) know that you can rack these with their lobes contracted using the trigger keeper (on later models), an innovative feature that makes for compact racking.
Nuts
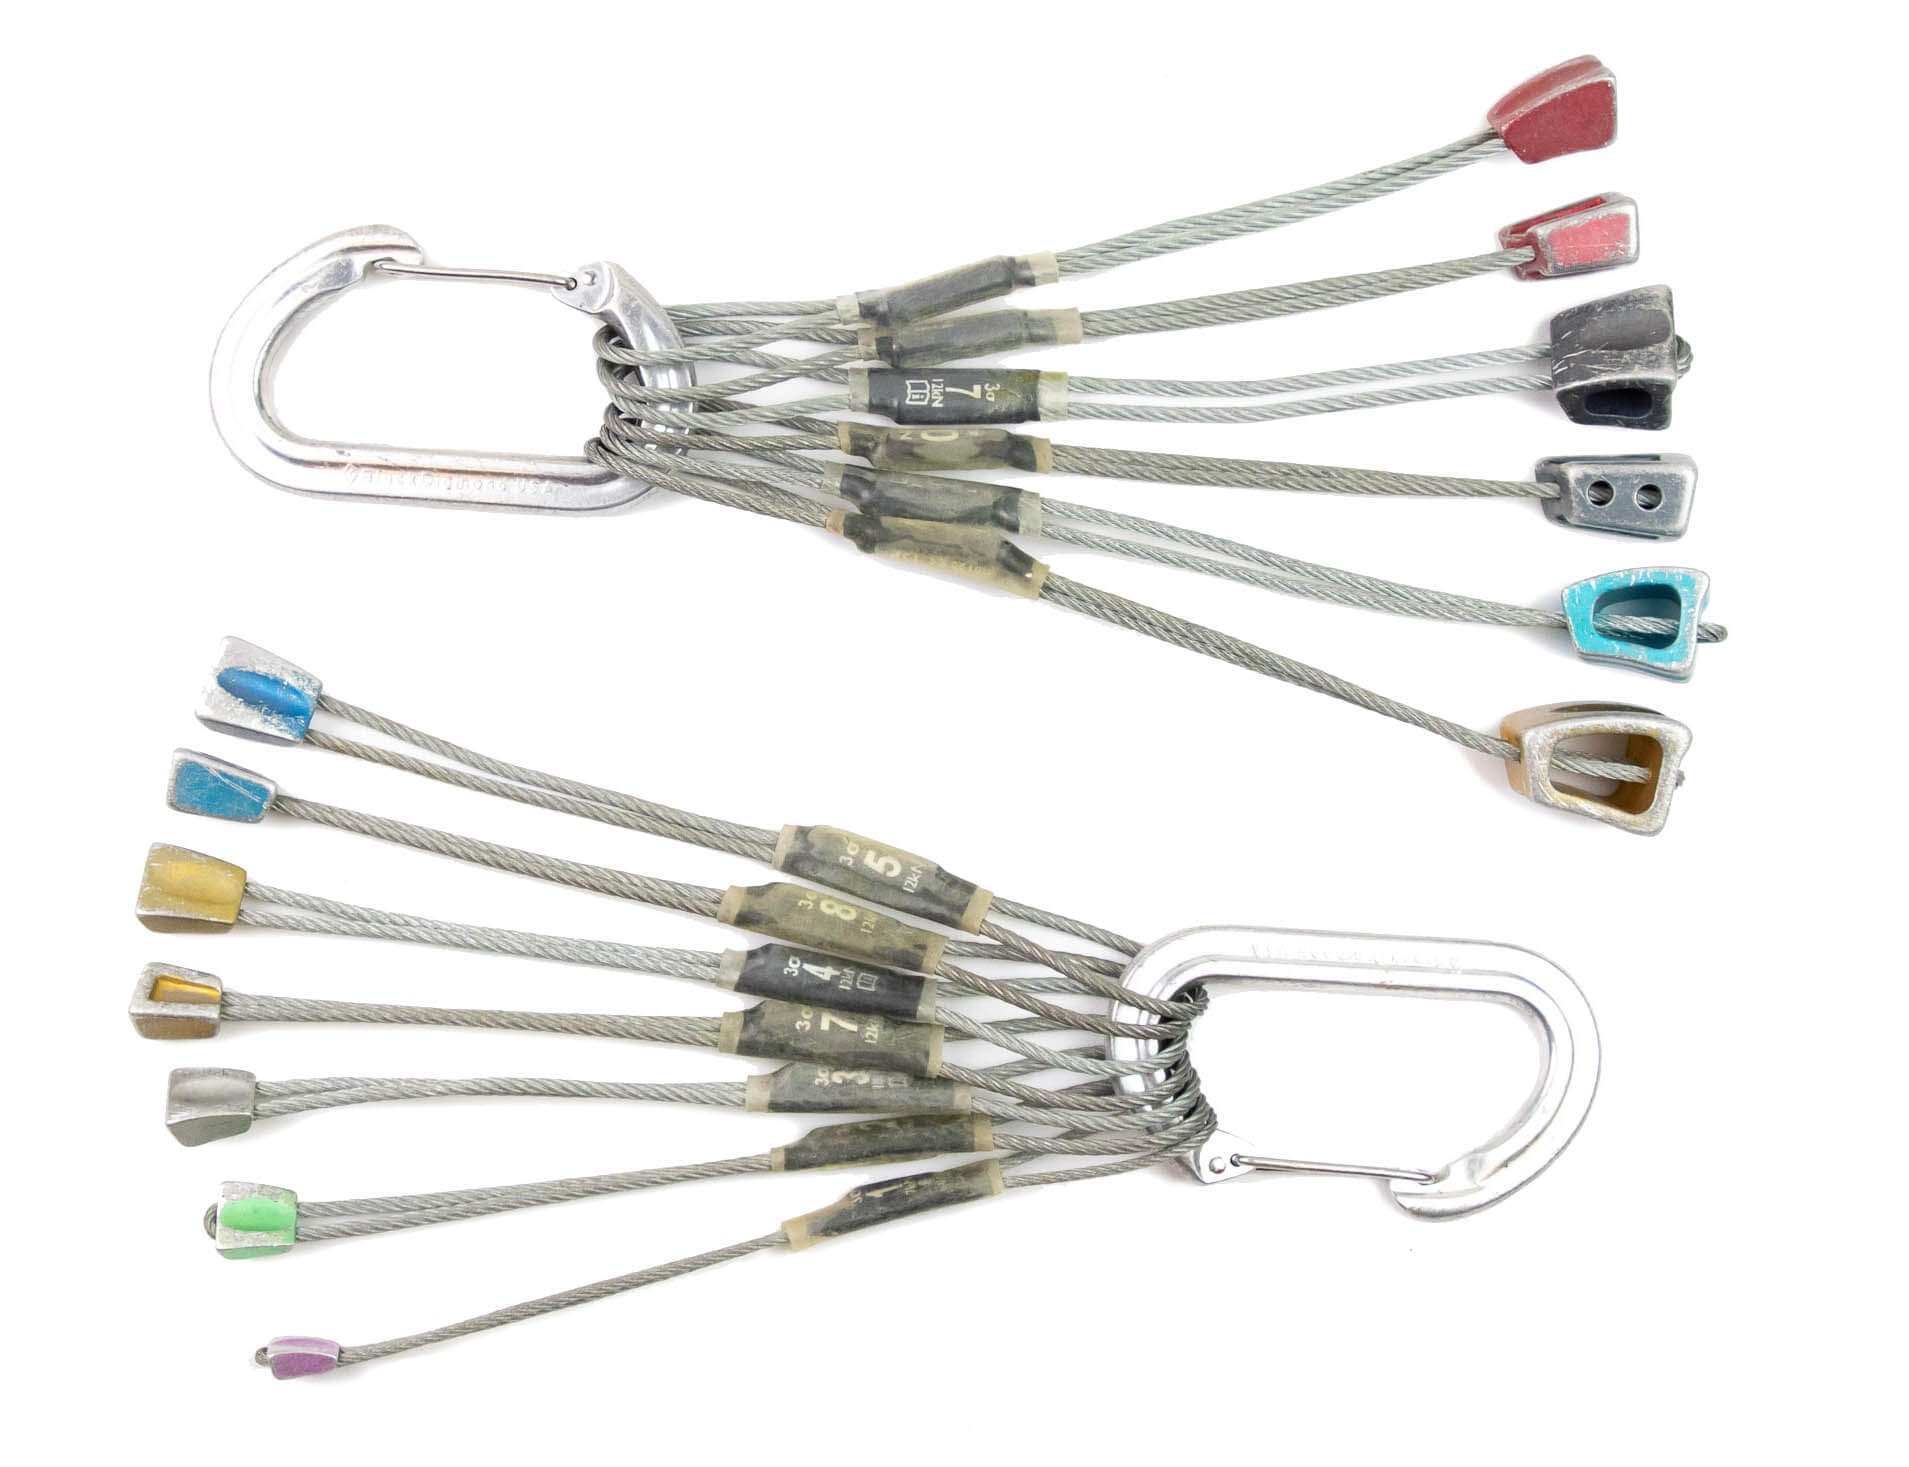
The average climber carries between 12 and 24 nuts. The best way to rack these is on two or three oval carabiners with six to eight nuts per biner. Group your nuts by size with small nuts (including brass and copper micros) on one carabiner, medium nuts on another, and big nuts on a third (if you’re carrying more than 16 nuts). If you have 16 nuts or fewer, you can get away with just two carabiners: one for small-medium nuts and another for medium-large nuts.
Gates in or out
Before we even get into where you’re going to put what gear, you need to decide whether you are going to clip carabiners to your gear loops with their gates facing in or out. The advantage of gates-out racking, especially for trad climbers, is that it positions a carabiner’s nose and gate away from the climber. It’s only natural that the deepest part of a carabiner’s rope basket will come to rest on the gear loop, but this causes carabiners that are clipped gates-in to poke into the hips of the climber.
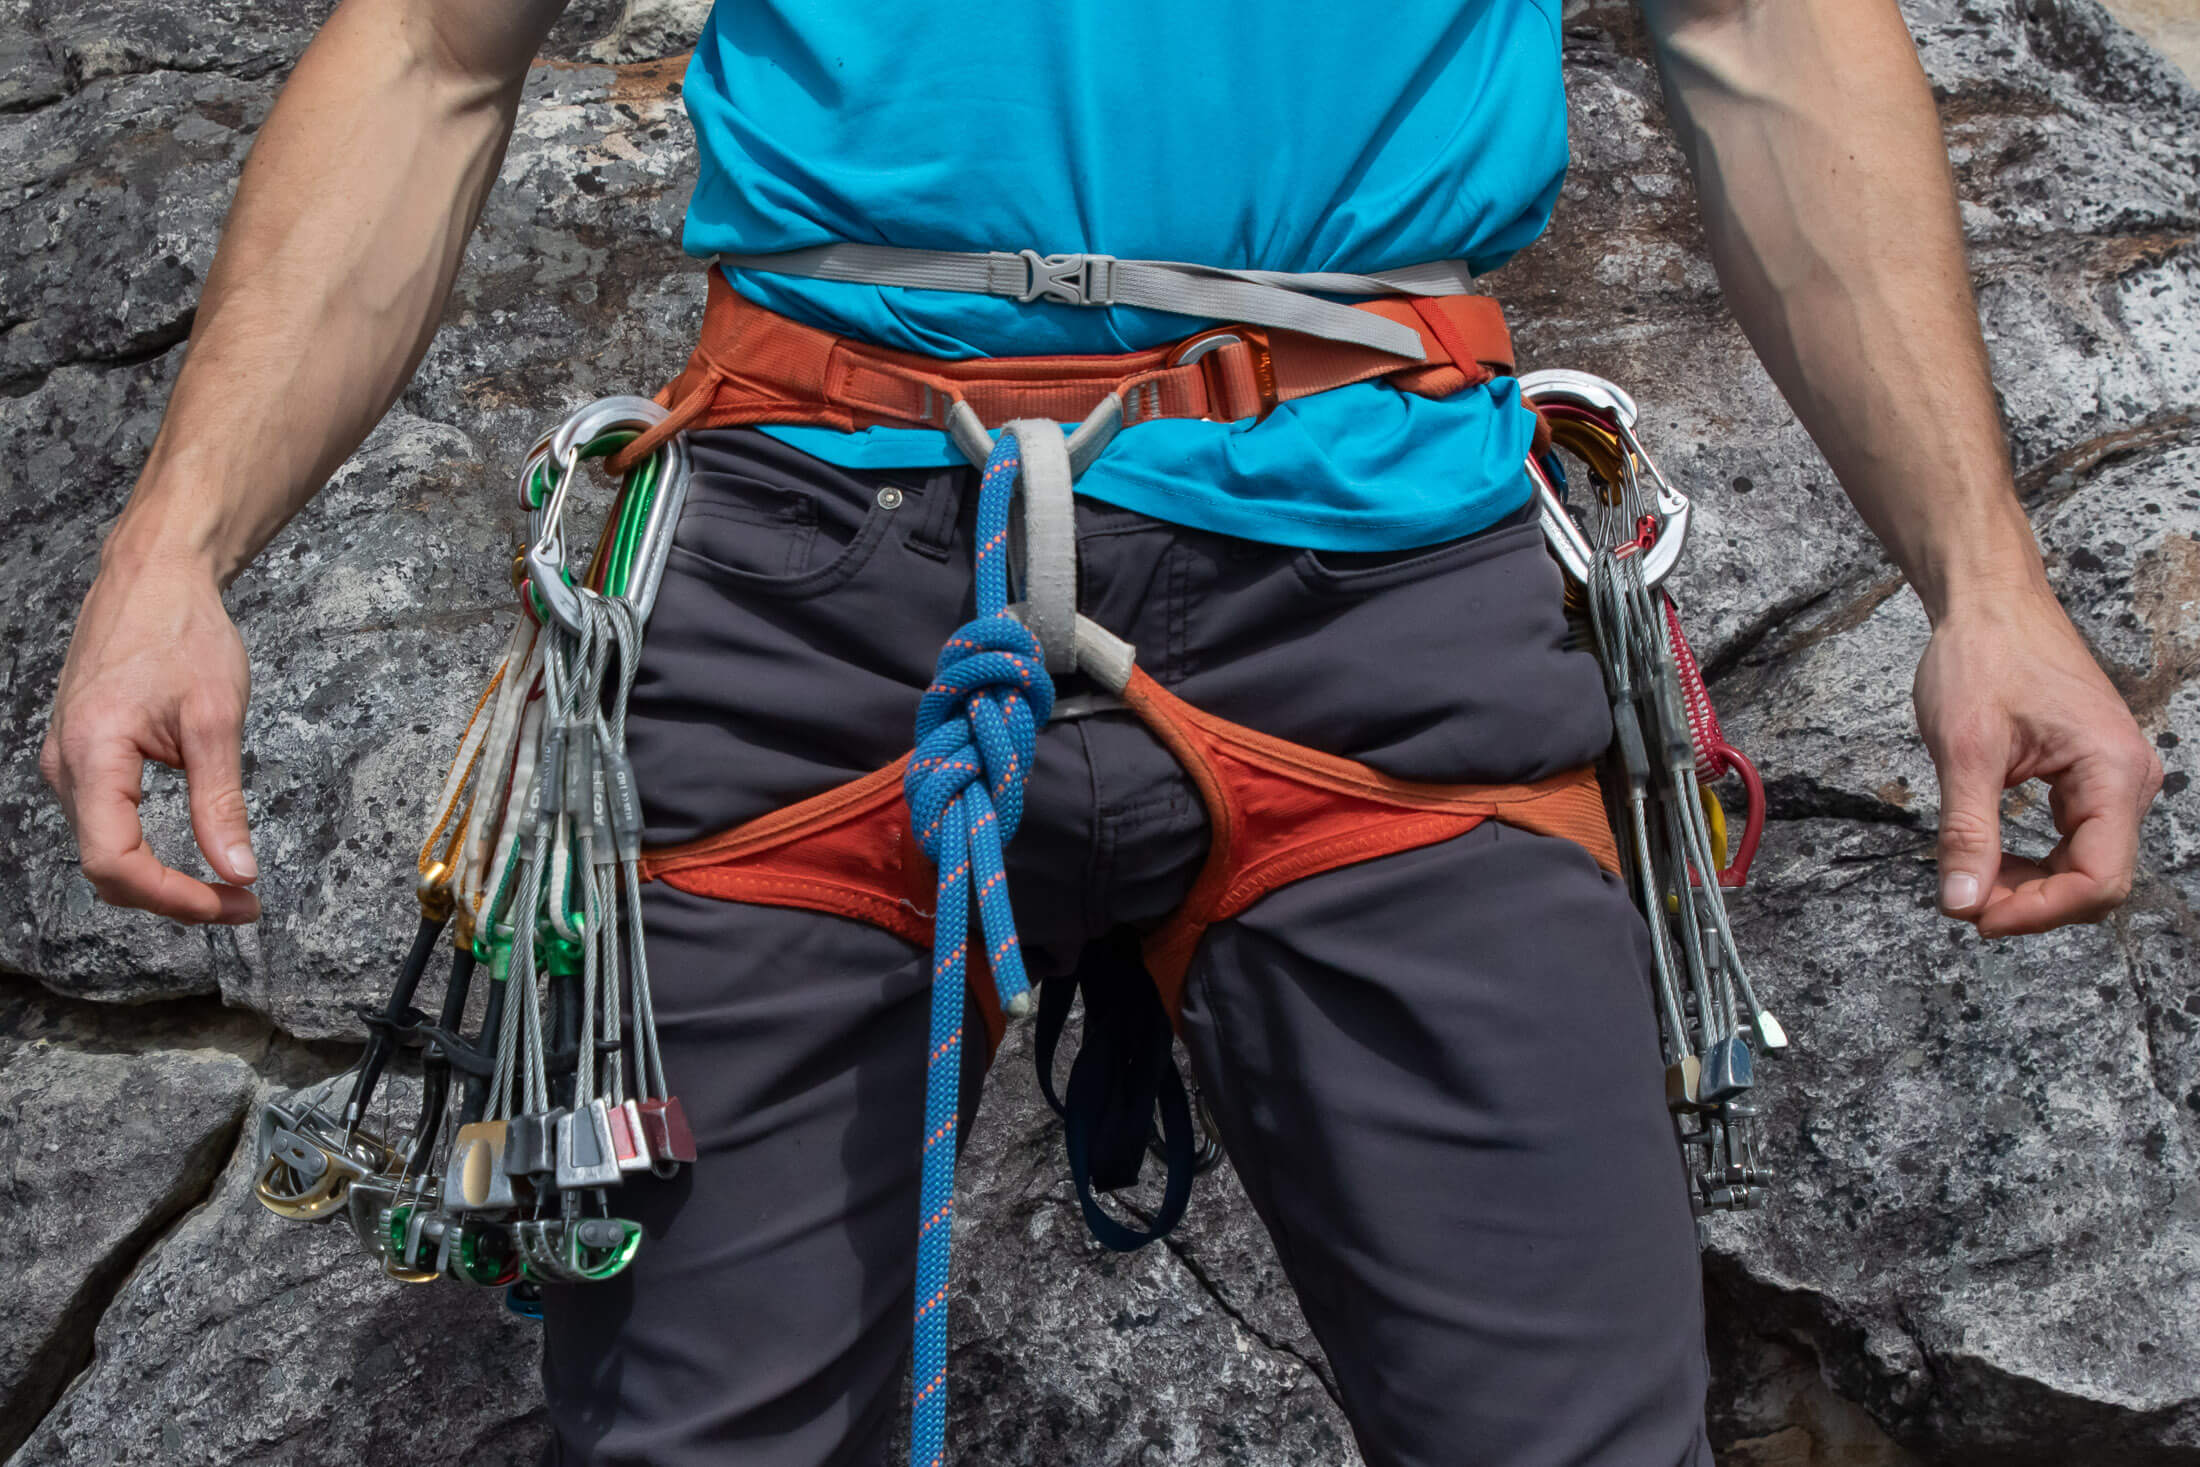
This is less of an issue with molded gear loops, like those on Black Diamond harnesses, but on other harnesses, the nose of the carabiner is likely to force the biner to sit on the gear loop at an angle, which can make it more difficult to get to. Despite this drawback, there will be climbers who still prefer to clip gates-in, and that’s okay. Just know that if you use this method, you must be consistent and clip all carabiners to your gear loops with their gates facing in.
Racking your gear
It’s important to keep your gear organised so that you can find and retrieve the right piece quickly. When you’re pumped out of your mind and barely hanging on, the last thing you want to do is faff. If you rack your gear according to a system, you’ll know that the #3 cam you so desperately need is the last piece on the front right gear loop, and you can probably reach for it without having to look for it. Of course, that #3 might not be on the front right gear loop, as there are many ways you could rack your gear. That said, I suggest you first try the tried and tested method described below, and if that doesn’t work for you, you can tweak it or come up with your own system using similar principles.
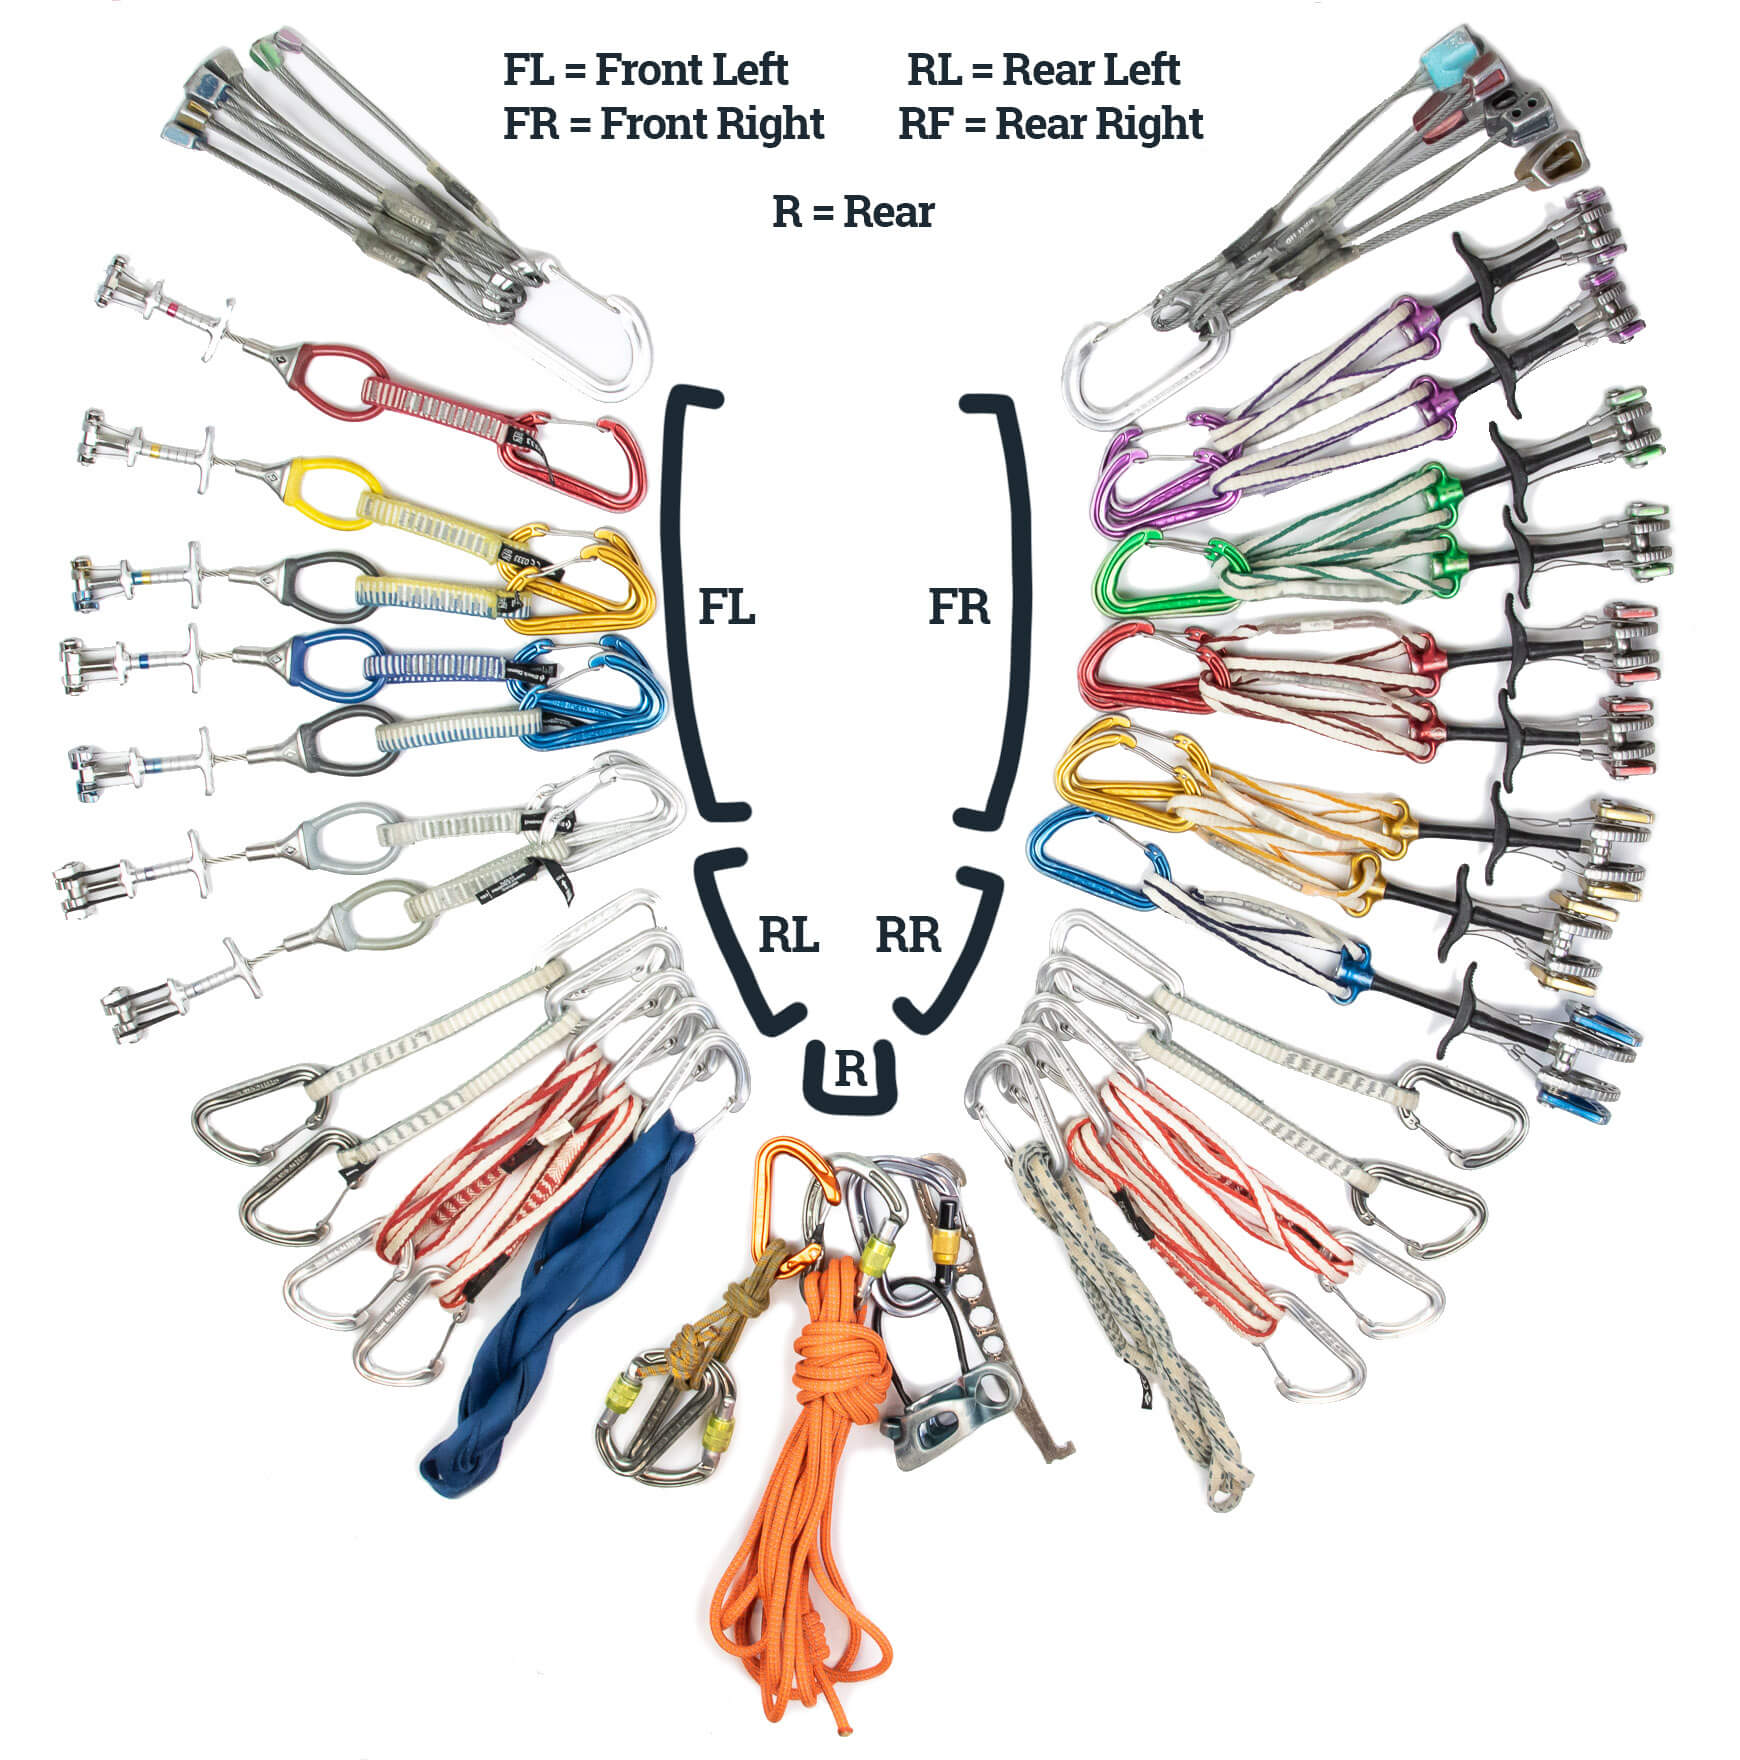
Front right
If you’re right handed, rack your nuts and mid-sized cams on this gear loop. The nuts (grouped on two or three carabiners) go on the front of the gear loop, and your cams go behind these in order from smallest to biggest. For most climbers this will mean doubles in each size from #0.75 to #3. This arrangement ensures that you can reach both your most fiddly pro and most commonly used pro with your most dextrous hand. If you were left-handed, you’d want these on the front left gear loop.
- Nuts (on two or three carabiners)
- Cams #0.75 - #3 (two in each size)
or
- Cams #0.4 - #3 (one in each size)
Back right
The back right gear loop is reserved for your biggest cams, half of your extensions, and the gear you need to build an anchor and belay your partner. This keeps your bulkiest and longest gear towards the back of your harness where it is less likely to get in the way. I recommend racking alpine draws and quickdraws on both rear gear loops as it’s difficult to reach the rear left gear loop with your right hand and vice versa. By racking both types of extension on both rear loops, you avoid having to perform such antics. So that’s cams in front, then extensions, and finally your nut tool, belay device, and cordelette.
- Big cams
- Quickdraws x 3
- Alpine draws x 3
- Double-length slings x 2
- Nut tool
- Belay device (if not on 5th loop)
- Cordelette (if not on 5th loop)
Note: I have specified 3 quickdraws and 3 alpine draws, but this could be any combination or extensions as suits your needs.
Draws can be racked individually or in bunches.
Front left
Your smaller cams (#0.1 to #0.5) go here. Again you will arrange these by size from smallest to biggest. If you have offset cams in your rack, place these between regular cams with the same sized lobes. For example, a #.2/.3 will sit between a #0.2 and #0.3. Some climbers also like to put the second cam in each of the most commonly used sizes on this gear loop. In that case, you’d probably have one cam in each size from #0.4 to #2 on both forward gear loops.
- Cams #0.1/0.2 - #0.5 (two in larger sizes)
or
- Cams #0.1/0.2 - #2 (one in each size)
Back left
In addition to your remaining extensions, your back left gear loop will hold the gear that you’re unlikely to need until you finish the route and start rappelling. This includes your prusik loops, personal anchor system, rope knife, and shoes (if you need them for the walk-off). Regarding the PAS, I don’t see too much point in using an adjustable lanyard for securing oneself to belay anchors as you can use the rope for this purpose, and that has better dynamic properties. But a PAS is very useful for multistage rappels, and that’s why I recommend you rack it among the other items you’re only likely to need once you’ve topped out.
- Quickdraws x 3
- Alpine draws x 3
- Prusik loops (if not on 5th loop)
- Rope knife (if not on 5th loop)
- Personal anchor system
- Approach shoes
Back center (if your harness has one)
Some trad-focussed harnesses like the Black Diamond Solution Guide have a fifth gear loop between the two rear gear loops. This additional racking space is particularly useful if you want to free up some space in your rear gear loops, which can get a bit crowded. I like to keep my belay device, cordelette, prusik loops and spare carabiners on this loop.
- Belay device
- Cordelette
- Prusik loops
- Rope knife
- Personal anchor system
Over the shoulder
Racking single-length slings over your shoulder is easy enough, but double-length slings make things a little trickier. You can double up the sling by putting a half twist in and then one loop over the other, but with this method, you’ll likely find that one loop will grow longer than the other and then get in the way or slowly strangle you. This technique can also make it very hard to remove a sling if you have more than one over the shoulder.
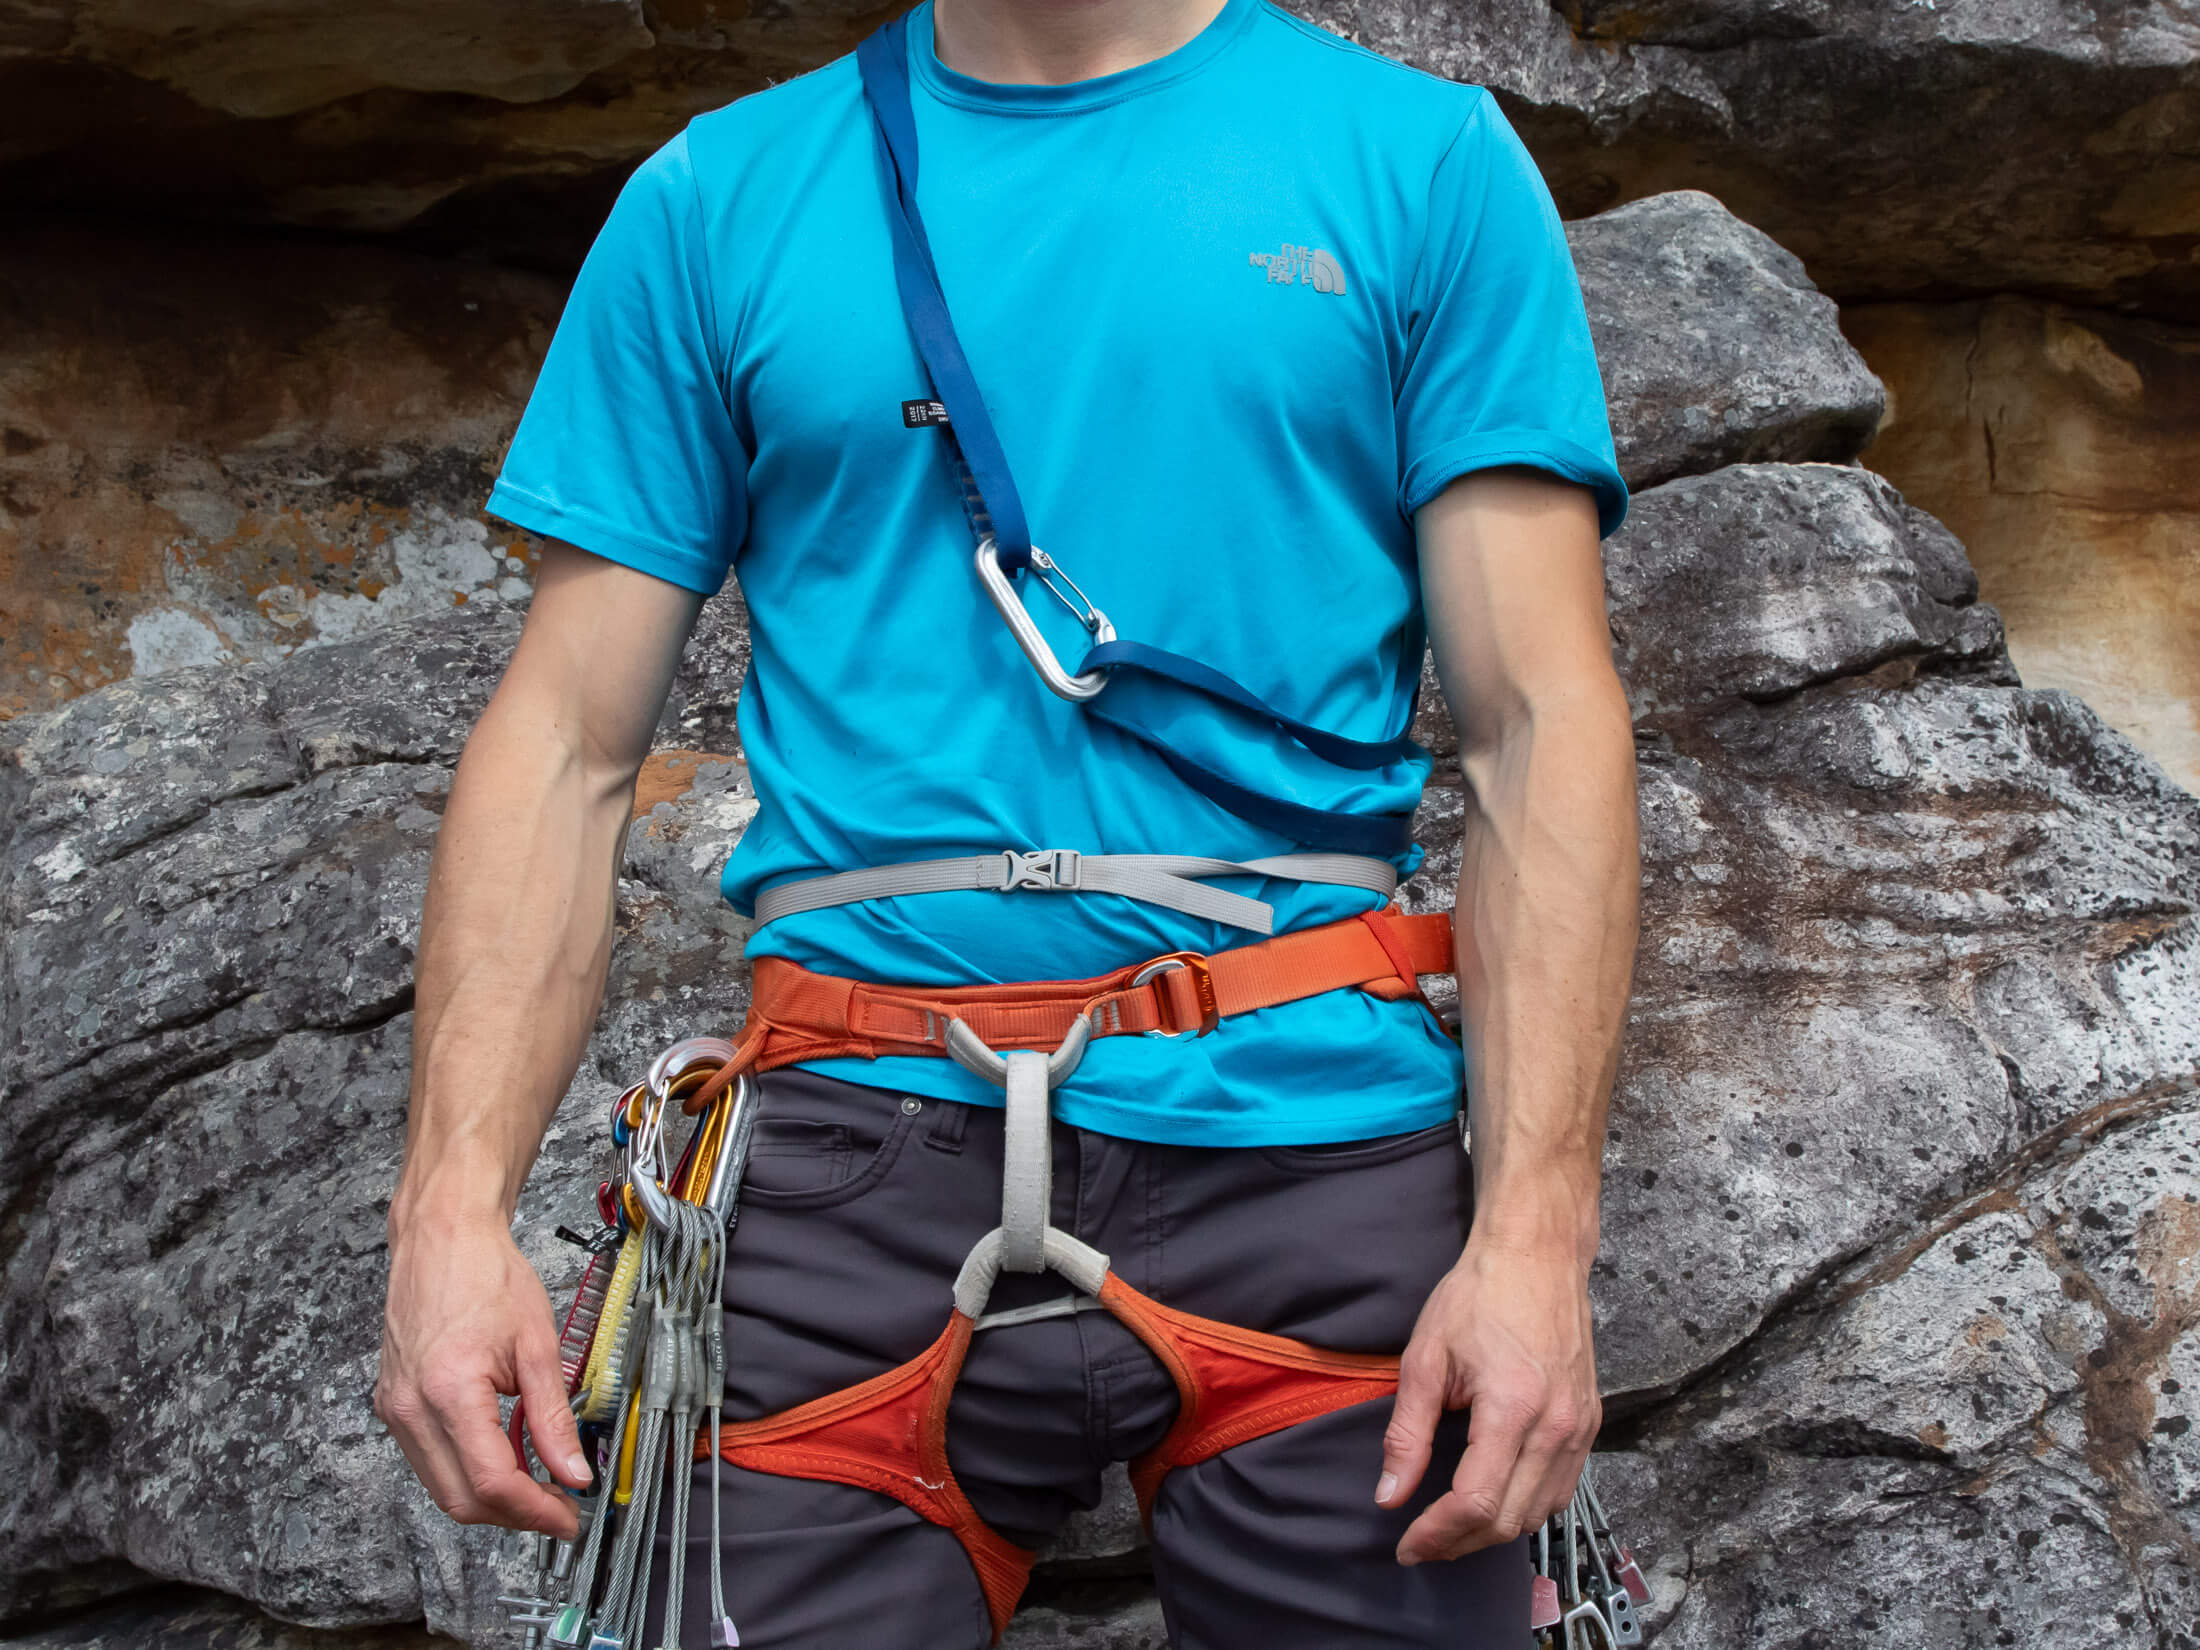
It’s better to make a loop from your sling by clipping the ends together with a carabiner. Besides keeping the stands an equal length, this method makes it easier to rack multiple slings over your shoulder. When you need a certain sling, you can simply unclip the carabiner from one of the two ends and pull it. This method works even if you rack double-length slings under single-length slings.
Climbing pack
For longer multipitch climbs that require you to carry water, snacks, approach shoes, and an extra layer, it makes a lot of sense to have the follower carry a small climbing pack. A 16 to 18 litre pack like the Black Diamond Bullet will fit all of the aforementioned kit (if you choose your approach shoes and extra layer wisely) and your PAS if you’re only going to use it to rappel.
- Approach shoes
- Extra layer
- Water and snacks
- Personal anchors systems
Tip: Climbing a chimney with a pack on is almost impossible. The simplest and most commonly used solution in such situations is to hang the pack below the follower on a double-length sling clipped to their belay loop. It’s a little awkward but not nearly as difficult as trying to grovel up a chimney with the pack on.
Why not use a gear sling?
Some old school tradster still like to use gear slings, but almost everyone else racks their gear on their harnesses. If you’re wondering why that is, the answer is simple. Gear got lighter, and gear loops improved. As a result, climbers were able to start racking all their gear onto their harnesses, which was preferable to using a gear sling which tends to swing around one’s chest and hide your feet from view when you’re trying zero in on small footholds.
Get more advice from this gear head
You now have everything you need to rack your trad gear properly. But don’t stop here. On this website you’ll find many more in-depth trad-related articles on everything from how to build a trad rack to how to lead on gear. Look for these and other useful guides under the climbing section in the categories menu. Alternatively, sign up for my newsletter to get all the latest from Trail & Crag delivered straight to your inbox.
