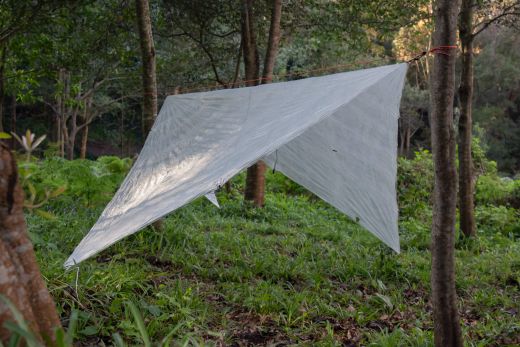
More versatile than just about any other kind of ultralight shelter, flat tarps can be pitched in a variety of configurations. This flexibility makes them a popular choice with outdoorsmen who want to be able to adapt their shelter setups according to the prevailing weather conditions. Over the years, these crafty tarp campers have come up with hundreds of ways to rig a flat tarp, but the following are, in my opinion, the eight most useful setups. Whether you’re about to set off on an epic bikepacking trip or are planning a weekend of peak bagging, you’re bound to find a few tarp rigging techniques in here that you can use on your next adventure.
Note: This is just one article in a whole series on tarp camping. If you want to learn more about the techniques used to rig the configurations described here, read my article on tarp rigging techniques and knots next.
For these demonstrations, I have used a Zpacks 8.5’ x 10’ flat tarp (shown above), but you can use any flat tarp with similar dimensions and tie-outs. Some configurations use part of the tarp as a groundsheet. When doing this, be careful not to damage the tarp on rough ground. It’s always best to carry a dedicated groundsheet.
1. A-frame
The classic A-frame is one of the quickest and easiest ways to configure a tarp. It can be set up either with a tree-to-tree ridgeline or, more commonly, with two trekking poles attached to the ridgeline tie-outs. You can also use a bike and accessory pole instead of trekking poles when bikepacking. Because of its steeply pitched sides, this setup provides ample protection against the wind and rain.
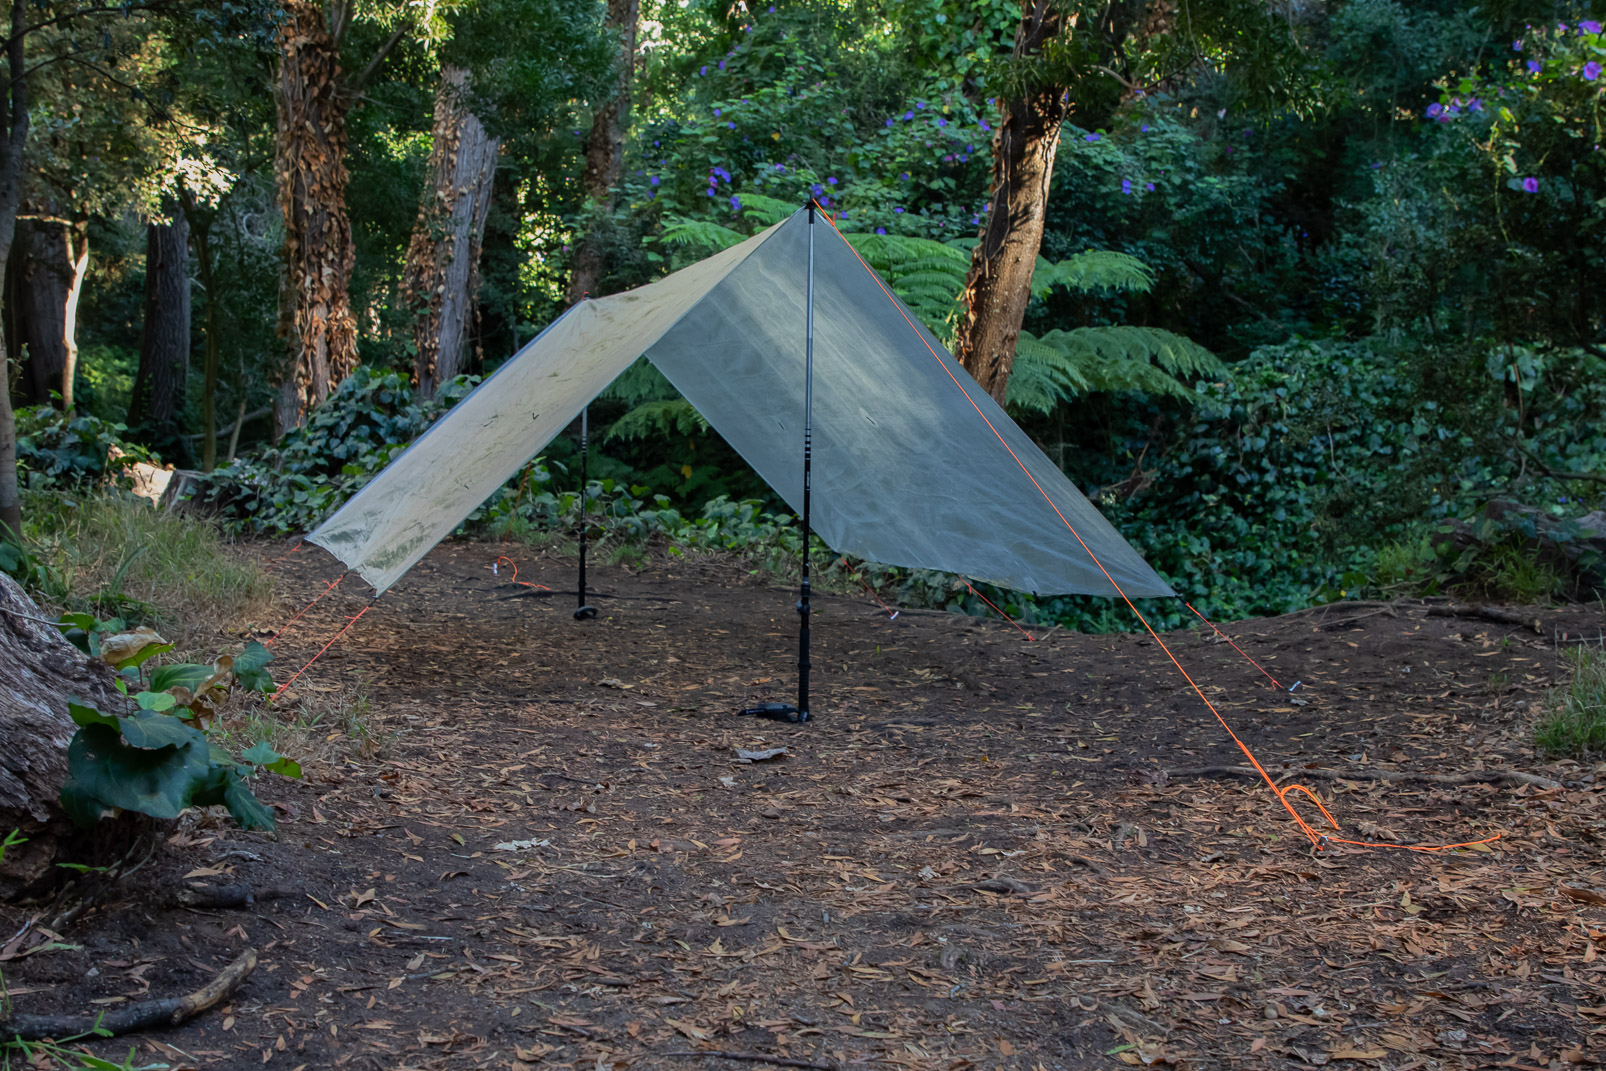
Supports: two trekking poles or ridgeline
Hardware: 2 trekking poles, 2 guylines, 8 stakes
Complexity: simple
Best for: most conditions
Steps for rigging an A-frame
1. Stake down both corners at one end of the tarp. Position the corners further apart or closer together depending on how much headroom you want.
2. Put the end of a trekking pole through the ridgeline tie-out at the same end of the tarp.
3. Secure the guyline on this tie-out to a stake using a bowline.
4. Put the end of the other trekking pole through the ridgeline tie-out at the other end of the tarp.
5. Secure the guyline on this tie-out to a stake using a truckers hitch.
6. Stake down the remaining corners.
You can adjust the amount of headroom by lengthening or shortening your trekking poles and repositioning the corners. If you want even more space and ventilation, you can raise the whole tarp and guy out the corners and sides a few inches off the ground.
2. Closed-end A-frame
This alternative to the classic A-frame gives you more protection from wind and rain as one end of the shelter is staked flat to the ground. The other advantage of this setup is that it can be set up with a single pole or tree and minimal amount of gear. The disadvantage is that you give up some space at the far end of the shelter – usually only an issue if you wanted to store gear there.
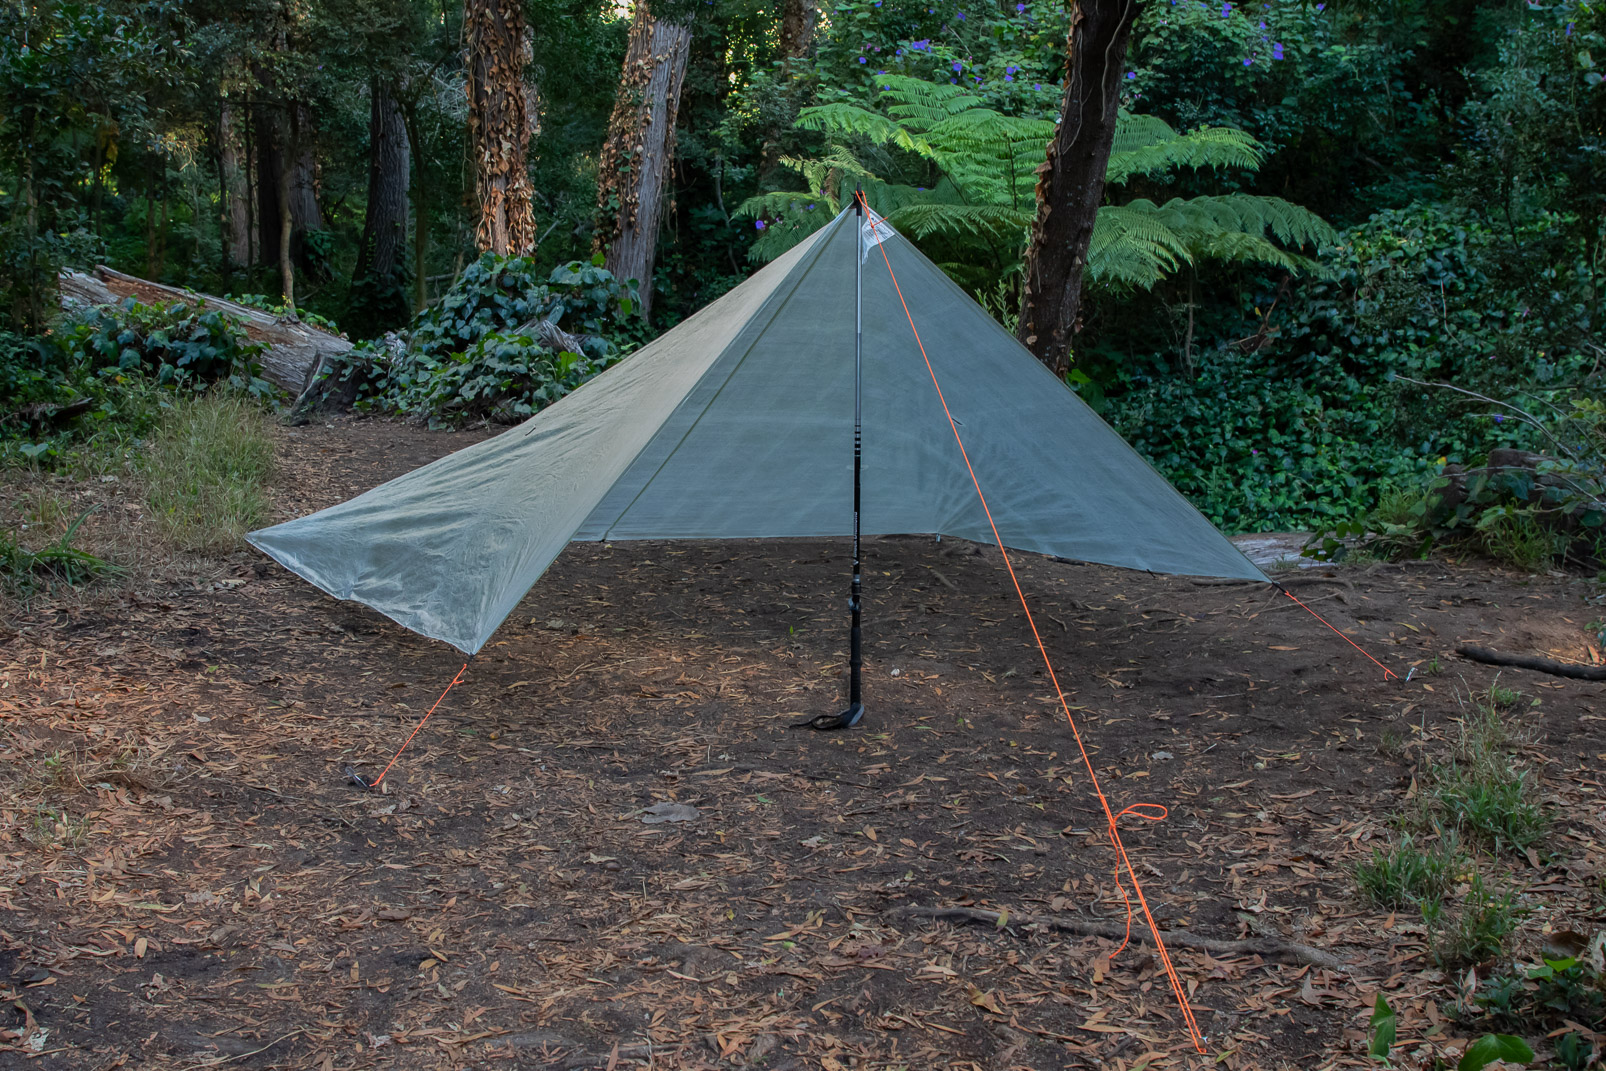
Supports: single trekking pole
Hardware: 1 trekking pole, 1 guyline, 8 stakes
Complexity: simple
Best for: windy and rainy conditions
Steps for rigging a closed-end A-frame
1. Stake down the back end of the tarp flat against the ground.
2. Put the end of a trekking pole through the ridgeline tie-out at the other end of the tarp.
3. Secure the guyline on this tie-out to an anchored stake using a truckers hitch.
4. Stake down the remaining corners. The guylines attached to the corners will have to be longer than those closer to the closed end.
3. A-frame on a ridgeline
If you choose to camp in an area with well spaced trees, you can also rig an A-frame with a ridgeline instead of trekking poles. Like the Diamond, this is a good setup for hammock camping, especially if your tarp is more rectangular than square (a shape that is less well suited to a Diamond setup). Just know that you will probably need longer corner guylines to make this setup work.
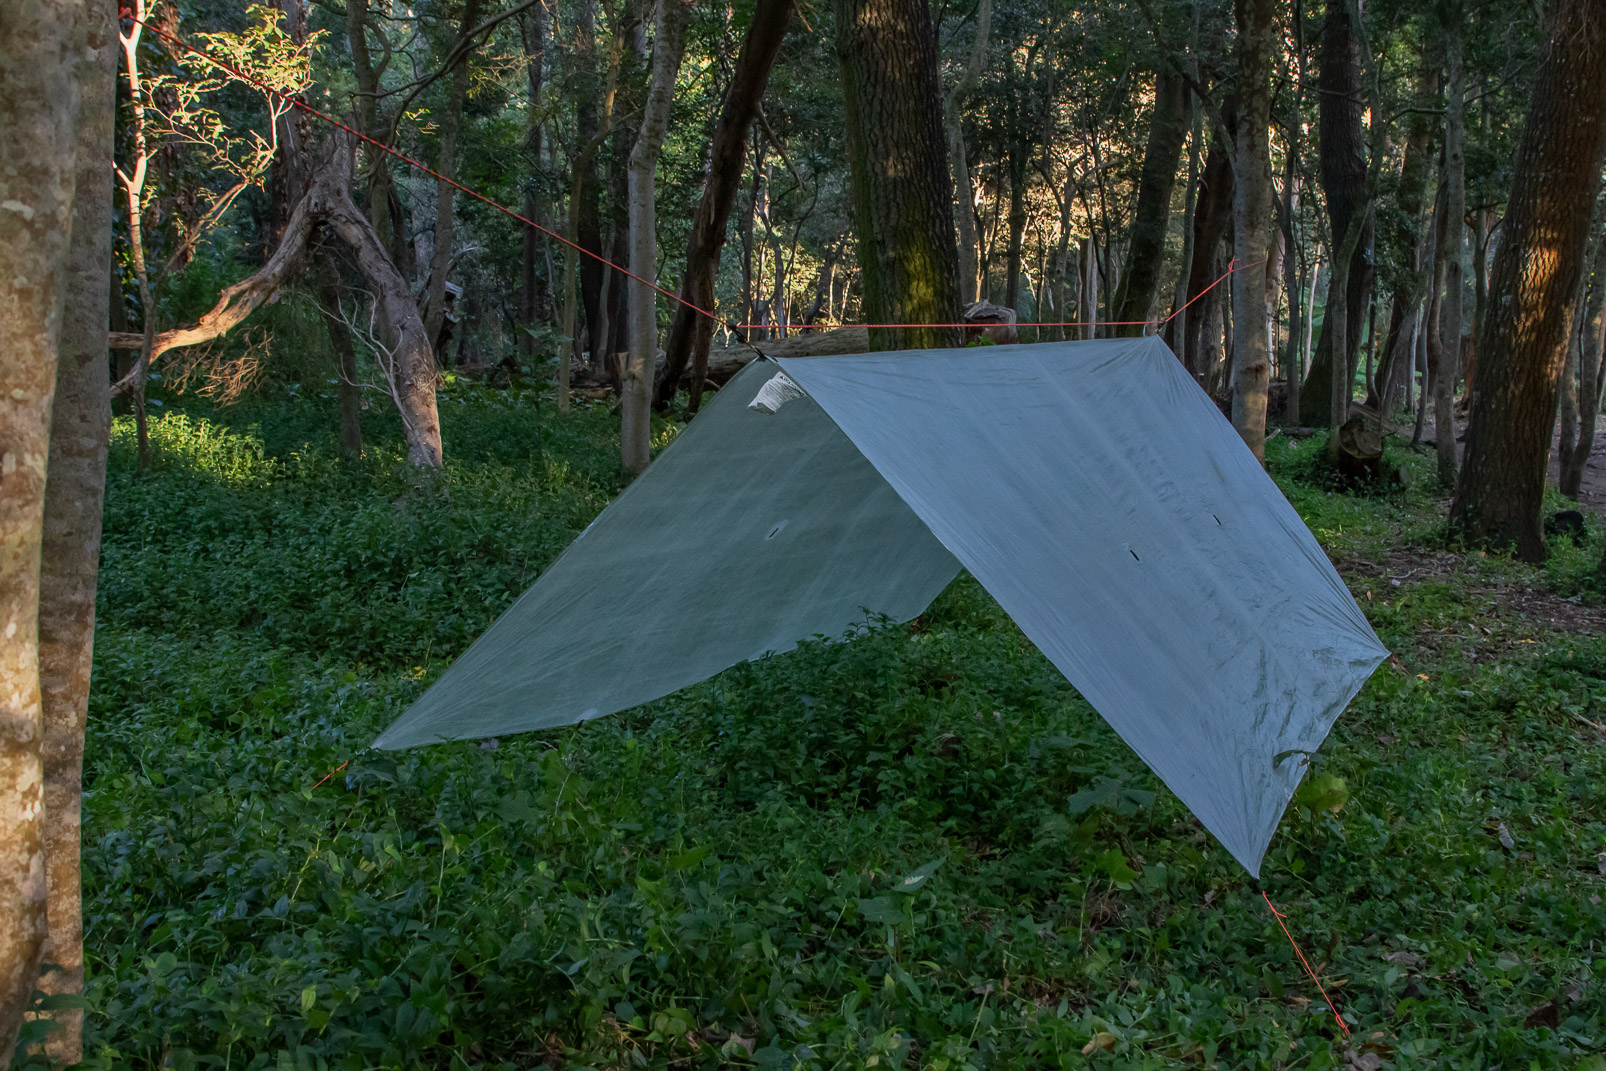
Supports: ridgeline
Hardware: ridgeline cord, 2 prusiks and clips, 4 guylines, 4 stakes
Complexity: simple
Best for: most conditions
Steps for rigging the A-frame
1. Rig a ridgeline between two uprights.
2. Attach the two ridgeline tie-outs to the ridgeline using prusiks and clips.
3. Stake down the guylines on the four corners.
4. Lean-to
Like the basic A-frame, the lean-to is the same height from end to end, but it is open on one side and provides less protection from the elements. If you have two trees, you can also use these to create a ridgeline and then fold the tarp over this. Otherwise, you will need to use two trekking poles attached to side tie-ins (along a tarp’s length). This second method requires two additional guylines but no ridgeline cord.
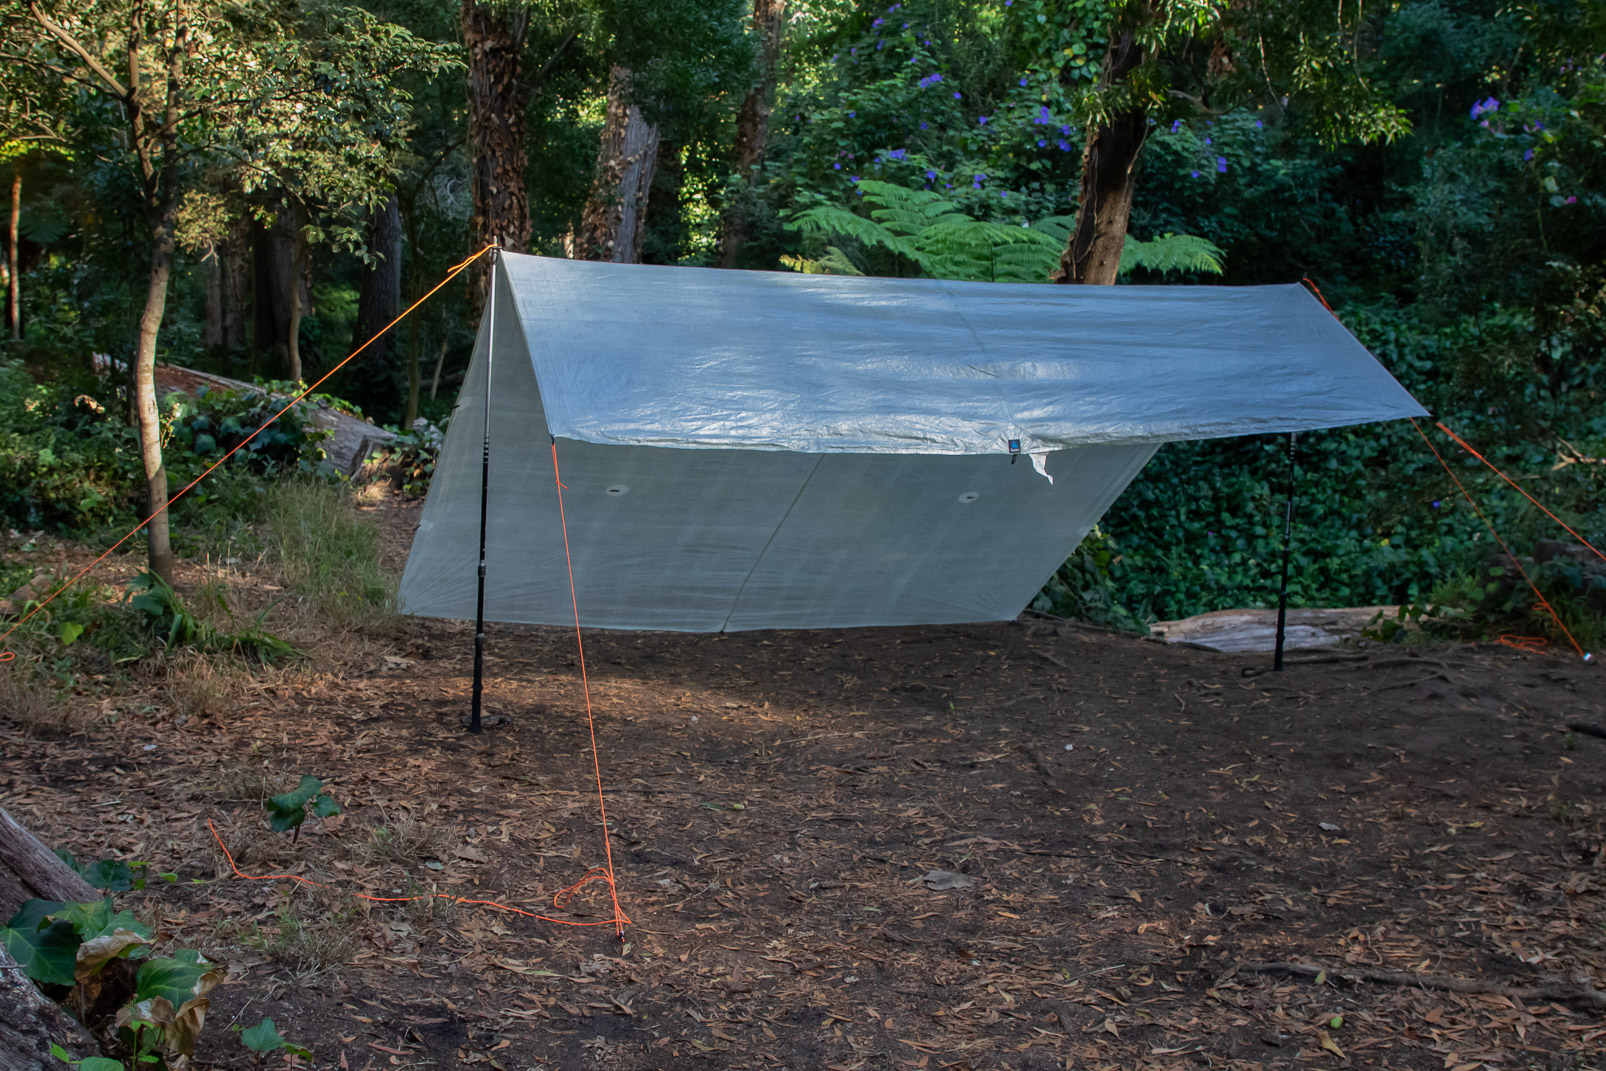
Supports: ridgeline or two trekking poles
Hardware: 2 trekking poles, 4 guylines, 7 stakes (swap out 2 guylines for a ridgeline cord if using 2 trees)
Complexity: moderate
Best for: fair weather
Steps for rigging a lean-to with trekking poles
1. Stake down the corners on one end of the tarp.
2. Put the ends of your trekking poles through the two side tie-outs (opposing) closest to the other end of the tarp.
3. Stake out the guylines on these tie-outs at right angles to the tarp.
4. Secure the two corner guylines to anchored stakes using the truckers hitch.
5. C-fly
The C-fly is similar to the basic lean-to configuration but includes an extra fold which converts a section of the tarp into a groundsheet. Like the lean-to, this setup can be constructed with a tree-to-tree ridgeline or two trekking poles (or other uprights). A tree-to-tree ridgeline is easier to set up and requires less gear. To ensure that you have length for both the awning and the groundsheet, you might need to shorten your trekking poles, if they are adjustable.
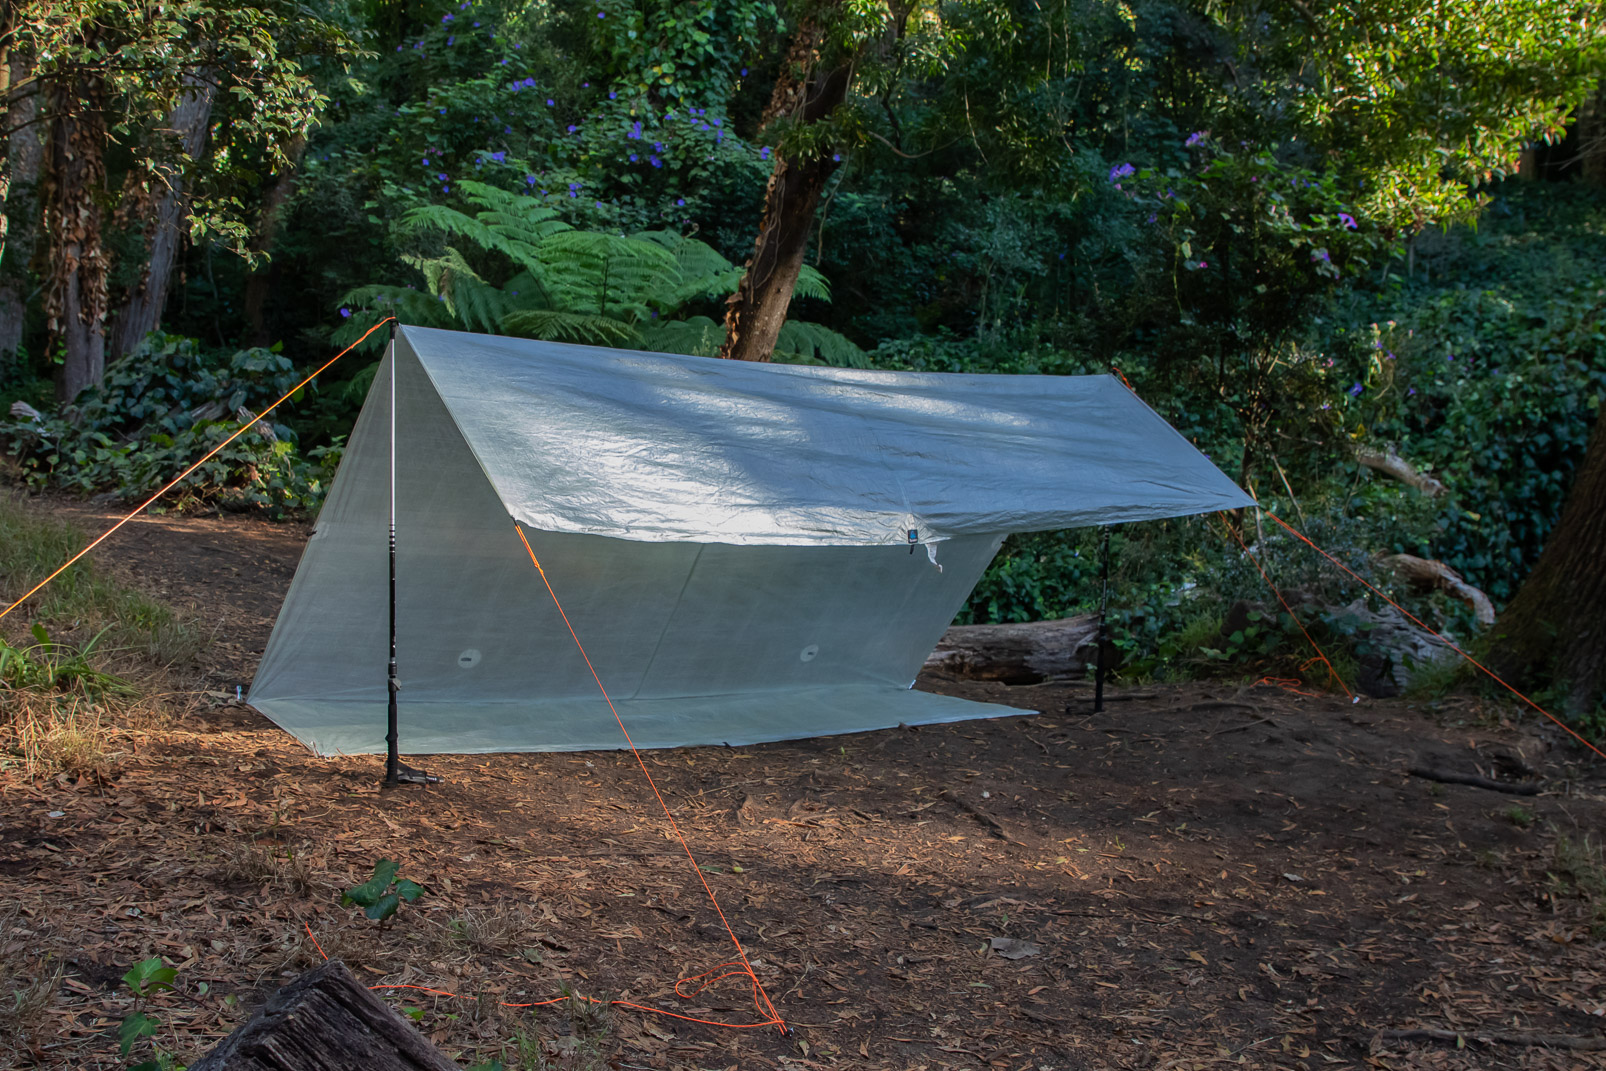
Supports: ridgeline or two trekking poles
Compatible tarps: square and rectangular tarps
Hardware: 2 trekking poles, 4 guylines, 11 stakes
Complexity: advanced
Best for: fair weather; when you don’t have a groundsheet
Steps for rigging a lean-to with trekking poles
1. Stake down the corners of what will become your groundsheet and rear wall.
2. Put the ends of your trekking poles through the two side tie-outs (opposing) closest to the other end of the tarp.
3. Stake out the guylines on these tie-outs at right angles to the tarp.
4. Secure the two corner guylines to anchored stakes using a truckers hitch.
6. Wind-shed setup
As the name implies, the wind-shed configuration is also a good choice for windy conditions, but it is more open than the stealth configuration and won’t withstand shifts in wind direction quite as well. If you decide you want a view of a lake down-valley but also know you’ll need protection from a katabatic wind that evening, the wind-shed setup can be a good choice. It also offers more headroom than a stealth tarp or closed-end A-frame. Just know that this setup requires the careful tensioning of three guylines and is more complicated than most other setups. Practise this one at home.
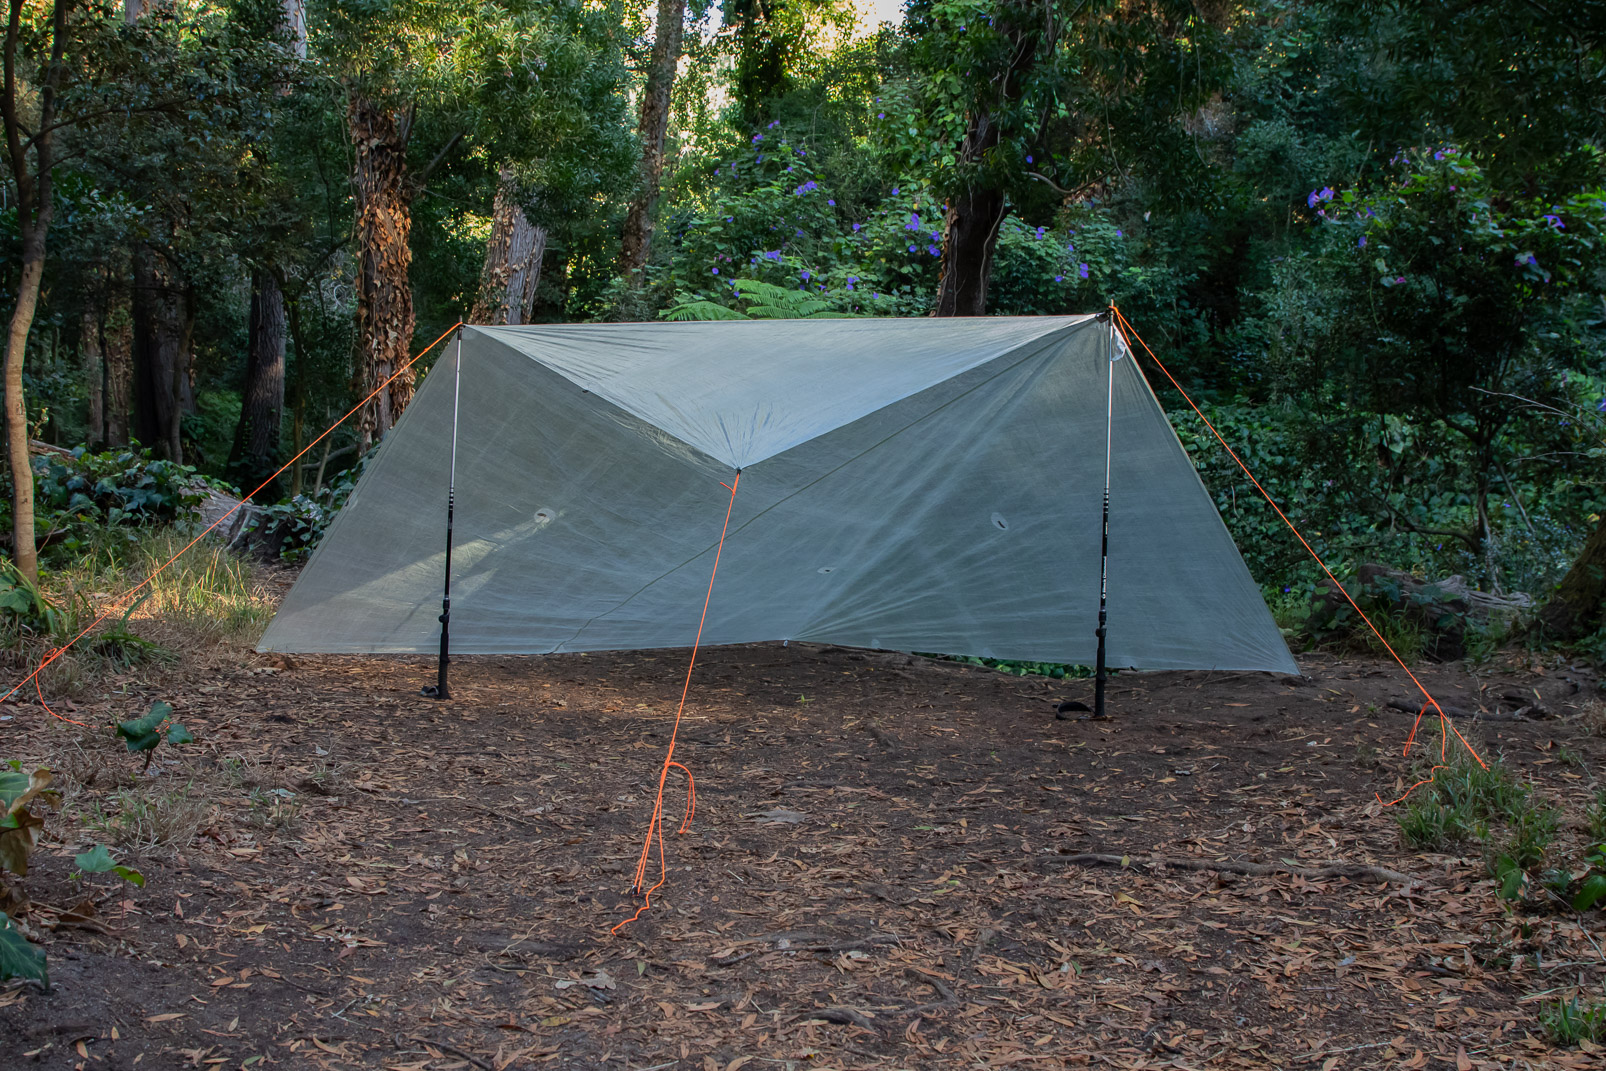
Supports: two poles
Hardware: 7 stakes, 3 guylines, 2 trekking poles
Complexity: advanced
Best for: windy conditions
Steps for rigging a wind-shed tarp
1. Stake down one side of the tarp.
2. Attach a trekking pole (angled slightly outwards at the top) to the ridgeline tie-out on the end that will stay open
3. Stake down the pole’s guyline at a right angle to the tarp.
4. Stake down the corner tie-out that will form the back wall of the shelter.
5. Put the end of the other trekking pole through the tie-out in the middle of the side that will be held open.
6. Stake down the guyline on this tie-out at a right angle to the tarp.
7. Stake down the corners of the far end of the tarp – that furthest from the ridgeline tie-out held up with a trekking pole.
8. Stake down the guyline on the remaining corner tie-out.
7. Stealth
As its name implies, the stealth tarp is good for keeping a low profile. Like the C-fly and lean-to, it’s open on one side, but the ends are closed and slanted, which helps to protect occupants from wind. It’s also pitched lower than these other two other designs, which helps it to stand up to winds that blow more or less from the same direction. And it creates a groundsheet that covers the whole footprint of the shelter. The only downsides to this setup is that it doesn’t create a lot of space for the camper.
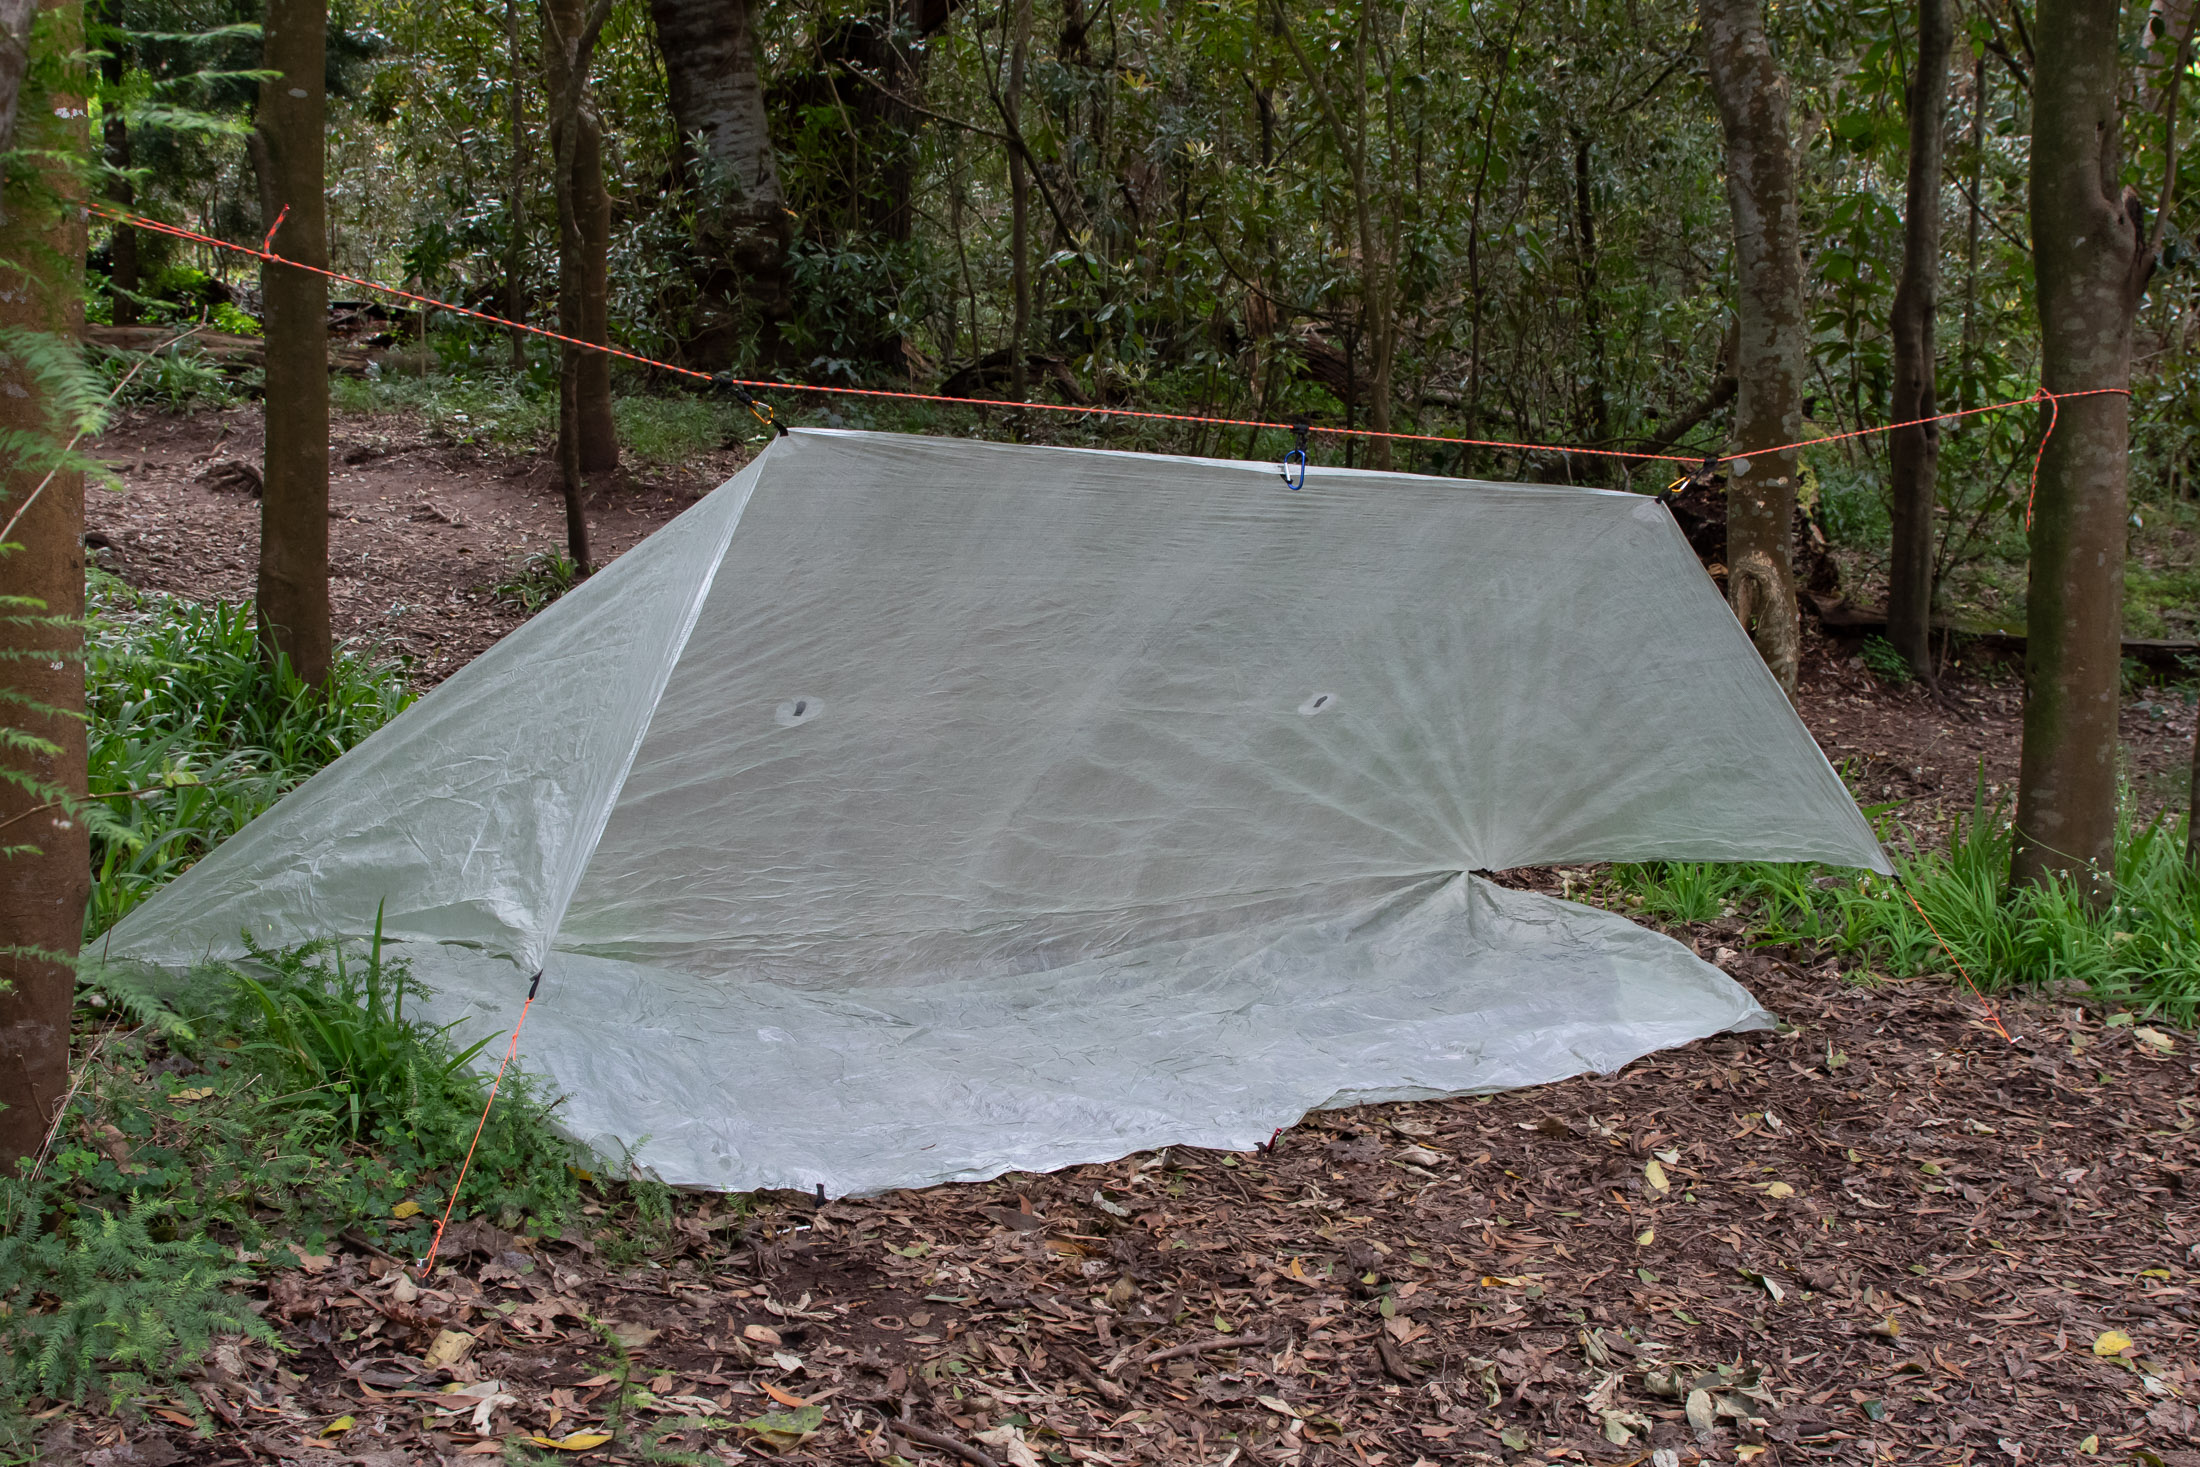
Supports: ridgeline
Hardware: ridgeline cord, 3 prusik loops, 7 stakes
Complexity: advanced
Best for: keeping a low profile; conditions where wind direction is unchanging
Steps for rigging a stealth tarp
1. Rig a ridgeline between two uprights.
2. Attach the middle three tie-outs along one edge of the tarp to the ridgeline cord with three prusiks.
3. Stake down the front corners.
4. Fold the end of the tarp back in underneath itself to create a groundsheet.
5. Stake down the new back corners and edge (folded).
8. Diamond
The diamond configuration is a popular setup for hammocks. You can use either a square tarp or a rectangular tarp. However, if you can’t fold a rectangular tarp into a square (tie-out positions might not allow for this), it won’t be symmetrical. Regardless of the shape, it should provide ample protection from the wind and rain. It’s also very quick and easy to pitch, and requires a minimal amount of gear.
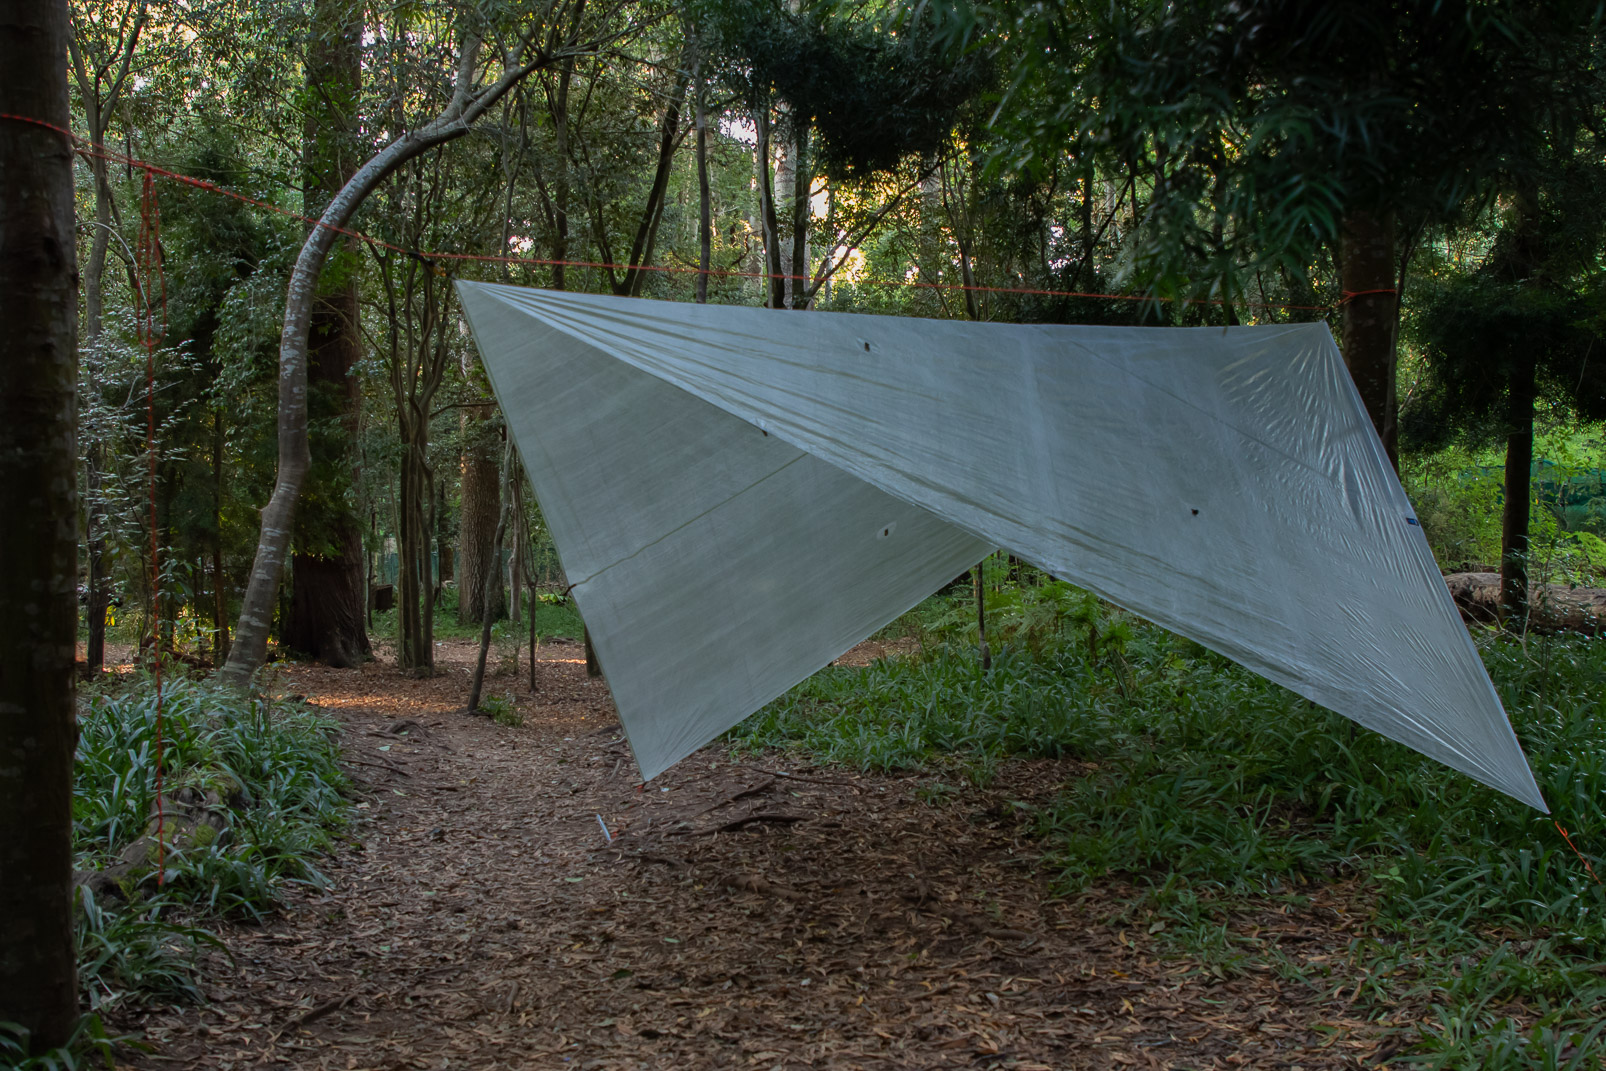
Supports: ridgeline
Hardware: ridgeline cord, 2 prusiks and clips, 2 stakes
Complexity: moderate
Best for: hammocks
Steps for rigging the diamond
1. Rig a ridgeline between two uprights.
2. Attach two opposing corner tie-outs to the ridgeline using prusiks.
3. Stake down the two remaining corners.
Learn more from this gear head
The best way to hone your tarp rigging skills is to get outside and practise them. That said, if it’s more instruction you’re, there’s a wealth of useful information on tarp camping and other outdoor topics on this website. Look for these on the category page ‘Outdoor life’. Alternatively sign up for Trail Mail and get the latest from Trail and Crag delivered straight to your inbox every month.
