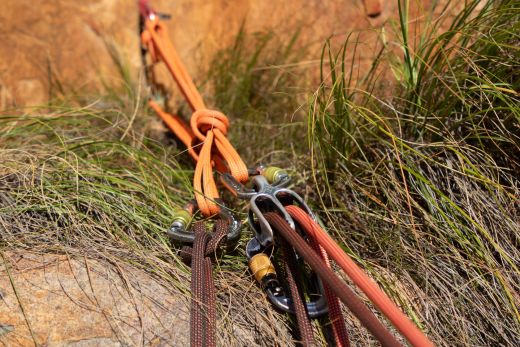
For years climbers have been using acronyms like SRENE and ERNEST as guidelines when building multipoint belay anchors. These checklists are easy to remember, and on the face of it, they seem to make sense. But they have their limitations. Besides proposing standards that are unachievable in most situations, their ideals can mislead climbers by suggesting that it is possible to equalise an anchor regardless of the rigging technique used – a mistaken belief that can result in a climber overestimating the strength of their anchor.
In this article, I aim to dispel the myth of anchor equalisation and offer a better set of principles for building and assessing anchors. Here, I will propose a system for grading multi-point anchors and then will explain why we should aim for load distribution, not equalisation, in a certain category of anchor. It is going to get technical, but then you will gain a better understanding of the principles of anchor building and be better equipped to solve tricky and potentially dangerous anchor rigging problems.
Note: This is the fourth article in a whole series on anchor building. In the first article, I explained how to create a trad anchor using two methods: the quad and the traditional overhand-knot cordelette. In the second, I focussed on the quad, looked at the many ways it can be rigged, and explained the benefits of this technique. And in the third I covered monolithic anchors. If you are new to anchor building and haven’t read the first and second installations already, I recommend doing that before diving into this article.
- Definitions
- The limitations of SRENE, SERENE and ERNEST
- How strong does an anchor need to be?
- Factors affecting component strength
- Load distribution
- The danger of extension
- A system for classifying anchors
- A protocol for building and assessing anchors
Definitions
Before this gets too technical, let’s go over some definitions. That way you’ll know exactly what I mean when I say ‘component’ or ‘effective load’.
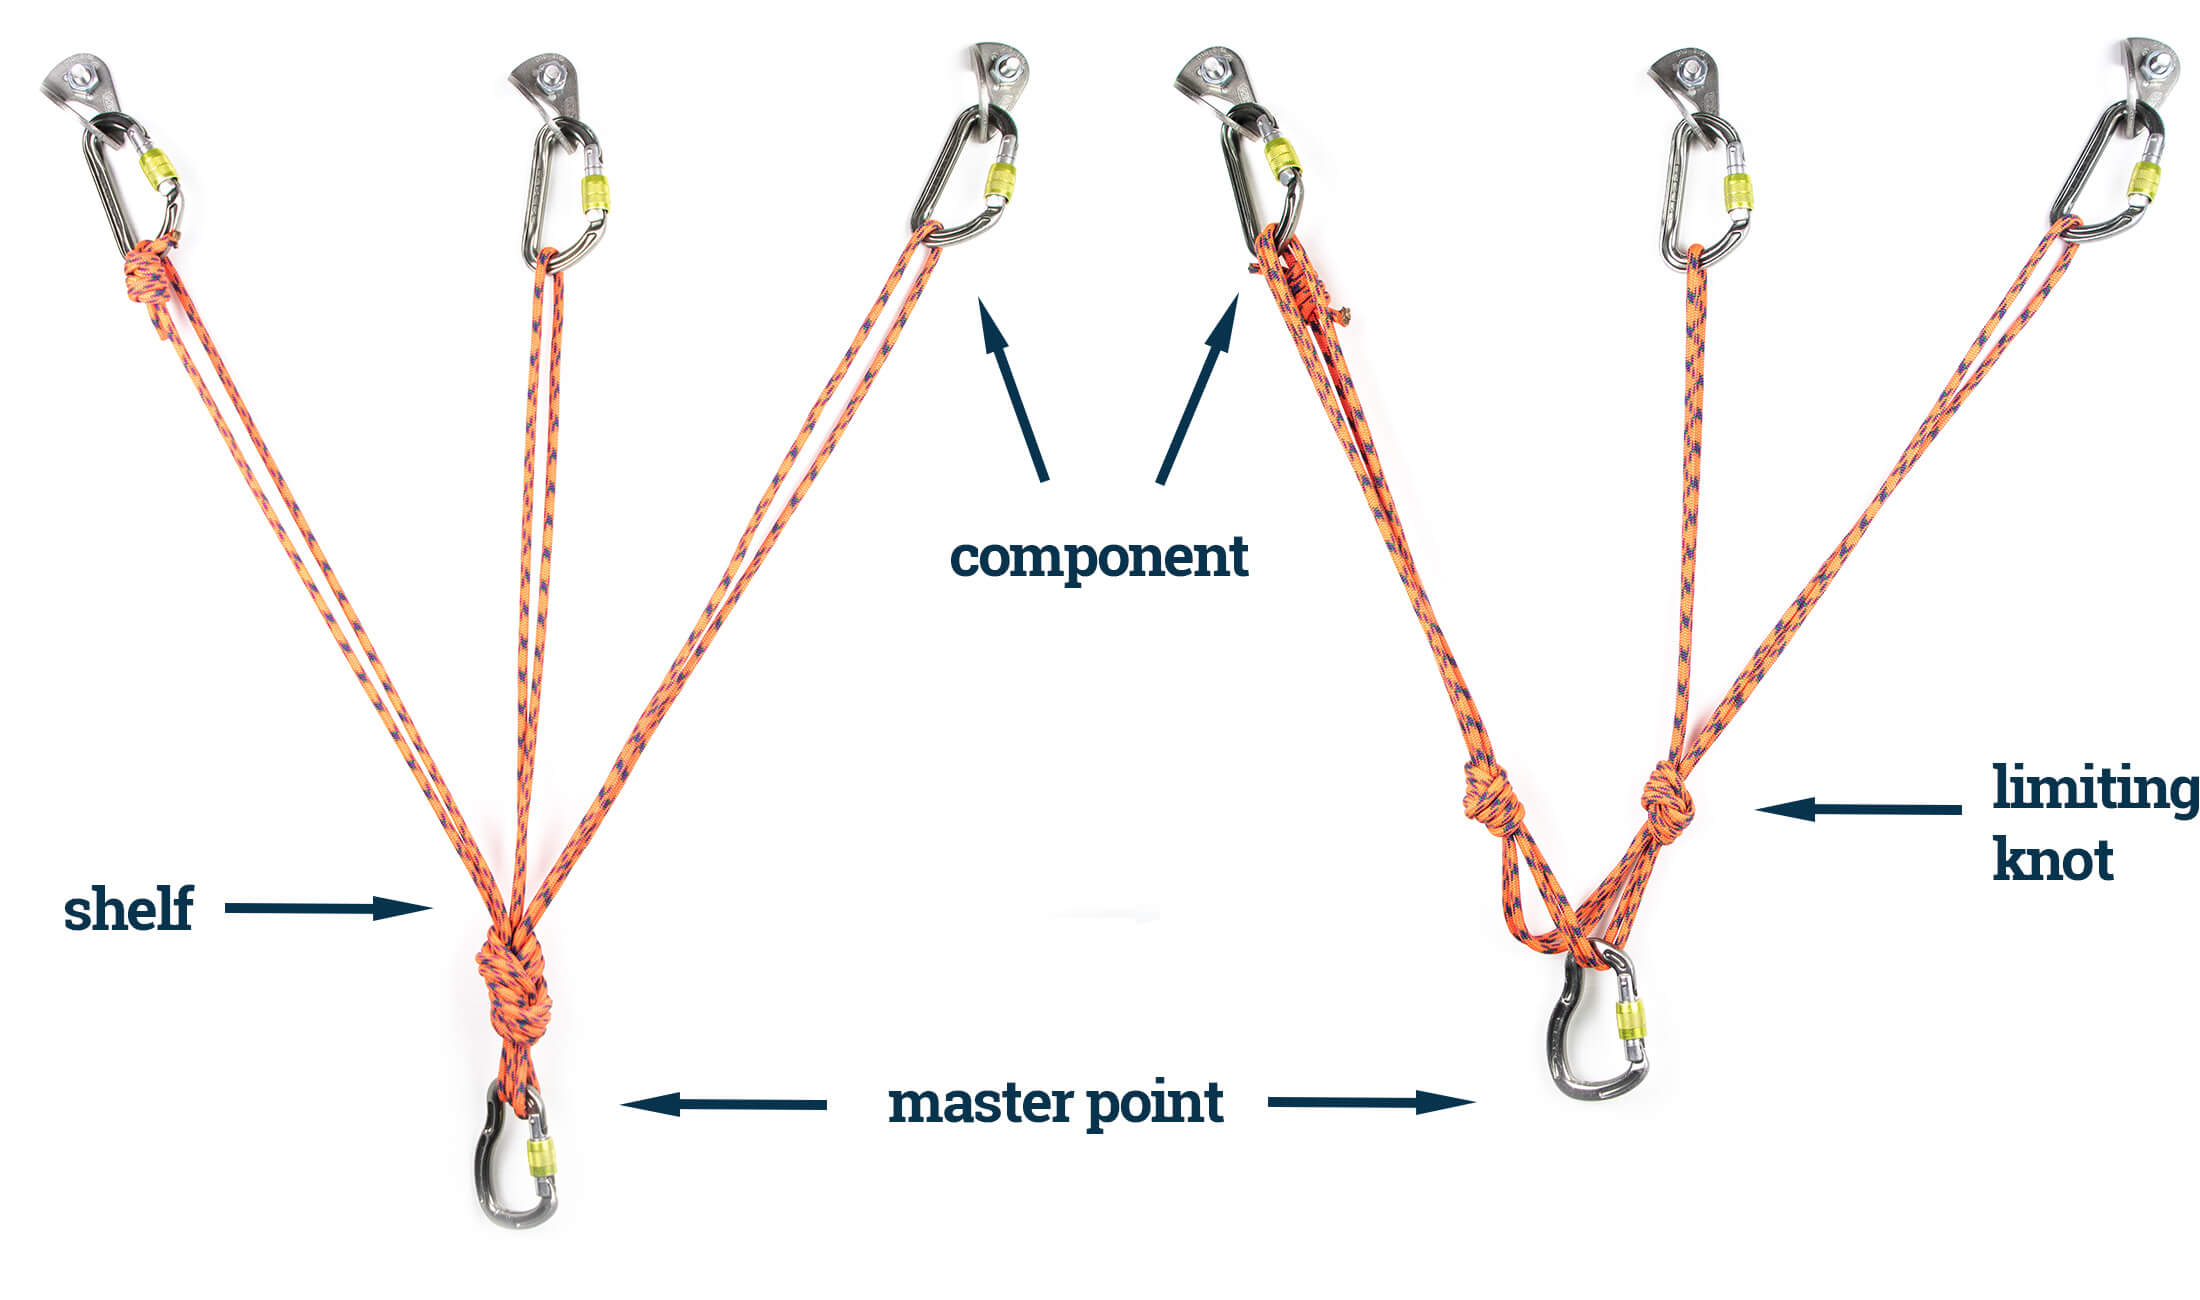
Master point
The master point is the part of the anchor you connect yourself and the belay device to. In the case of an overhand-knot anchor, there is only one master point – the short loops of the bundled strands below the knot. Quads, on the hand, have two master points, each with two strands.
Component
In this article I will use ‘component’ to refer to the separate primary anchors that make up an anchor. These could be bolts, cams, nuts, or natural features like boulders or trees that have been secured with a sling. I will use this term interchangeably with ‘primary anchor’.
Shelf
The shelf is a second attachment point created by clipping a carabiner through the loops that make up each arm of an overhand-knot anchor. It gives the belayer an alternative point for attaching the belay – useful if the master point is too low to make for easy belaying.
On-axis
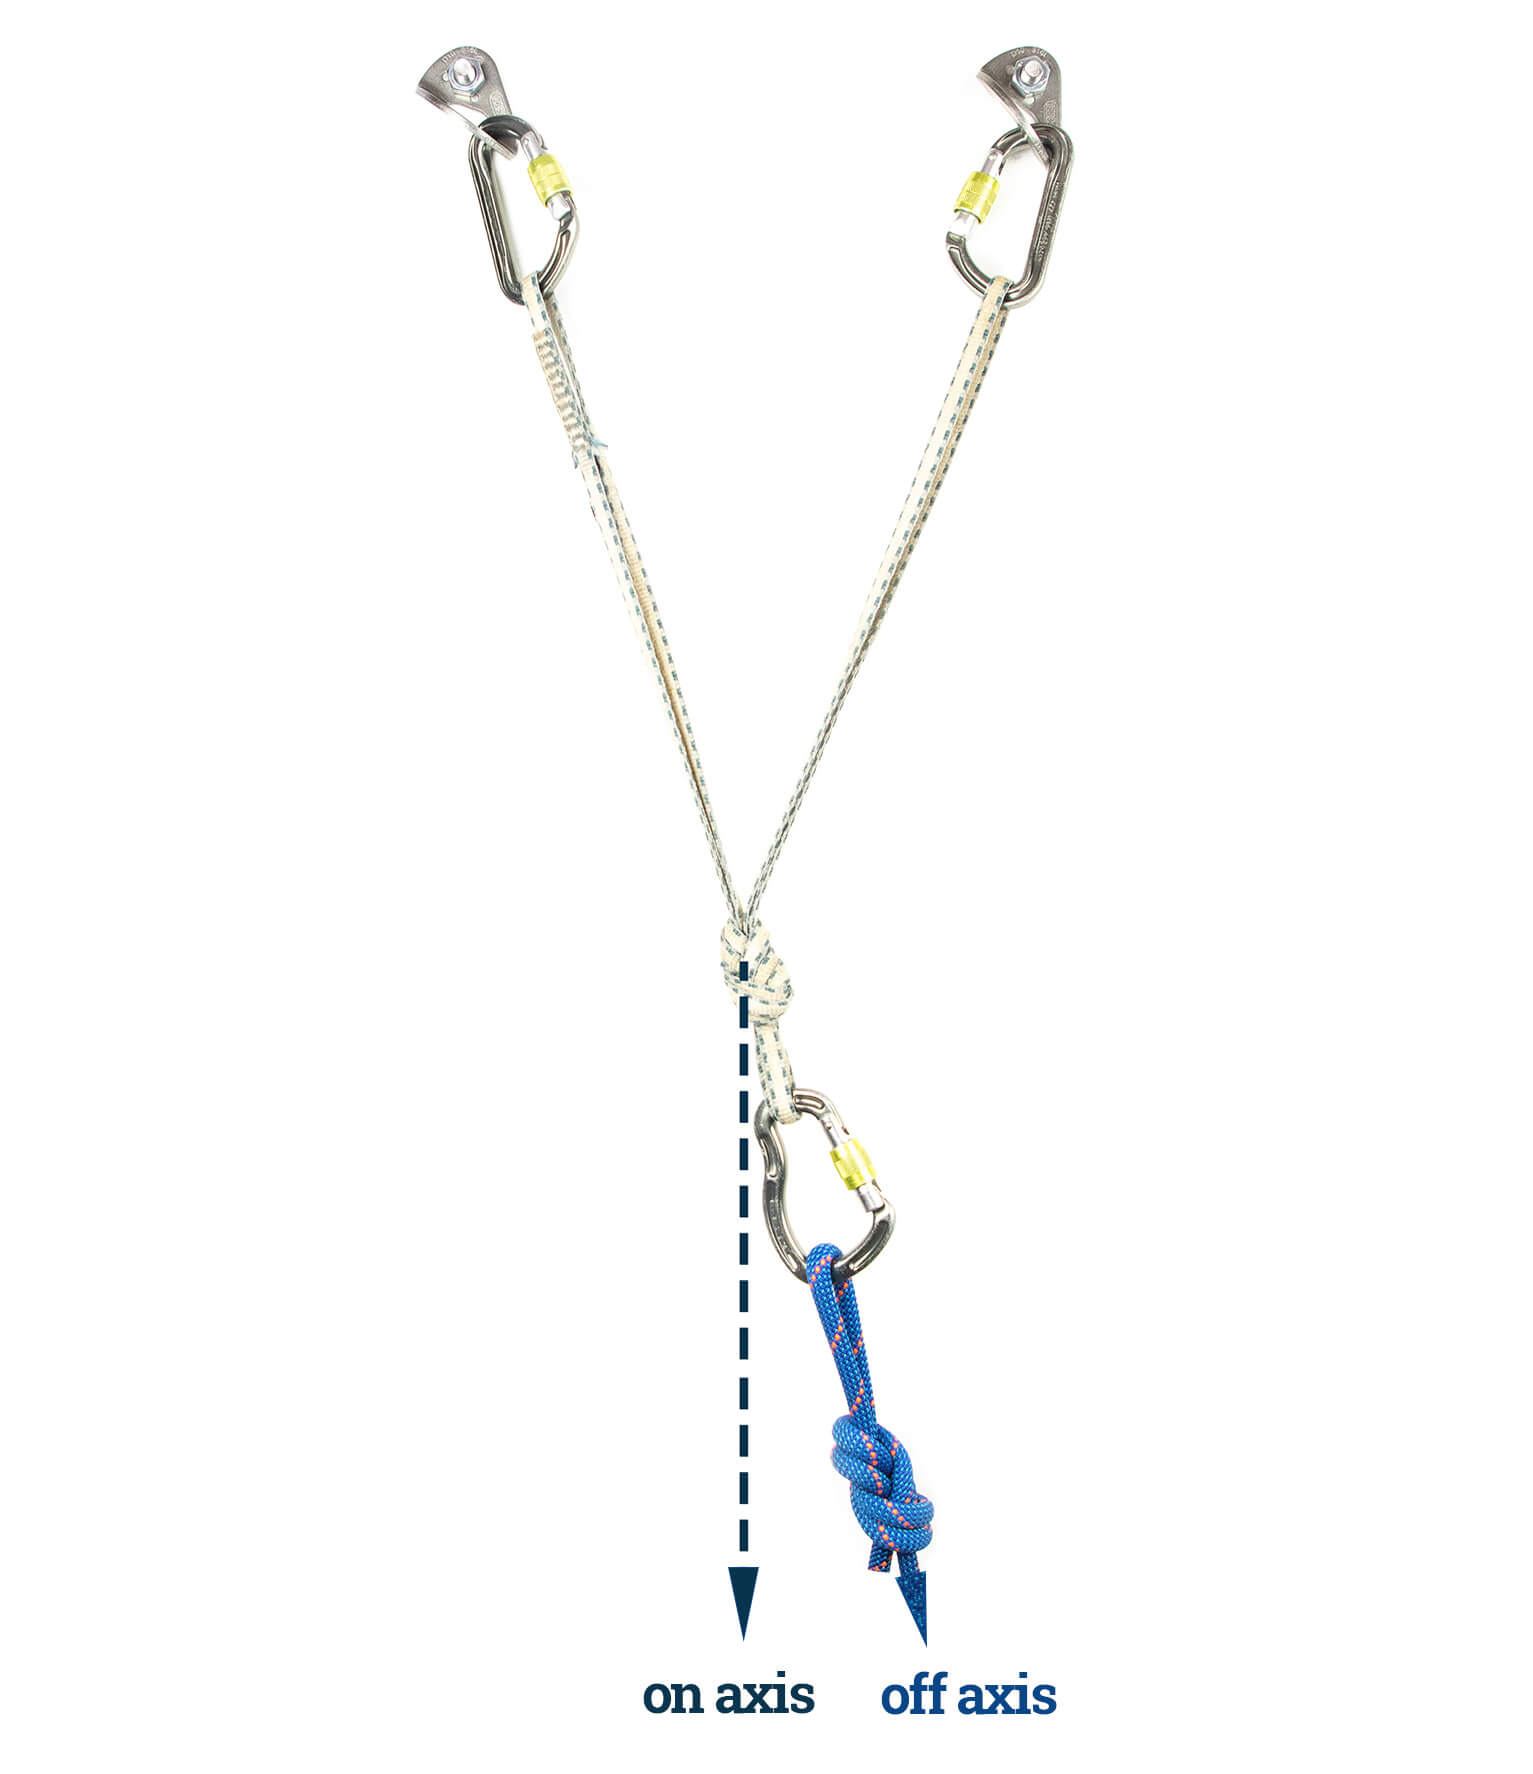
The direction of pull on an anchor is on-axis when it is straight on, ensuring a more or less equal distribution of load on both components. An anchor builder should always strive to build an anchor that will be loaded on-axis when the belayer or climber weights the anchor.
Off-axis
The direction of pull on an anchor is off-axis when it is not straight on – that is when it doesn’t distribute a load equally to the primary anchors in a system. The master point in a self-distributing anchor can slide, moving the axis. In this case, an off-axis load is one that the anchor still has to adjust for.
Distributed load
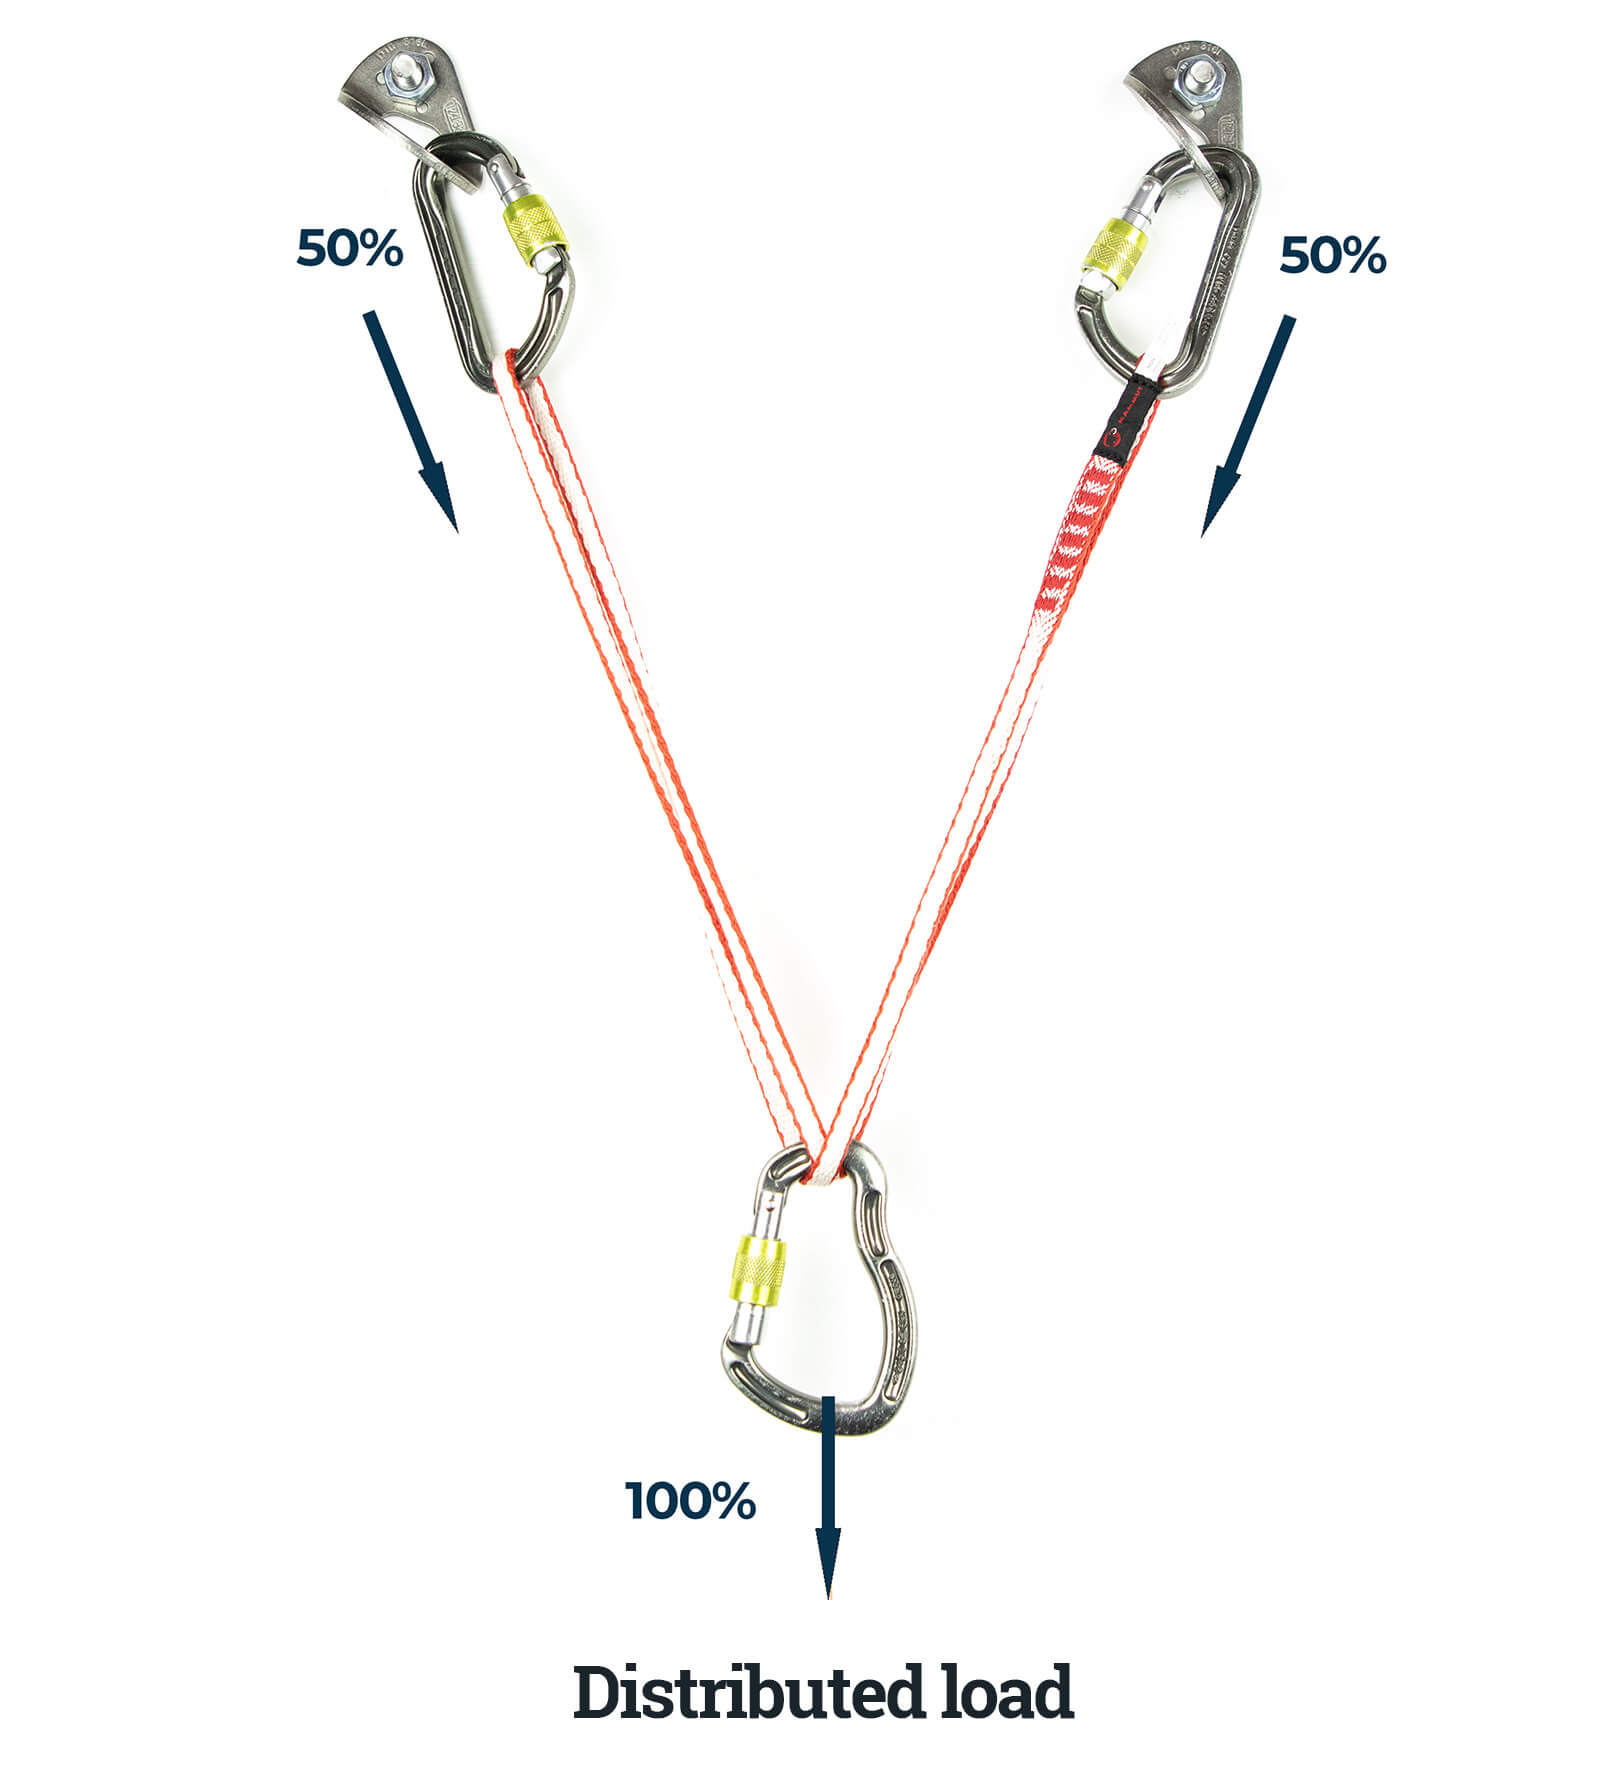
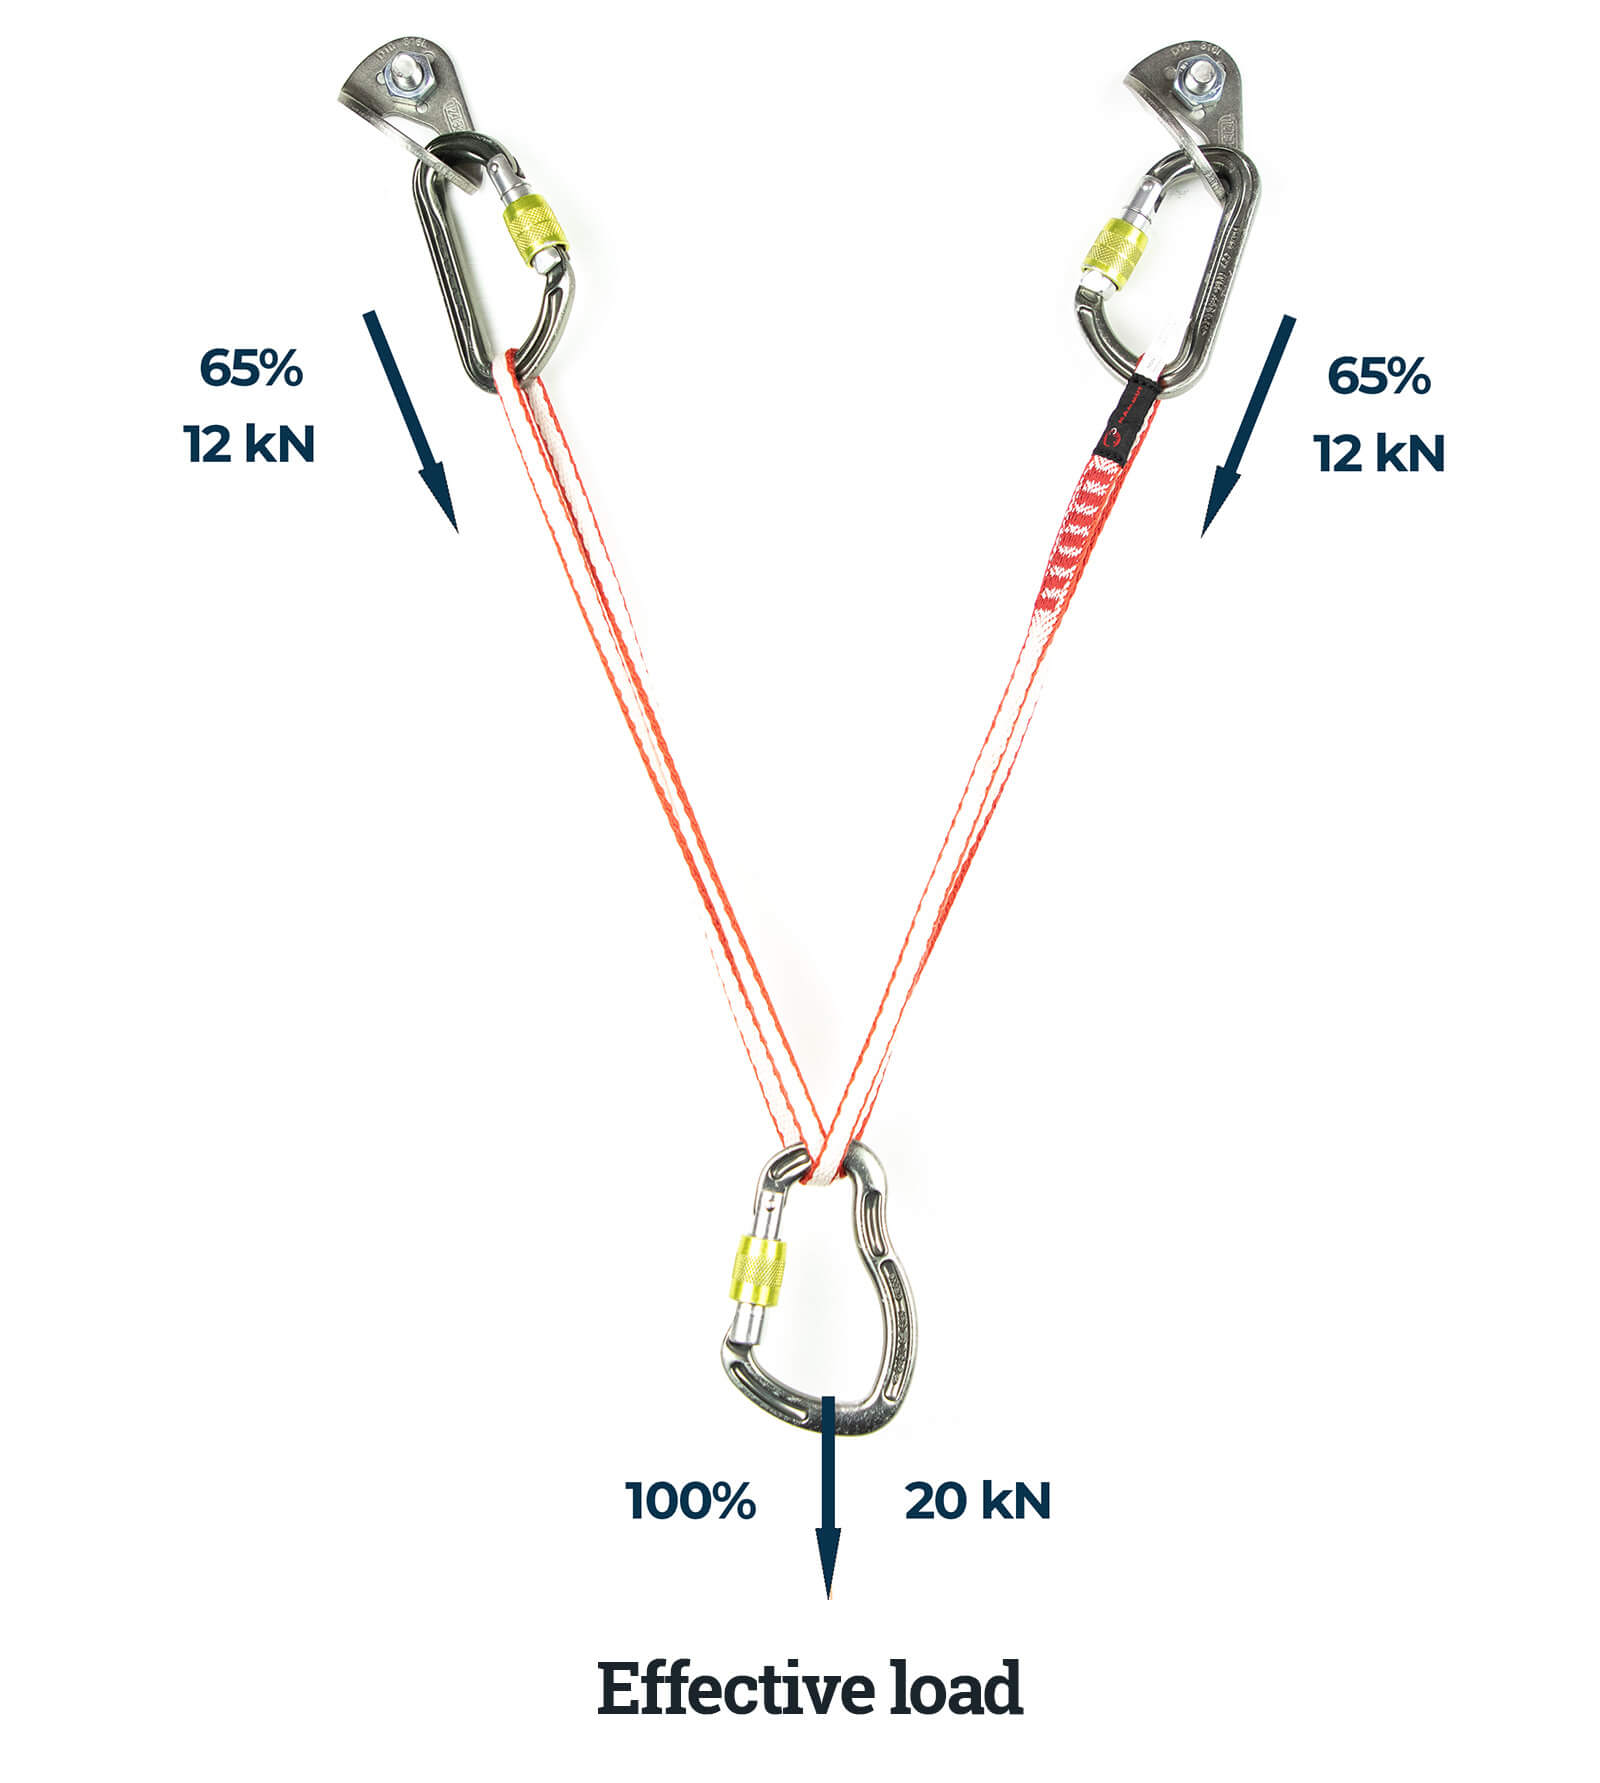
For the purpose of this article, I’m going to differentiate between ‘distributed load’ and ‘effective load’. The distributed load is the percentage of the shared load that is placed on a single component. It is always expressed as a percentage and does not indicate the actual load (in kN) placed on a component. Even if the distributed load on a component is around 50% – as it would be in an equitably distributed two-bolt anchor – the actual load (force in kN) on that component can be significantly higher than 50% of the load placed on the master point. The distributed loads of all components in an anchor add up to 100%.
In a two-bolt anchor that is pulled perfectly on-axis, the distributed load on each component would be 50%. If it was slightly off-axis, the distributed loads for the components in a sliding X might be 60% and 40%.
Effective load
The effective load is the actual load on a component expressed both in kN and as a percentage of total load. When expressed as percentages, the effective loads placed on all components in an anchor add up to over 100%. The angles between components put additional force on those strands, and the effective load on a component is always higher than the distributed load. An anchor that carries 50% of the distributed load will be subjected to an effective load equal to 60% of the total load when the angle between components is limited to 65°. The other component – also bearing 50% of the distributed load – would also be subjected to an effective load equal to 60% of the load on the master point.
Distribution points
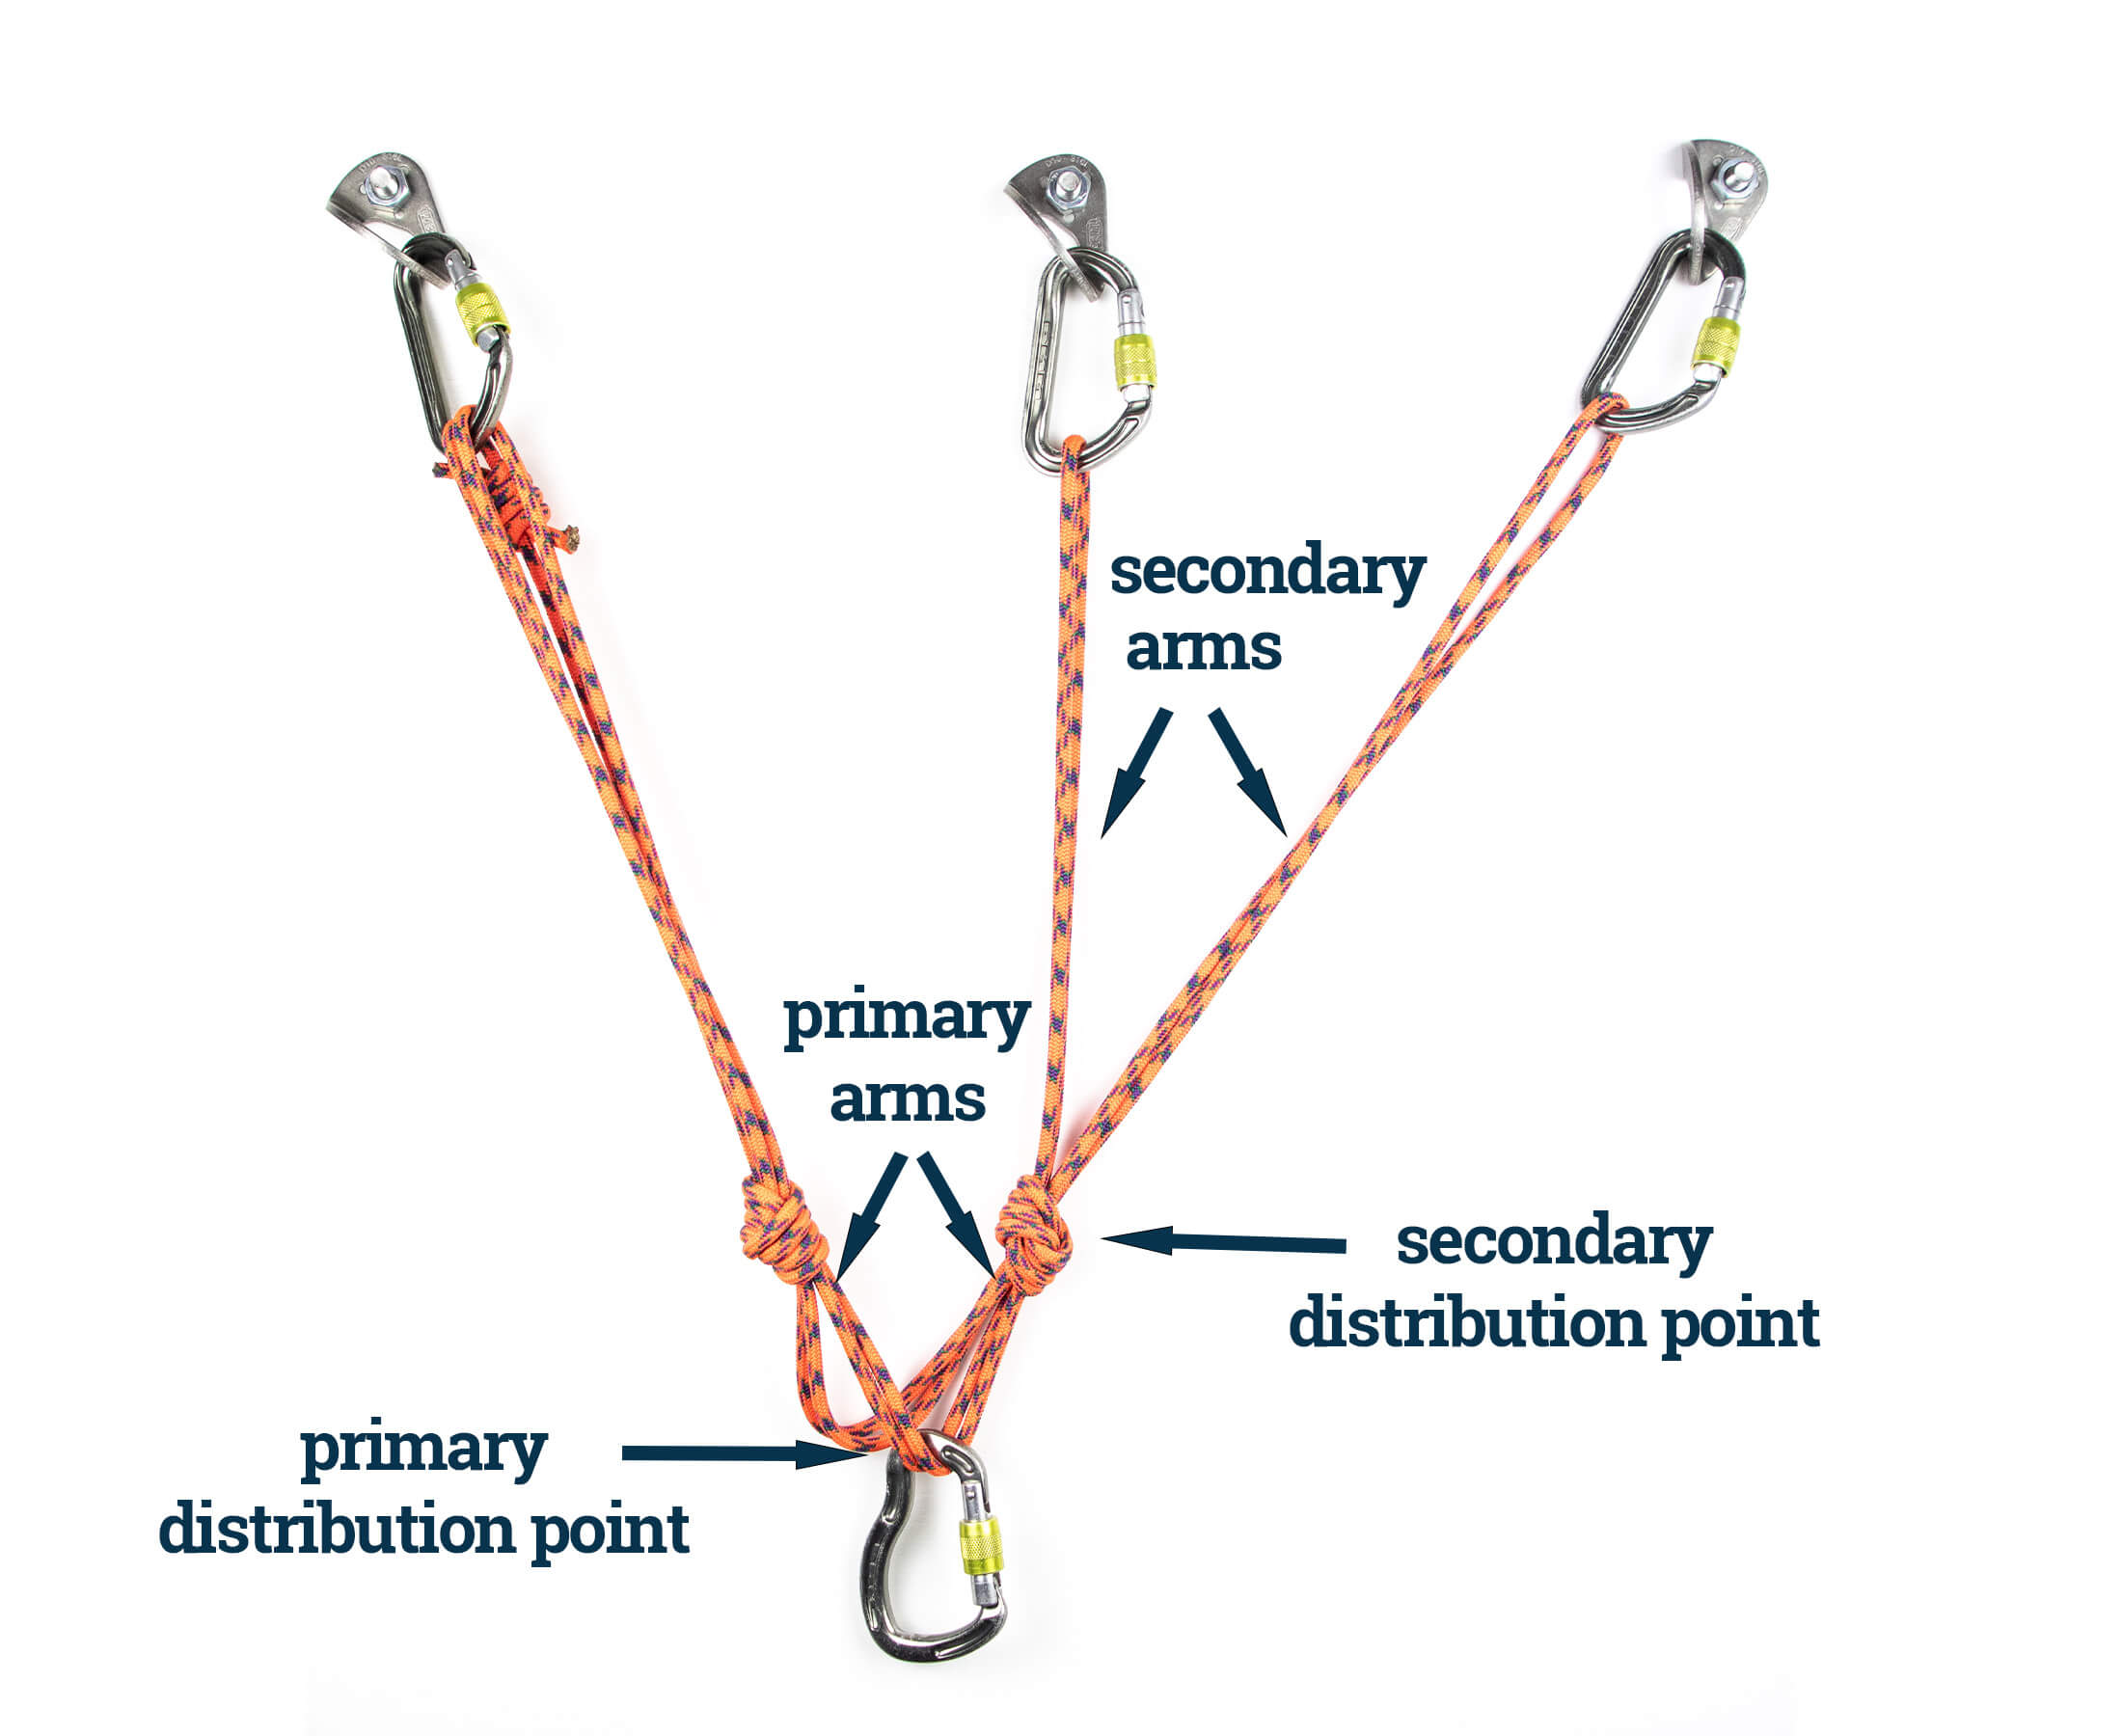
Distribution points are those points in an anchor system where the load is split. They can be self-distributing, which means they self-adjust for an off-axis load, or pre-distributed, which means they don’t adjust. Every multi-point anchor has a primary distribution point in its master point, but 3-piece quads and sliding X anchors also have a second distribution point on the arm that splits again. We will call the arms directly above the first distribution point ‘primary arms’ and those above the secondary distribution point ‘secondary arms’.
The limitations of SRENE, SERENE and ERNEST
Anchor building has come a long way since the days of hobnail boots, and today this essential skill is considered to be both a science and an art. But the science part is still not perfect. Many climbers still construct and evaluate anchors using concepts that are overvalued or impossible to apply consistently. In a world where all primary anchor points were equally strong and the direction of pull was just as intended, maybe these principles would hold up. But, in the real world, self-equalisation is impossible to achieve and in many cases is even undesirable. Likewise, ruling out the use of a self-distributing anchor because it doesn’t adhere to the ‘no extension’ rule can result in a climber disregarding what could be the best solution in a certain situation.
The problem started when anchor builders tried to simplify a complex subject. They had to teach less experienced climbers how to build anchors – sometimes very quickly – and the obvious solution at the time was a checklist of key principles that could be summed up with an easy-to-remember acronym. For some this would have been SRENE or SERENE. For others it might have been ERNEST, NERDSS, OR LEADSTER.
| SRENE | Solid, Redundant, Equalised, No Extension |
| SERENE | Solid, Efficient, Redundant, Equalised, No Extension |
| EARNEST | Equalised, Angles, Redundant, No Extension, Solid, Timely |
| NERDSS | No Extension, Redundant, Distributes load, Solid, Simple |
| LEADSTER | Limit Extension, Angles, Direction, Solid, Timely, Equalised, Redundant |
When applied to anchors comprised of strong components, SRENE works just fine, but when applied to a trad anchor comprised of several weaker components, none of these acronyms offers a viable method for solving the problem. NERDSS gets close, but a configuration that builds a solid anchor from weaker components is not going to be simple (the last point in NERDSS). Still, many climbers will attempt to tick every box on their acronym checklist. This can waste time (some ideals will be unattainable) and, worse, can lull the anchor builder into a false sense of security if he feels he has successfully adhered to the acronym’s principles.
The danger of overestimating an anchor’s strength
Let’s imagine that a new trad climber is trying to adhere to the principles of SRENE (Solid, Redundant, Equalised, No Extension). She might place three pieces (6 kN, 8 kN, and 9 kN) and, thinking that these look solid, tick the first box. The acronym doesn’t define ‘solid’ or ‘strong’ (the terms used in most acronyms) and so she believes that her primary anchors are good. After all, they look like perfect placements. And because she has three of them, she will tick ‘Redundant’ too.
Then there’s the issue of ‘equalisation’ and ‘no extension’. Because she knows that a quad can extend when a piece fails (when it doesn’t share an arm with another component), she prefers to use a traditional overhand-knot anchor. She has been taught that if she rigs the anchor so that it points in the direction it will be loaded, she will have equalised the load between all primary components. In reality this is highly unlikely. If she even pulls the anchor just five degrees off-axis or makes one of the arms a little too short, she will put the vast majority of the load (or even all of it) on just one piece.
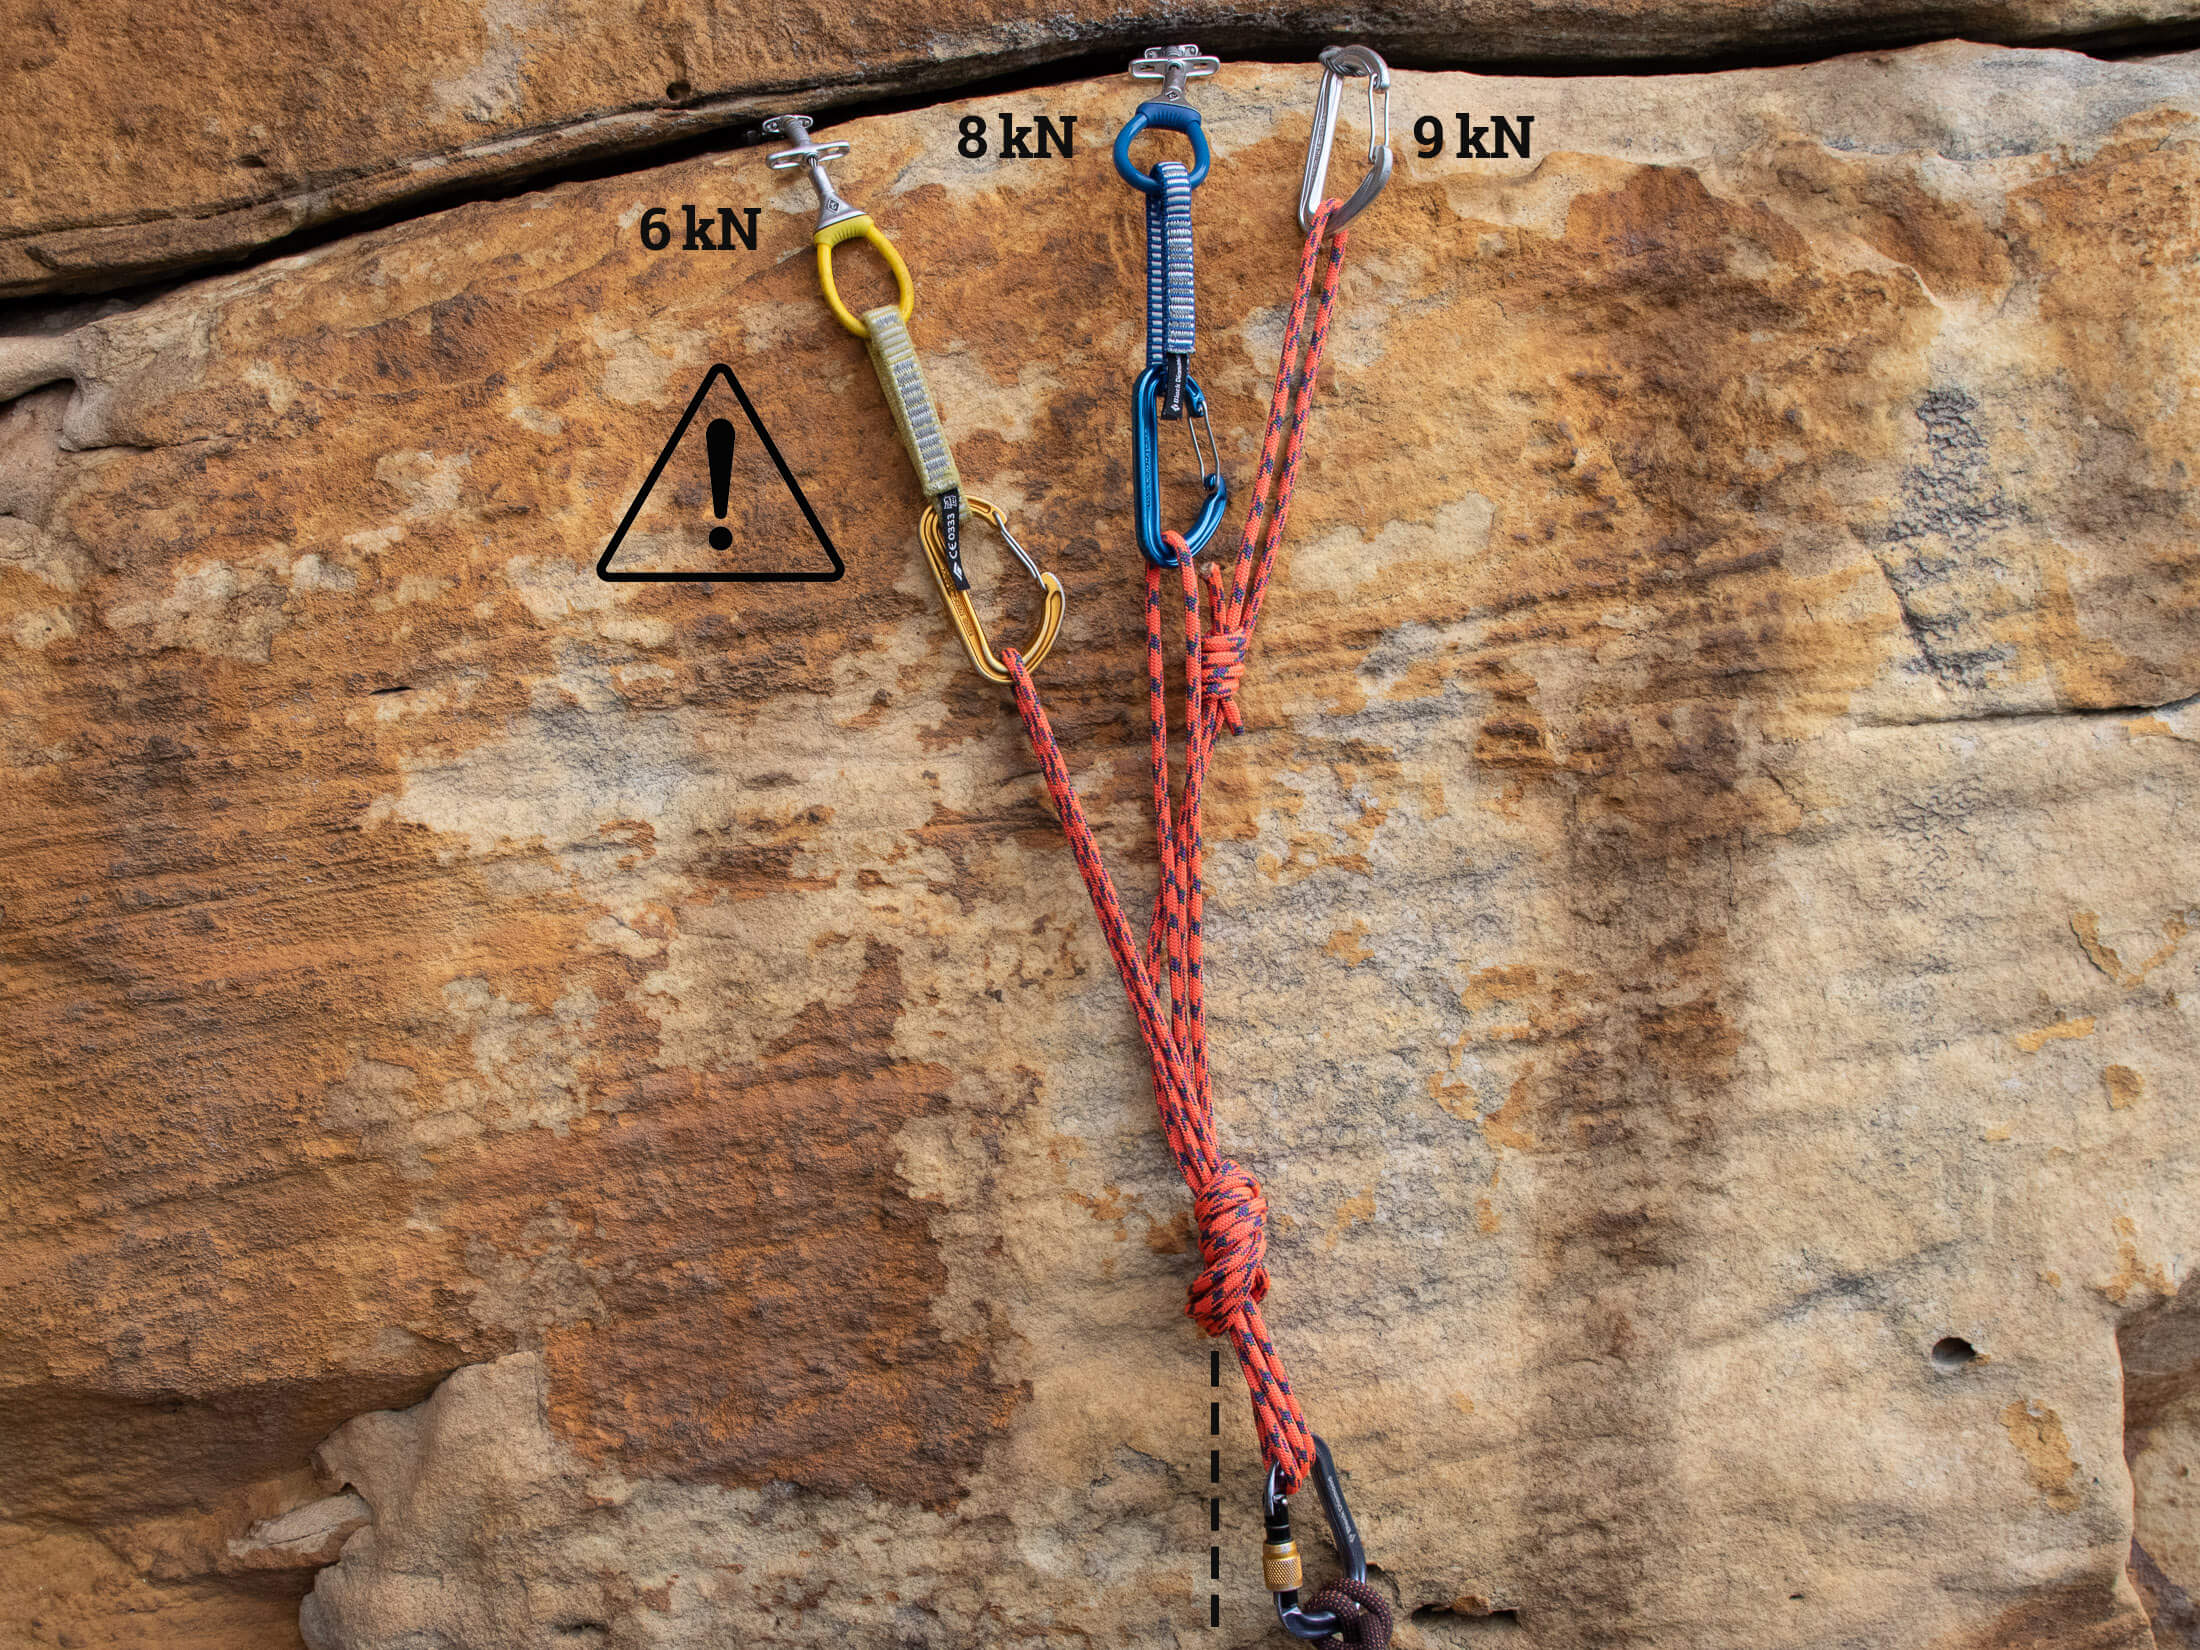
In her mind, 6 kN plus 8 kN plus 9 kN equals 23 kN. She realises that the components probably aren’t perfectly equalised, but then she still overestimates the strength of the anchor by guesstimating it at around 18 kN (She thinks this is conservative). In reality, her anchor will only hold around 9 kN if pulled only slightly off-axis. By failing to understand the forces at work, she has overestimated the holding power of her anchor and lulled herself into a false sense of security.
The second problem with acronym checklists is that they do not encourage the evaluation of different rigging techniques or standards. In some situations a self-distributing anchor is safer even if there’s a slight risk of extension. In other situations, a traditional overhand-knot anchor might be a better solution. Novel situations require anchor builders to assess the strengths and weaknesses of different configurations before choosing the best solution for that situation. This kind of assessment and decision making is far outside the scope of any method that simply ticks boxes. What we need is not a checklist but a protocol that offers a structured way for climbers to approach the many decisions involved in anchor building.
How strong does an anchor need to be?
Climbing instructors and authors talk about anchors needing to be unquestionably strong. But how strong is ‘strong’? An anchor should be capable of withstanding a worst case scenario impact force, and that is a factor 2 fall – one where the leader falls past the belay and the anchor is loaded directly in a downward direction (the rope does not run through any gear). Given the many factors at play in a fall, it’s impossible to say that a factor 2 fall will produce an impact force of X kN. The weight of a climber, diameter and condition of the rope, and even the type of belay device, all contribute to the amount of impact force acted on an anchor.
Sticking with our worst case scenario, let’s say that it’s a 100 kg climber (20 kg heavier than the 80 kg weight used in the standard drop test), a thick and relatively non-stretchy rope, and a Grigri, which allows for the least amount slippage and energy absorption. In this scenario, it is possible to generate as much as 10 kN in a factor 2 fall. Let’s consider that a minimum then. Some might say why stop at 10 kN? Why not 14 kN, which you can generate in a fall onto a static sling? The reason is efficiency. In many situations, building an anchor capable of withstanding 14 kN will take more time and gear than one designed to withstand a 10 kN impact force.
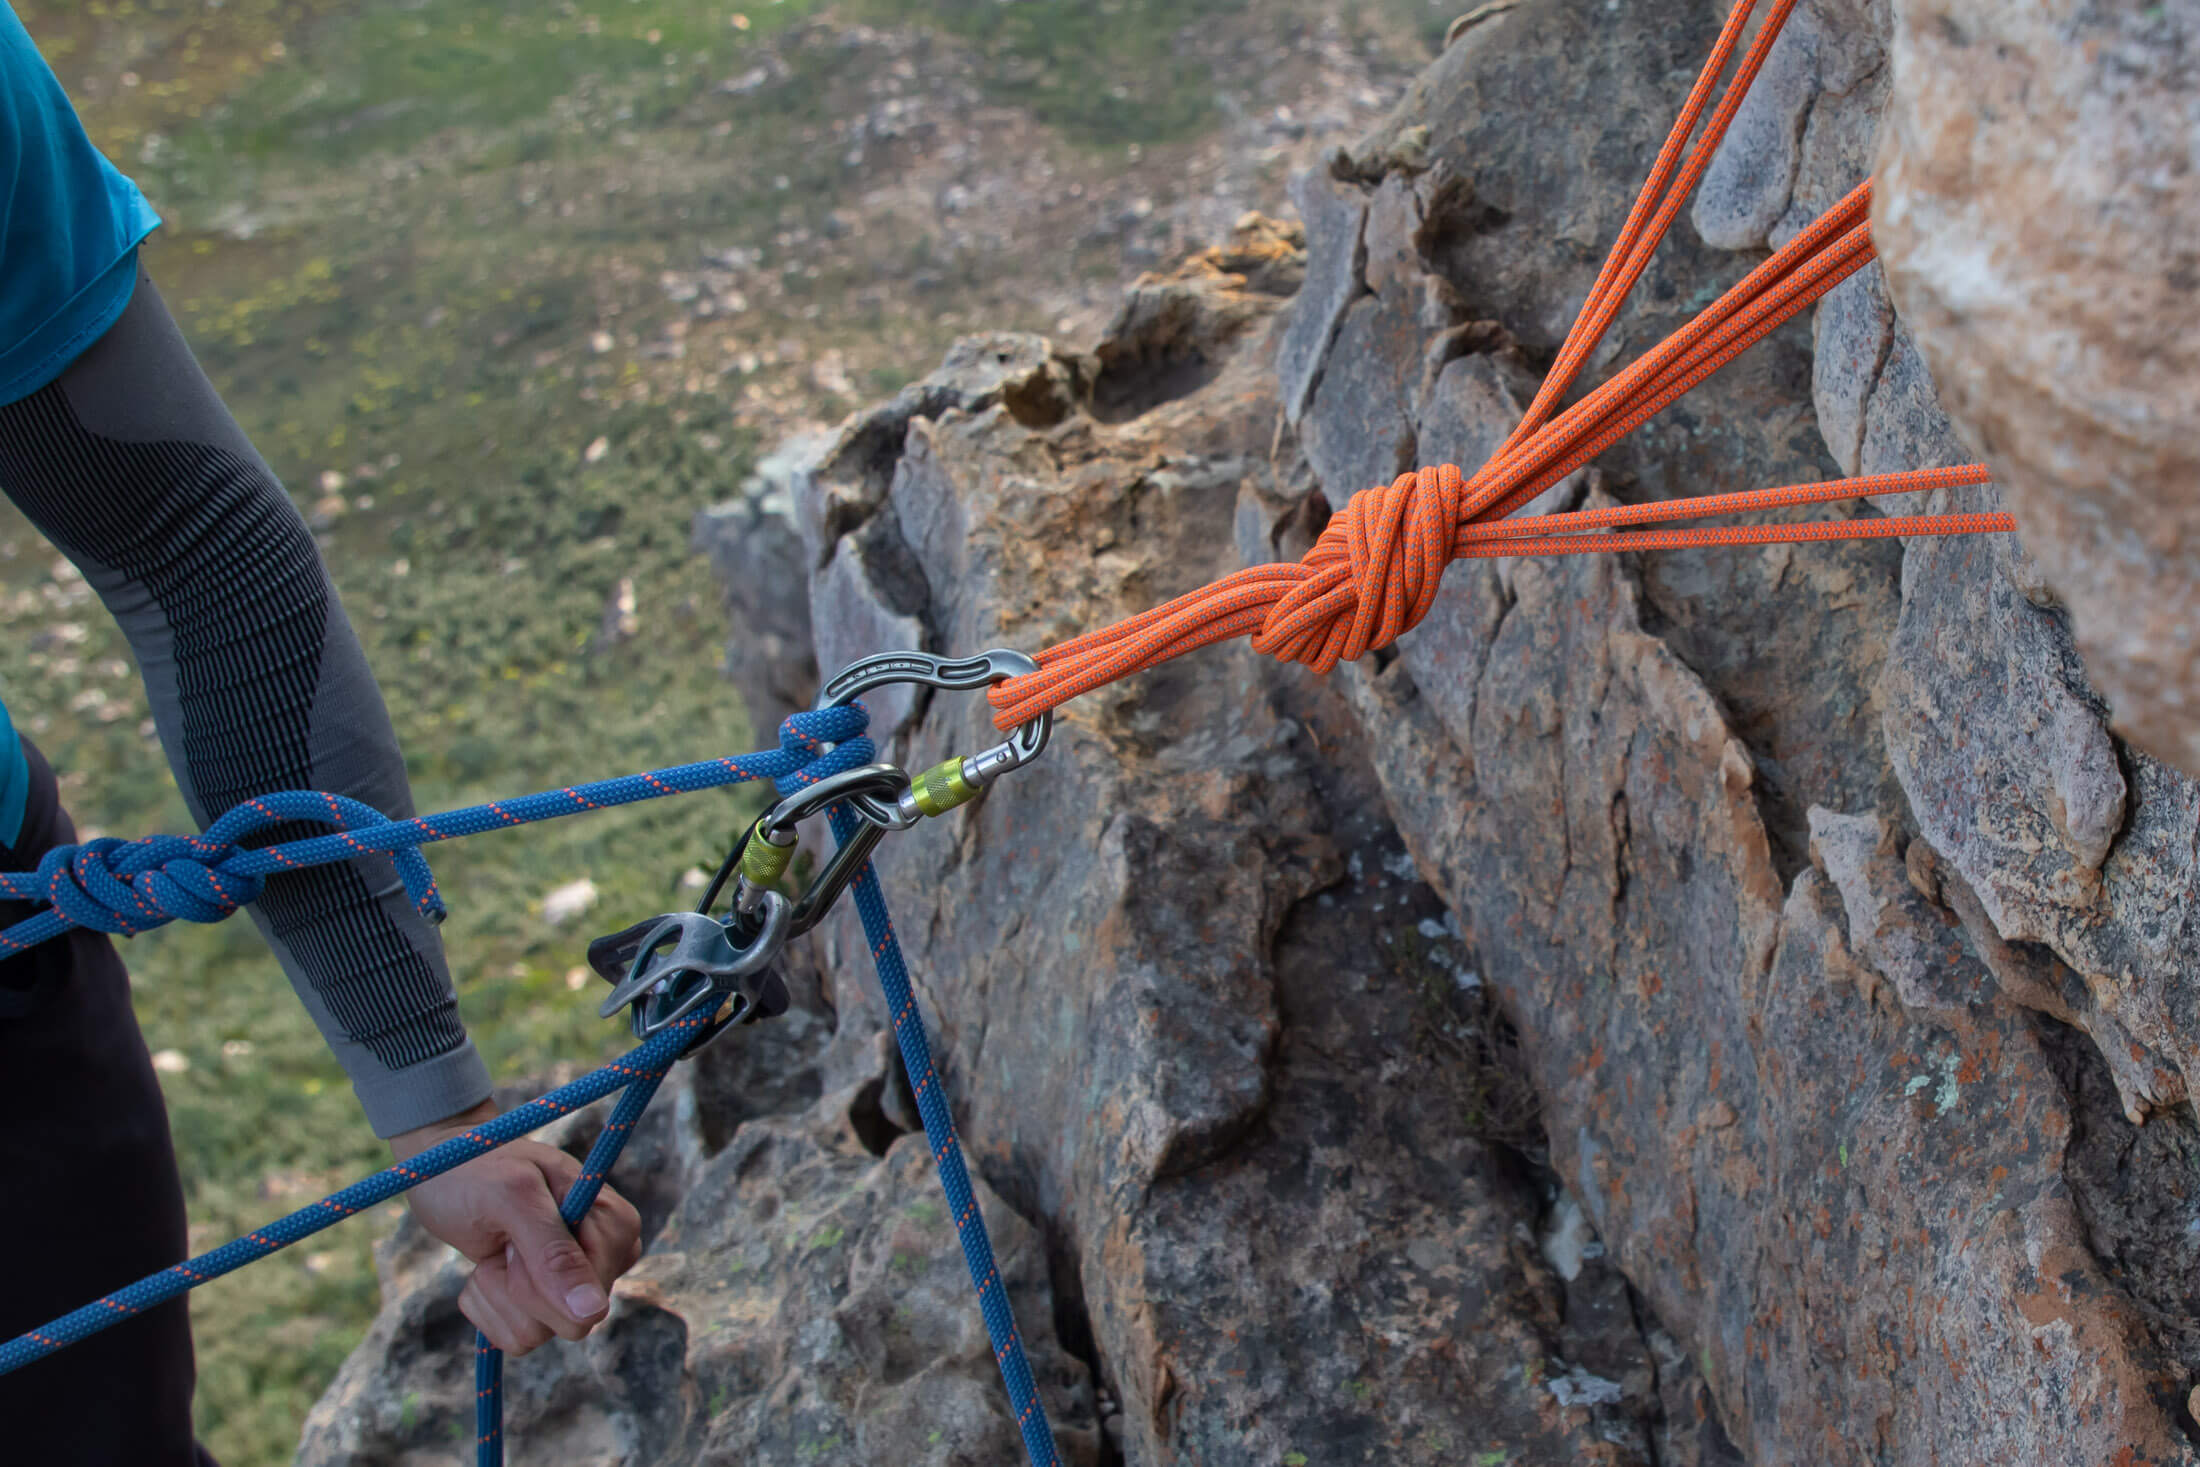
So, we have to choose between efficiency and an anchor’s ability to withstand the kind of impact force that can only be generated in a very unlikely scenario (one that is easy to prevent). Given that a 14 kN fall can cause serious injury or death even if the gear doesn’t break, it’s better to just not put yourself in a position where this kind of fall is even possible. Never climb above your anchor when your connection to the anchor is static. On that note, there is actually no reason to use a static sling as a leash when you can use the rope.
Factors affecting component strength
Having strong components is the most important requirement in building anchors – far more important than which rigging technique you use. If your anchors are unquestionably strong, it doesn’t matter whether you combine them with a quad, overhand-knot anchor, or rope anchor. Of course, now we have a definition problem. How strong is ‘strong’? Your anchor needs to be able to withstand a worst-case scenario impact force, and that is a factor 2 fall – one straight onto the anchor. In falls this severe, it’s possible to generate forces as high as 10 kN, so it follows that your anchor and ideally every component should be able to withstand the same kind of force.
Note: Anchor strength does not equal gear strength. There are two reasons that an anchor might fail at a load load that is less than the specified gear rating. There are three things that determine a component’s total strength: the actual gear strength rating (expressed in kN), the quality of the placement, and the quality of the rock.
Gear strength
This is the strength that a piece of gear is rated for. Protection can actually fail at lower forces if it's loaded over a sharp or placed badly, but generally this is the load you can expect a piece of gear to hold if placed properly and in good rock.
Rock quality
Functionally, a component is only as strong as the rock it is placed in. Don’t place gear in fractured or friable rock unless you have no other choice and you can mitigate the risk of a component failure.
Placement
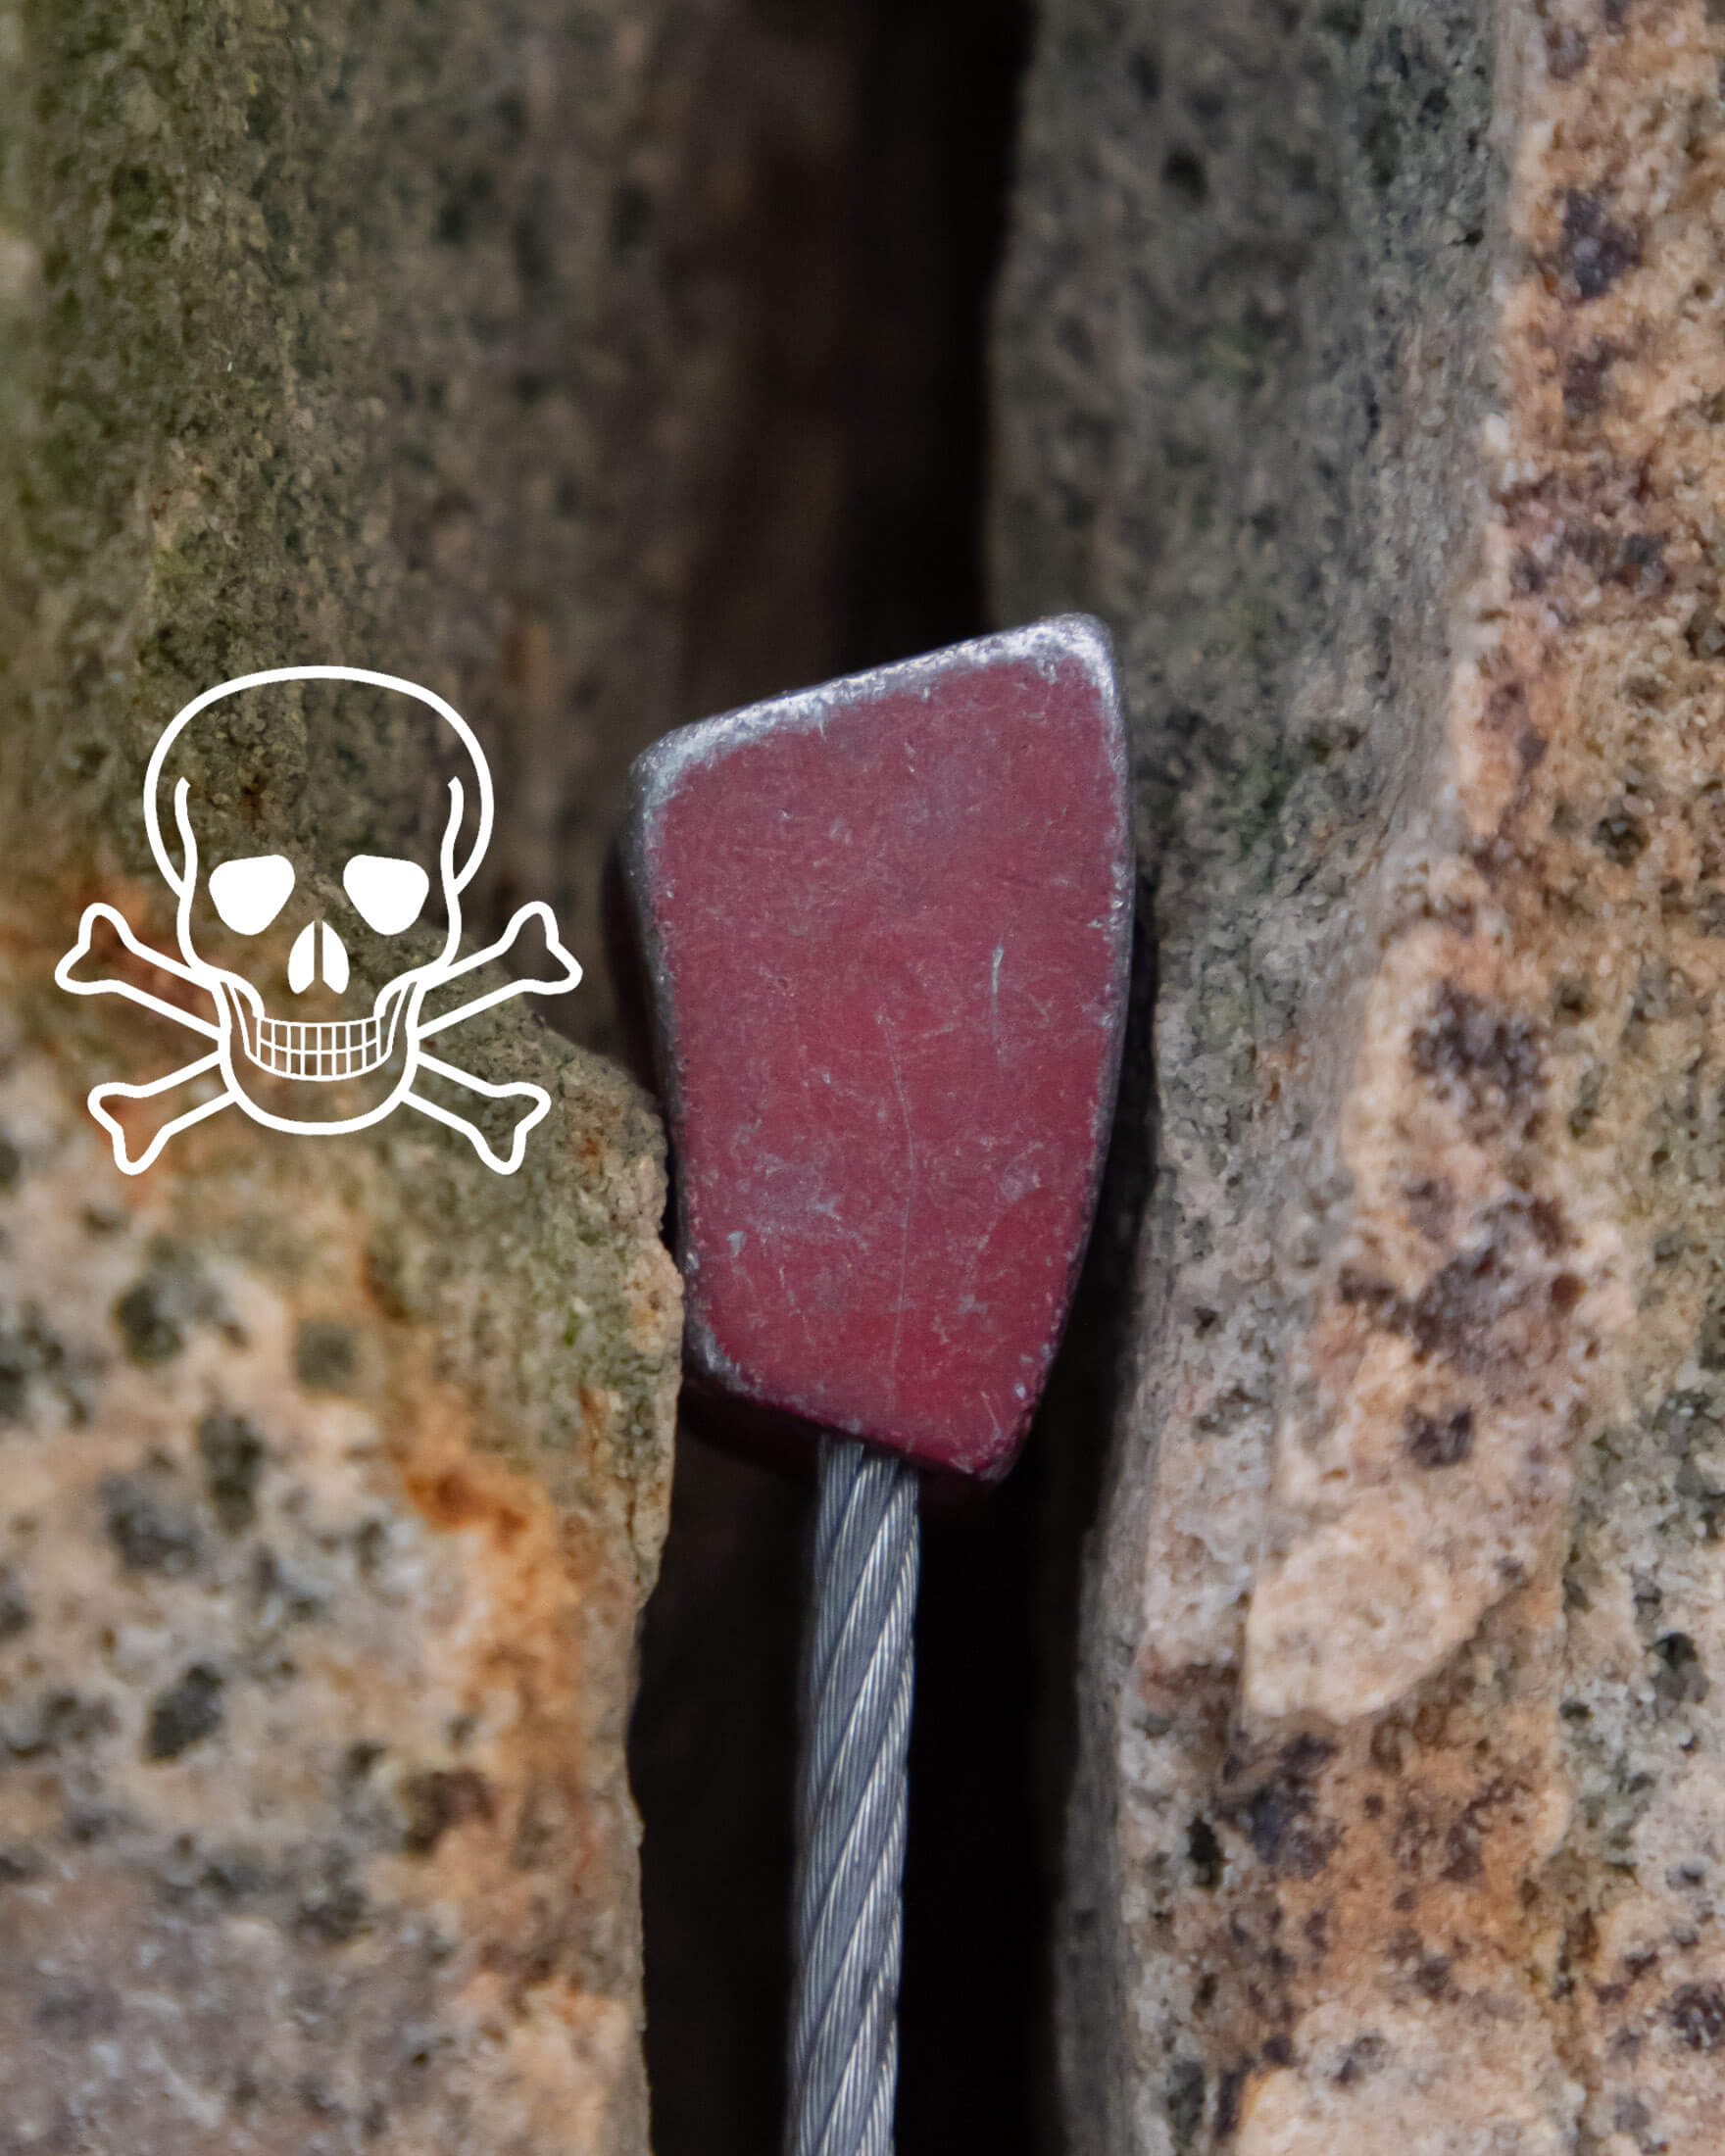
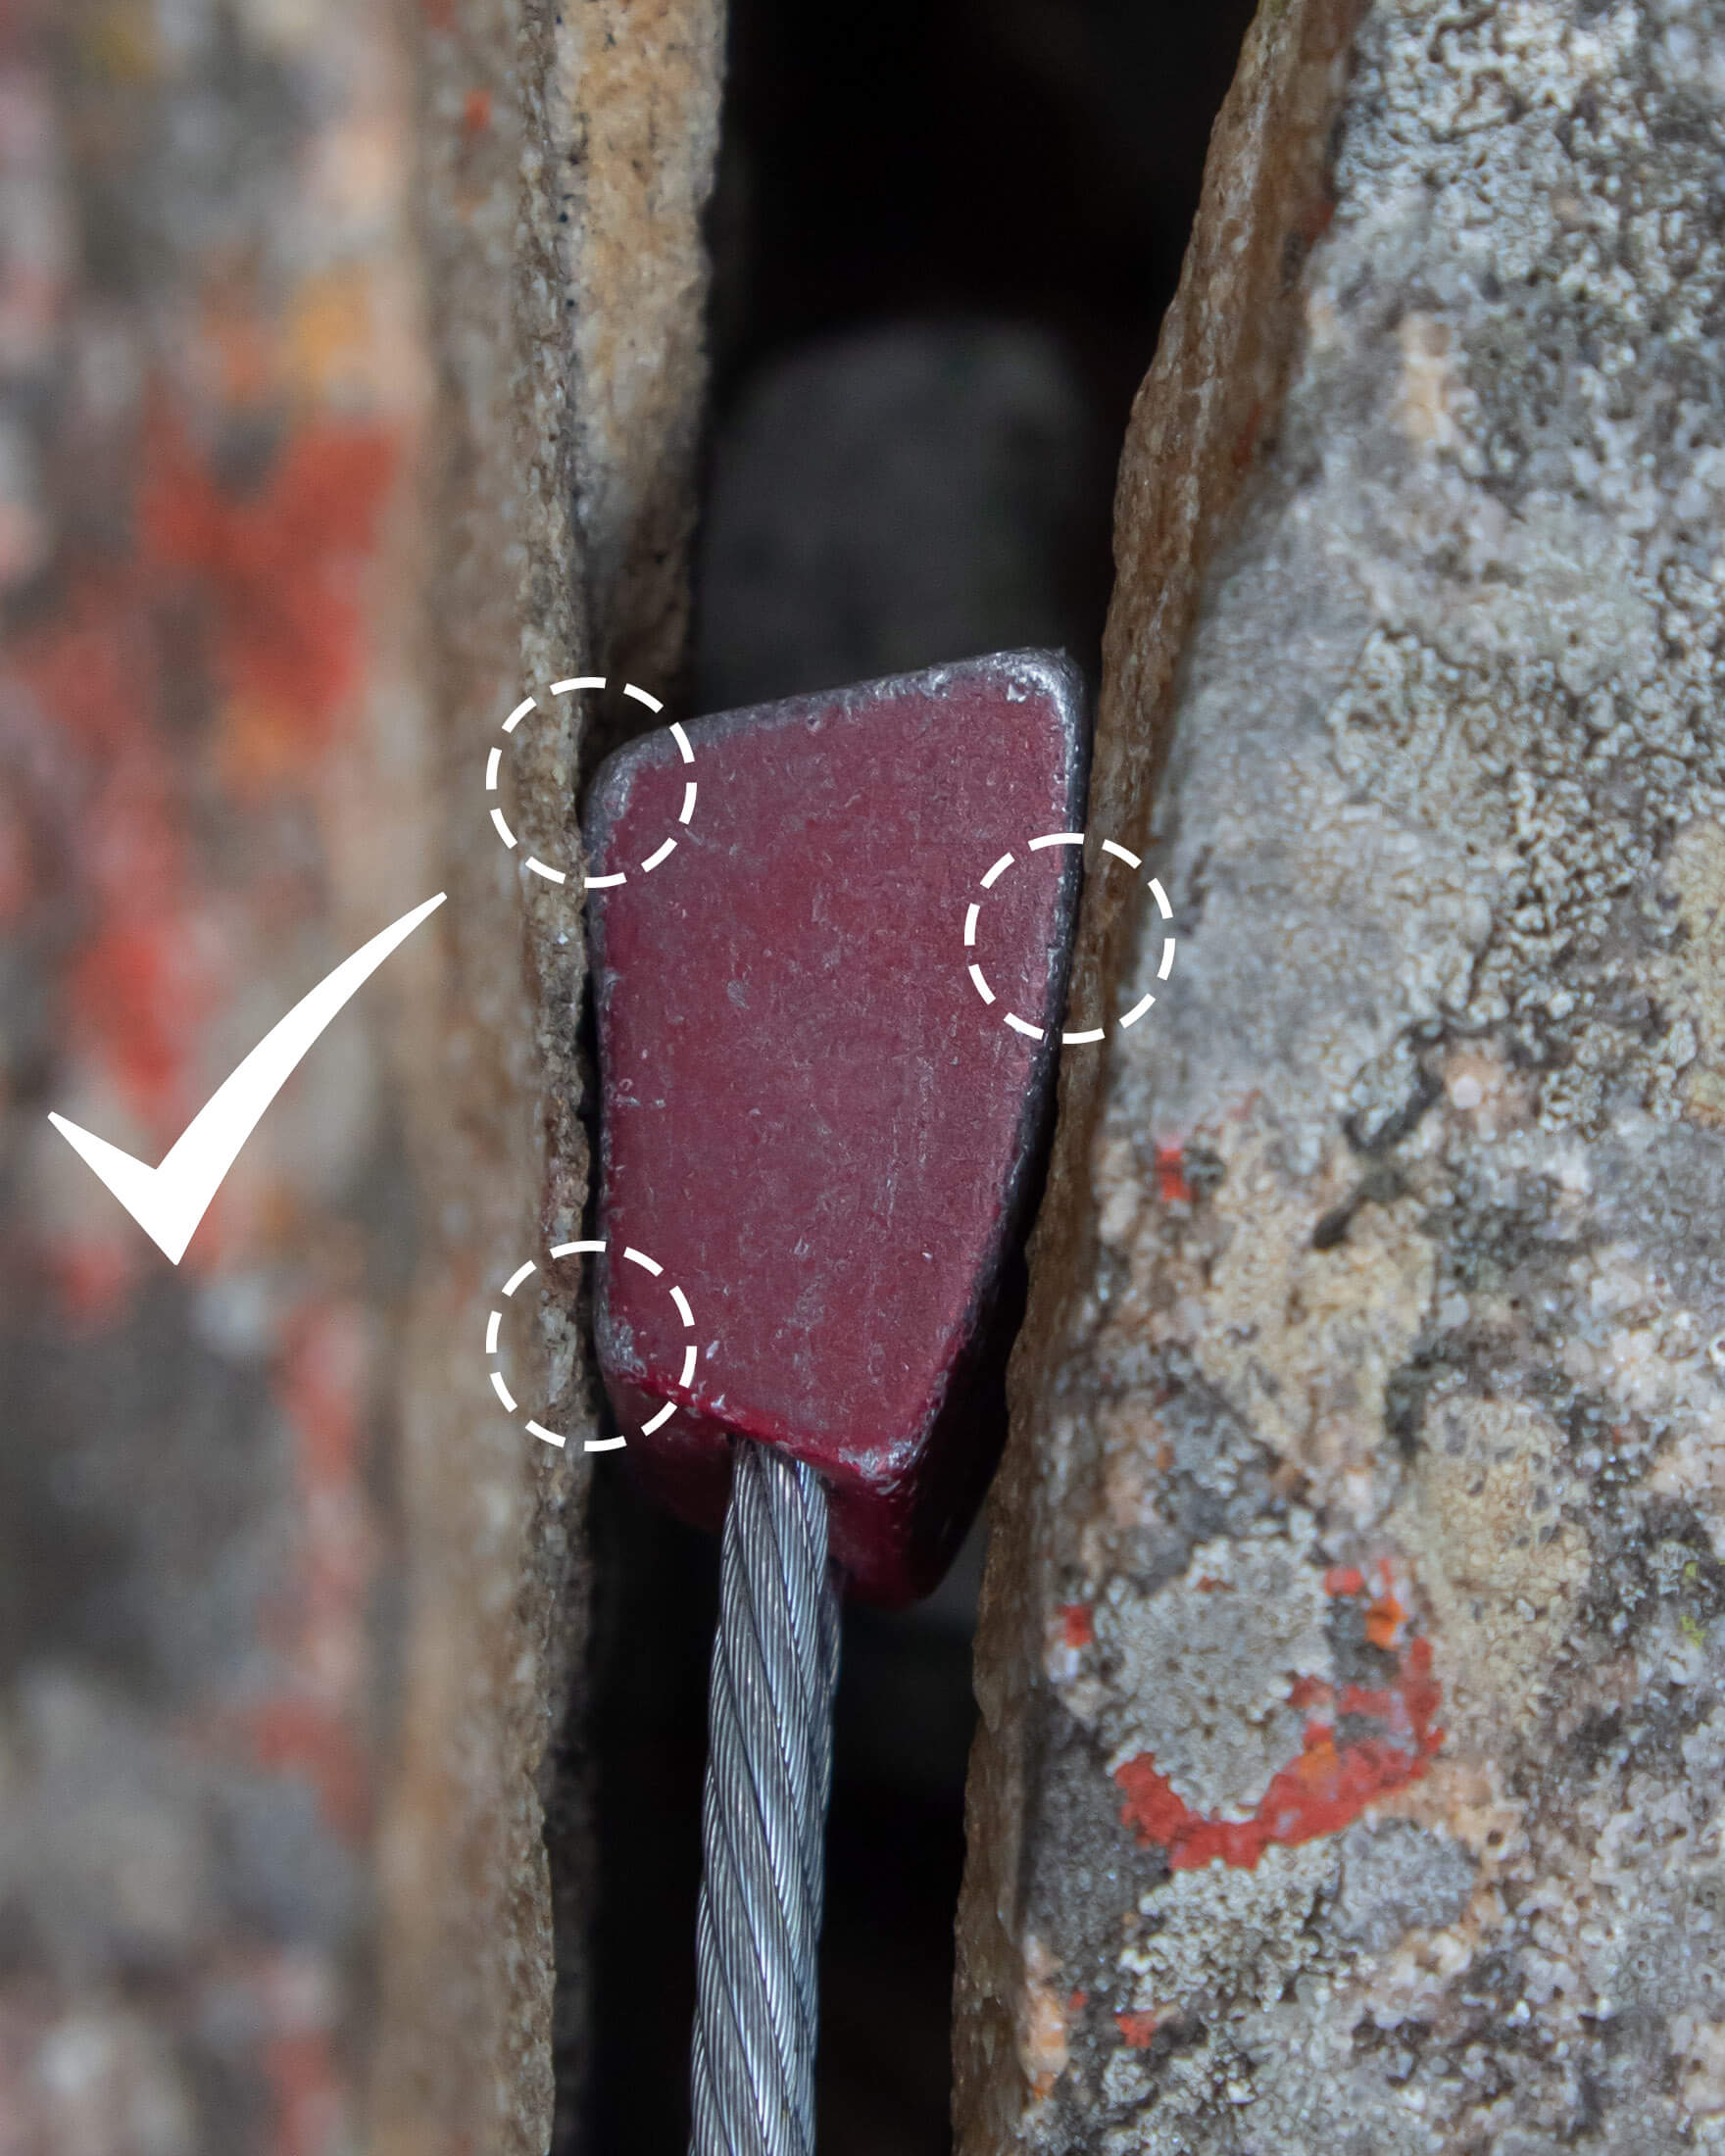
A poor placement in bullet hard rock is also not good. A solid placement puts a component in an orientation that matches the direction of pull, ensures maximum surface contact with the rock, and gives the piece some room to walk a little (if it’s a cam).
Load distribution
You probably already know that the total holding power of an anchor is significantly lower than the sum of their components’ load bearing abilities. But now it’s important to also understand why. In the real world, anchors are almost never loaded perfectly on-axis. In the vast majority of belay situations, the anchor is pulled several degrees off-axis, and that skews load distribution.
Pre-distributed vs self-distributing anchors
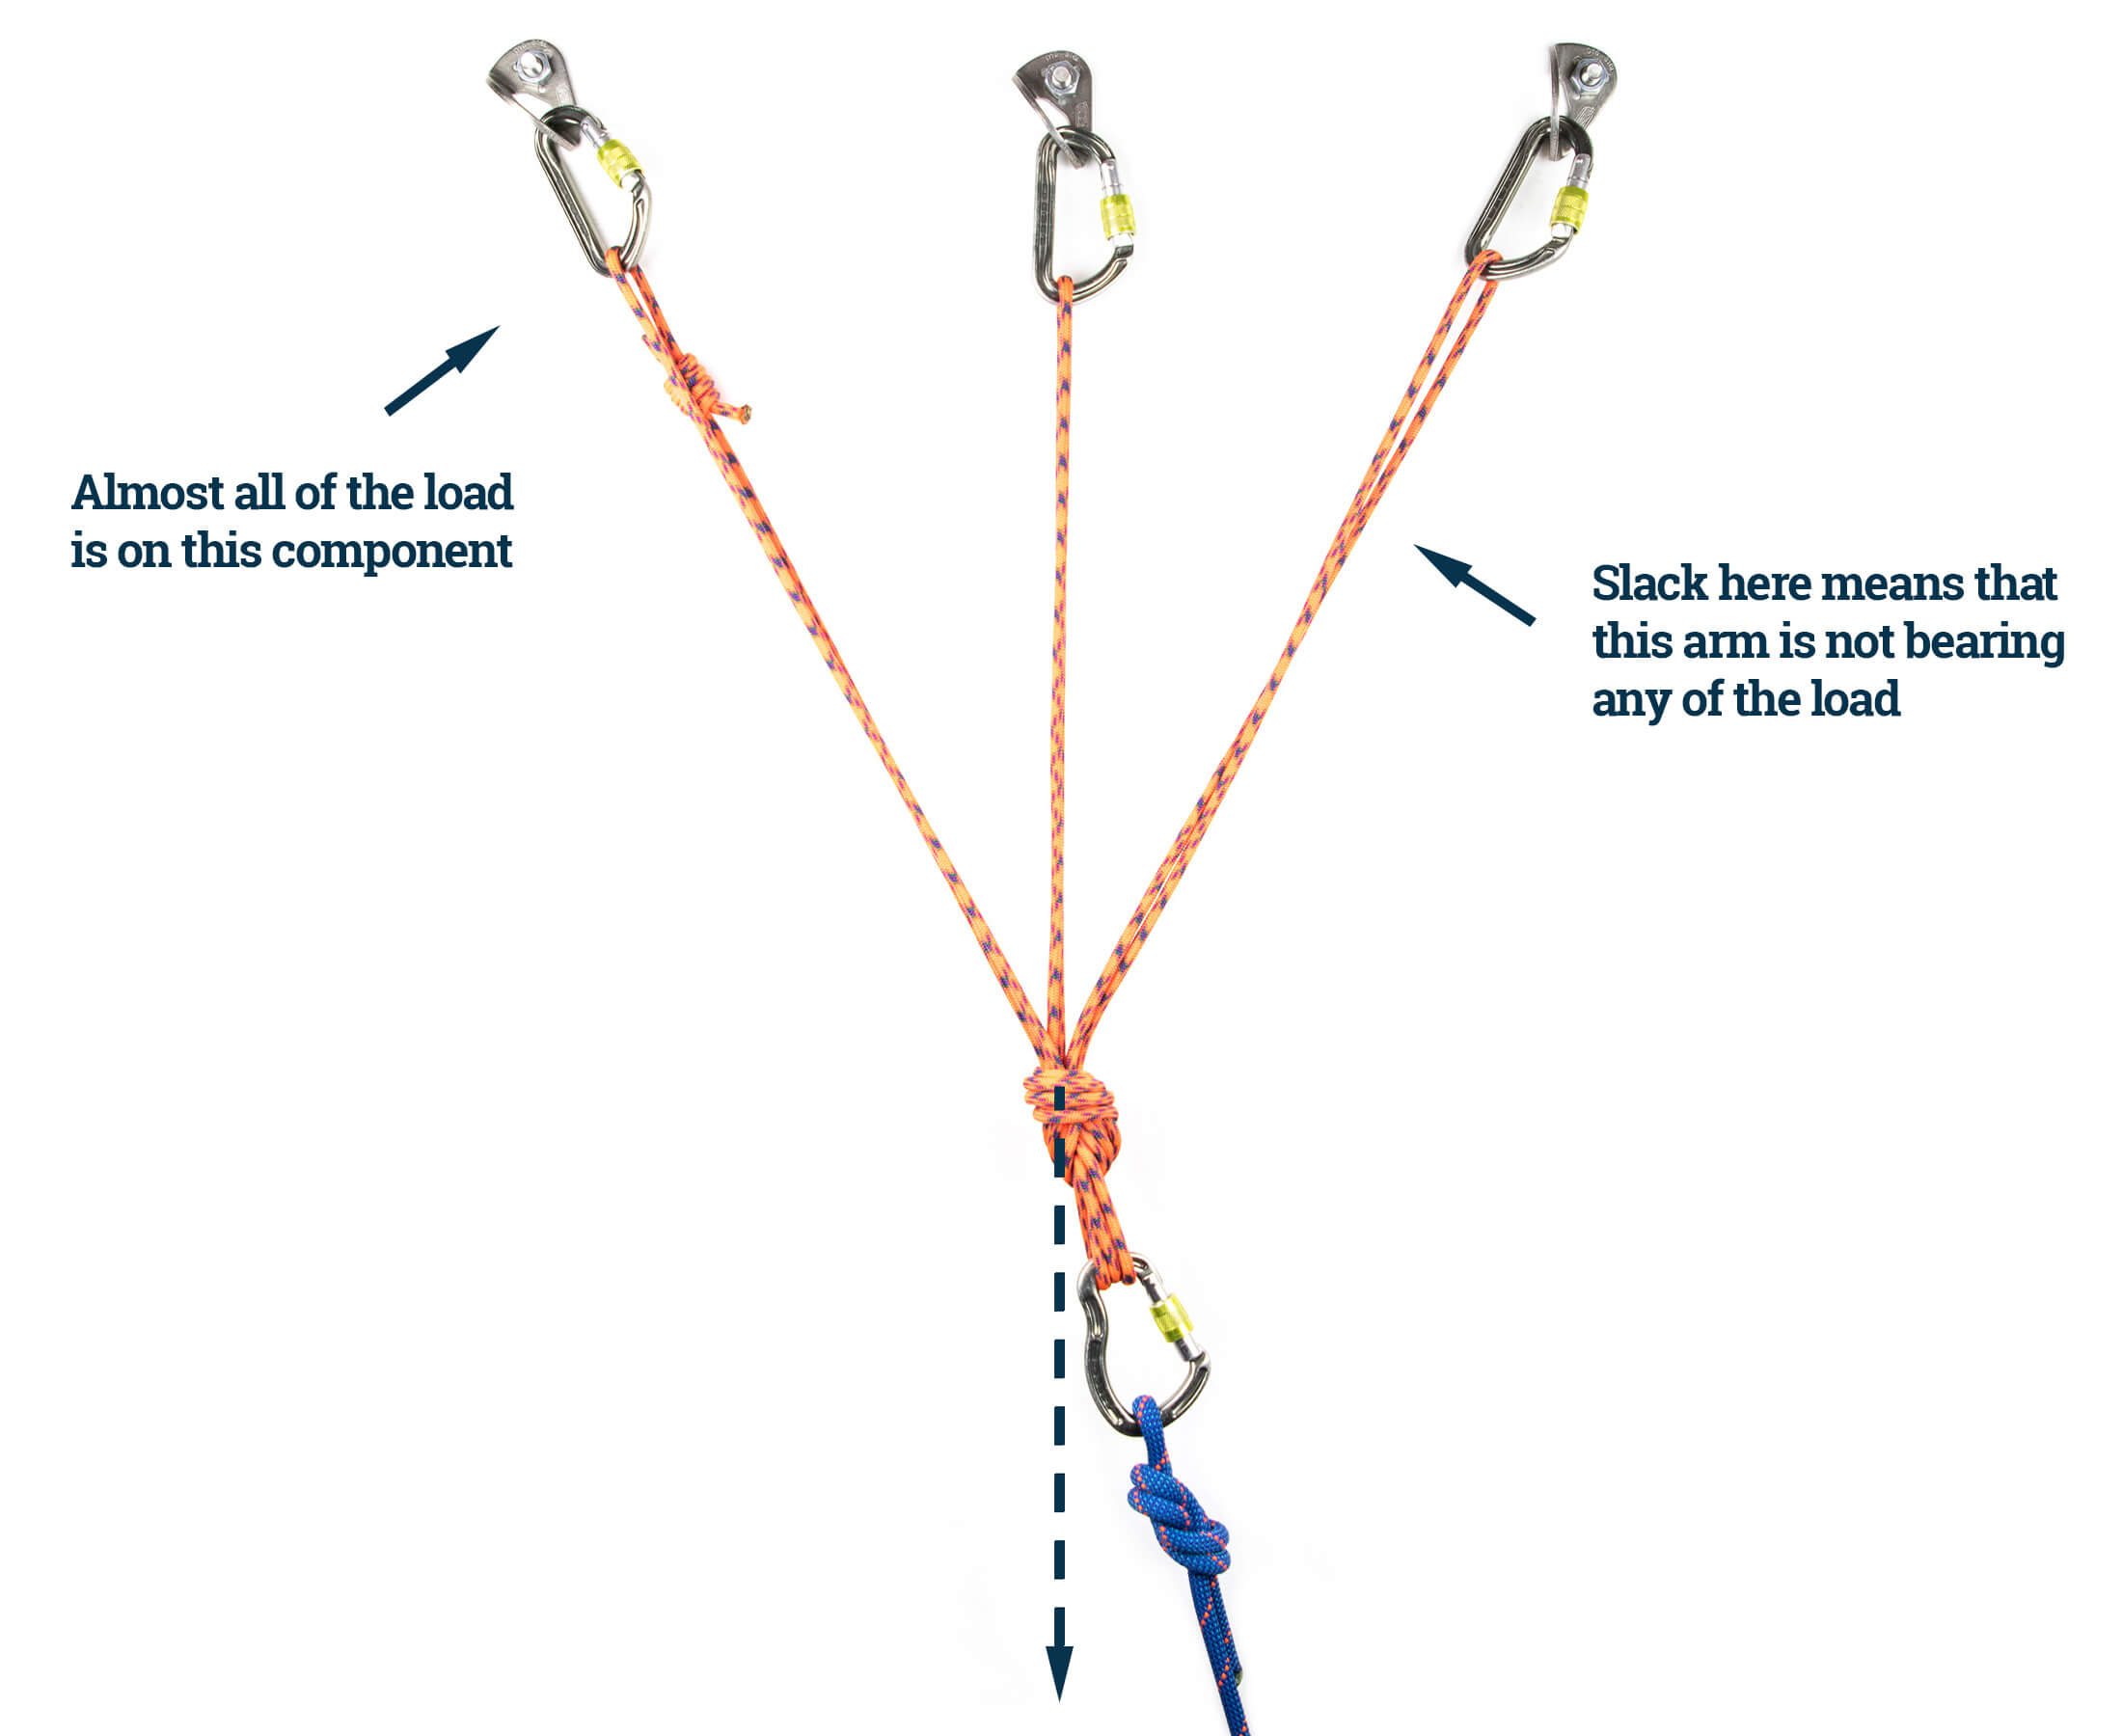
In pre-distributed anchors like the traditional overhand-knot configuration, all or most of the load is put on a single component when the anchor is pulled evenly slightly off-axis. What this means is that an anchor with a strongest component of 10 kN might only be capable of withstanding an impact force of, you guessed it, 10 kN.
Self-distributing anchors, on the other hand, do a much better job of sharing the load between components, although the degree of distribution varies from technique to technique. When a sliding X self-adjusts, as it does when the anchor is pulled off-axis, friction created by the twist at the master point causes a greater share of the load to be placed on one of the two arms. The difference here can be as much as 30/70%. The quad, which has no twist, achieves more equitable distribution – somewhere in the region of 45/55%.
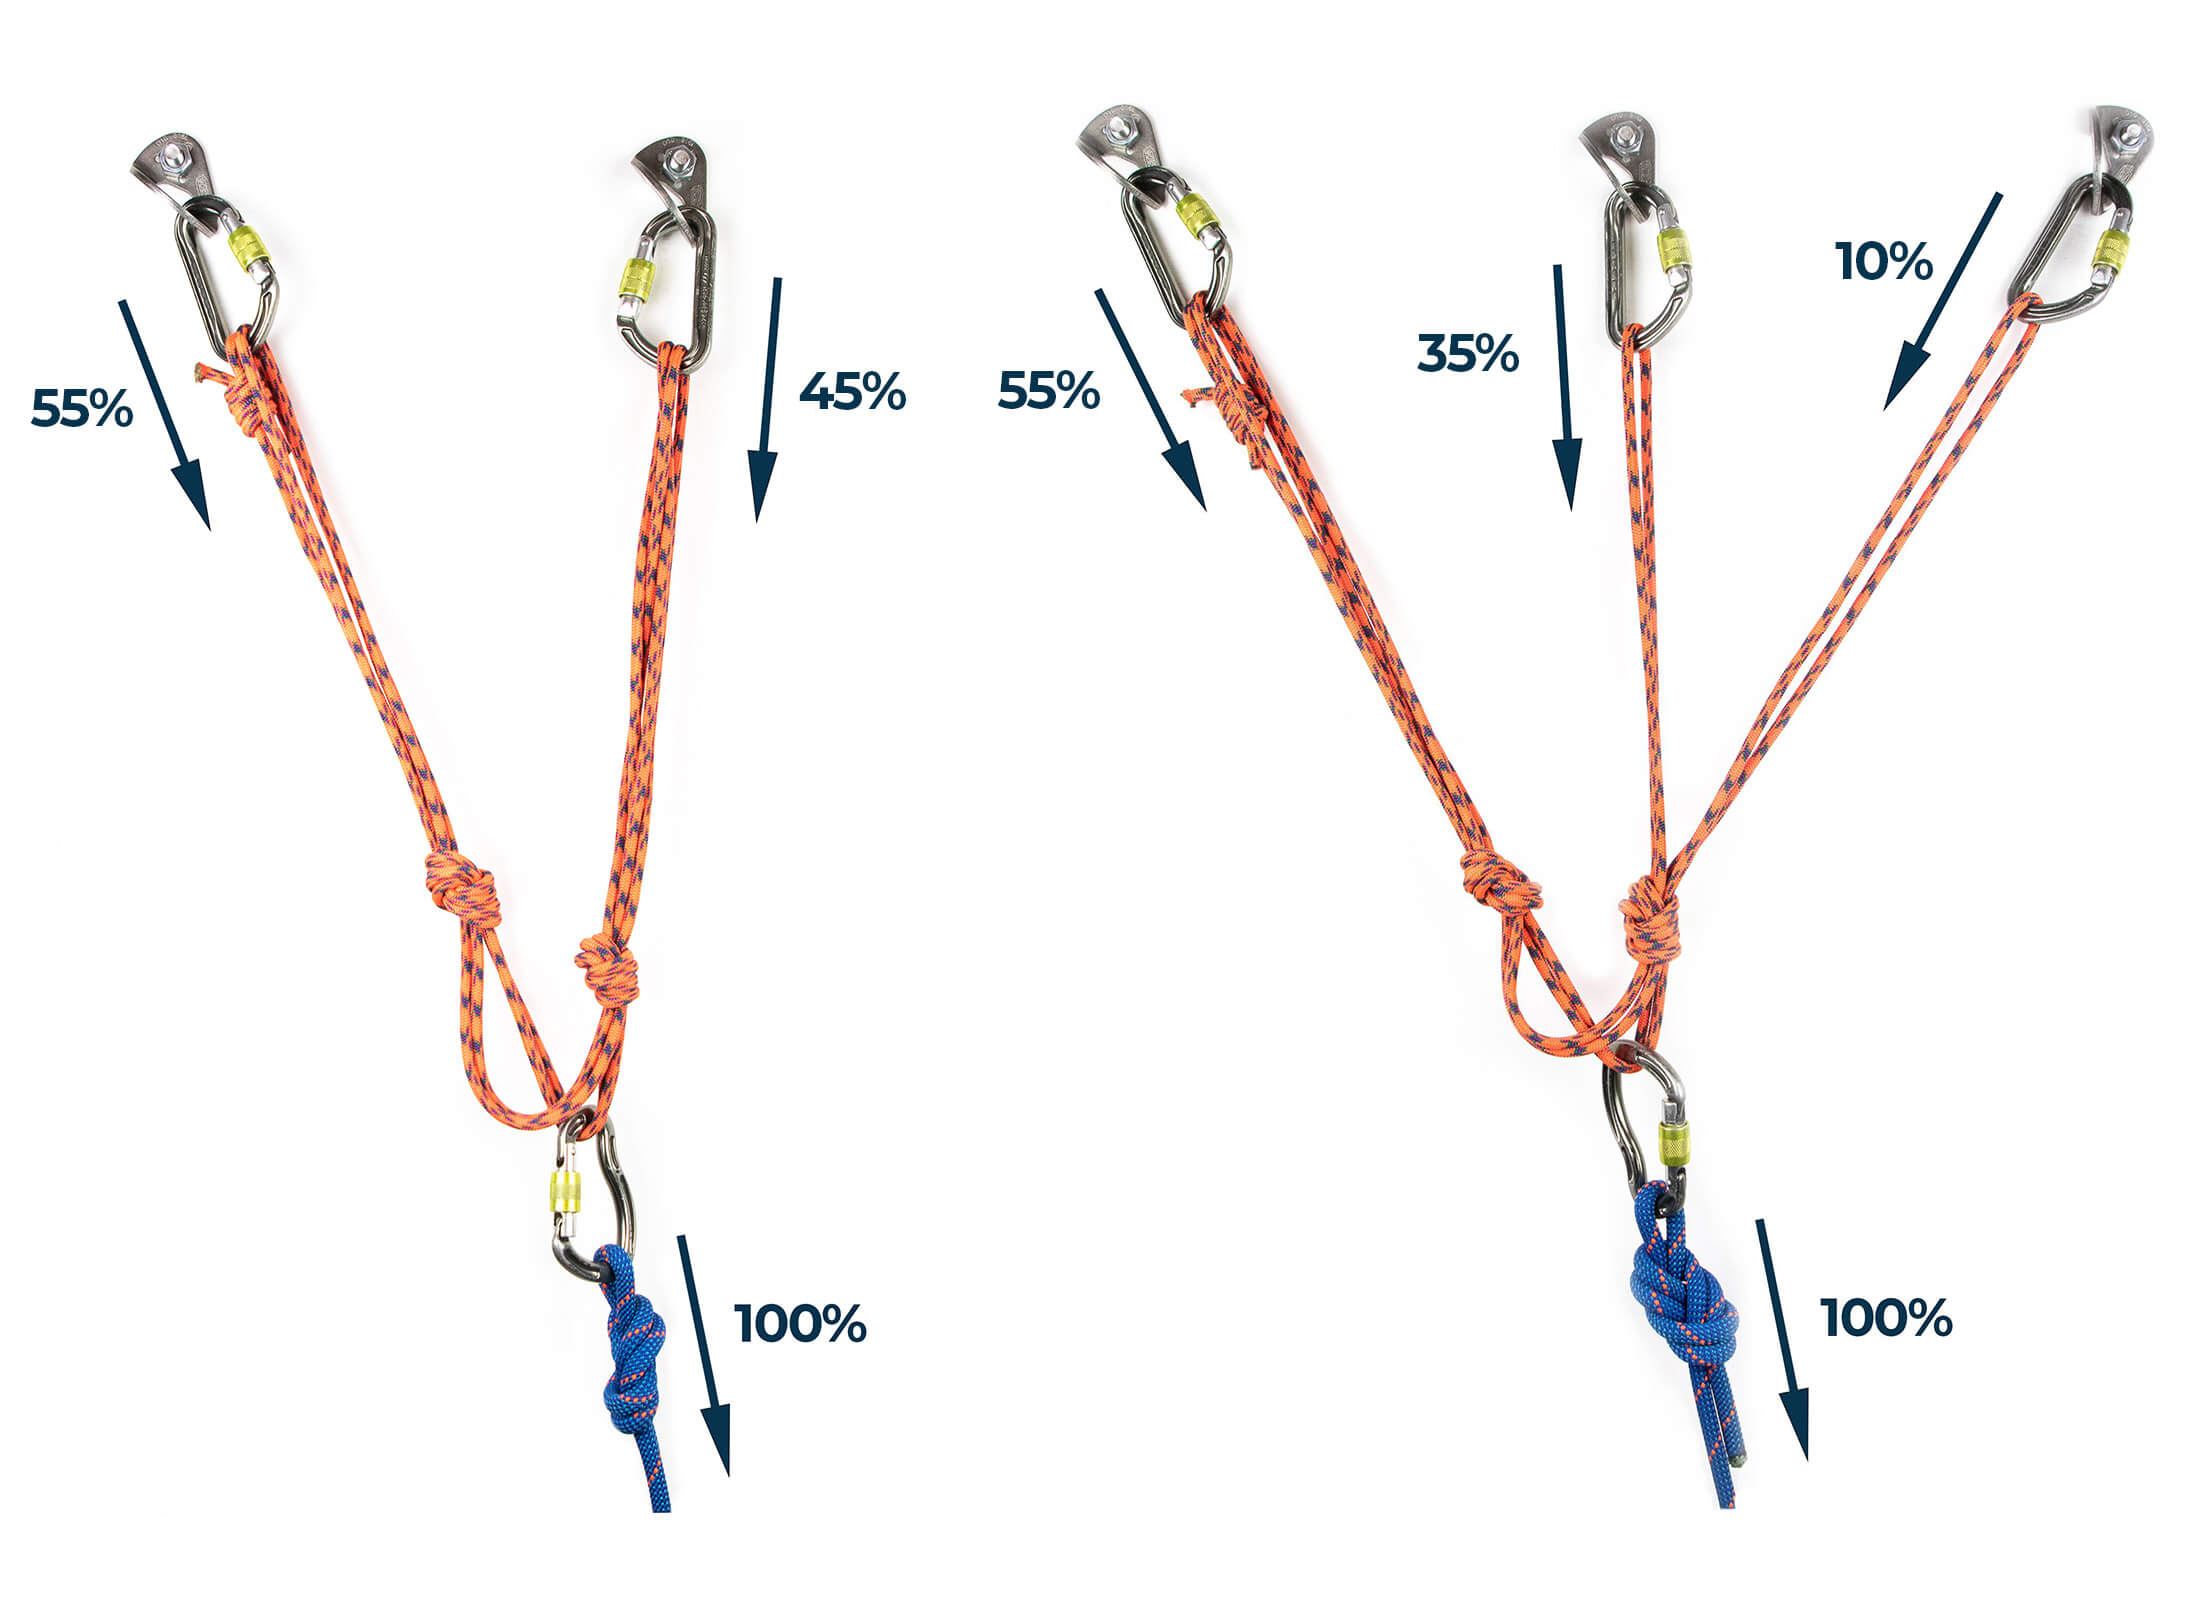
But then things get slightly more complicated with 3-piece quads. In the standard 3-piece quad, two components share a single arm. They might be on their own strands, but these split from the same limiting knot, which is not self-distributing. As would happen with an overhand-knot anchor, much of the load would be put on just one of the two components if the anchor was pulled off-axis. This type of anchor is best described as a hybrid system.
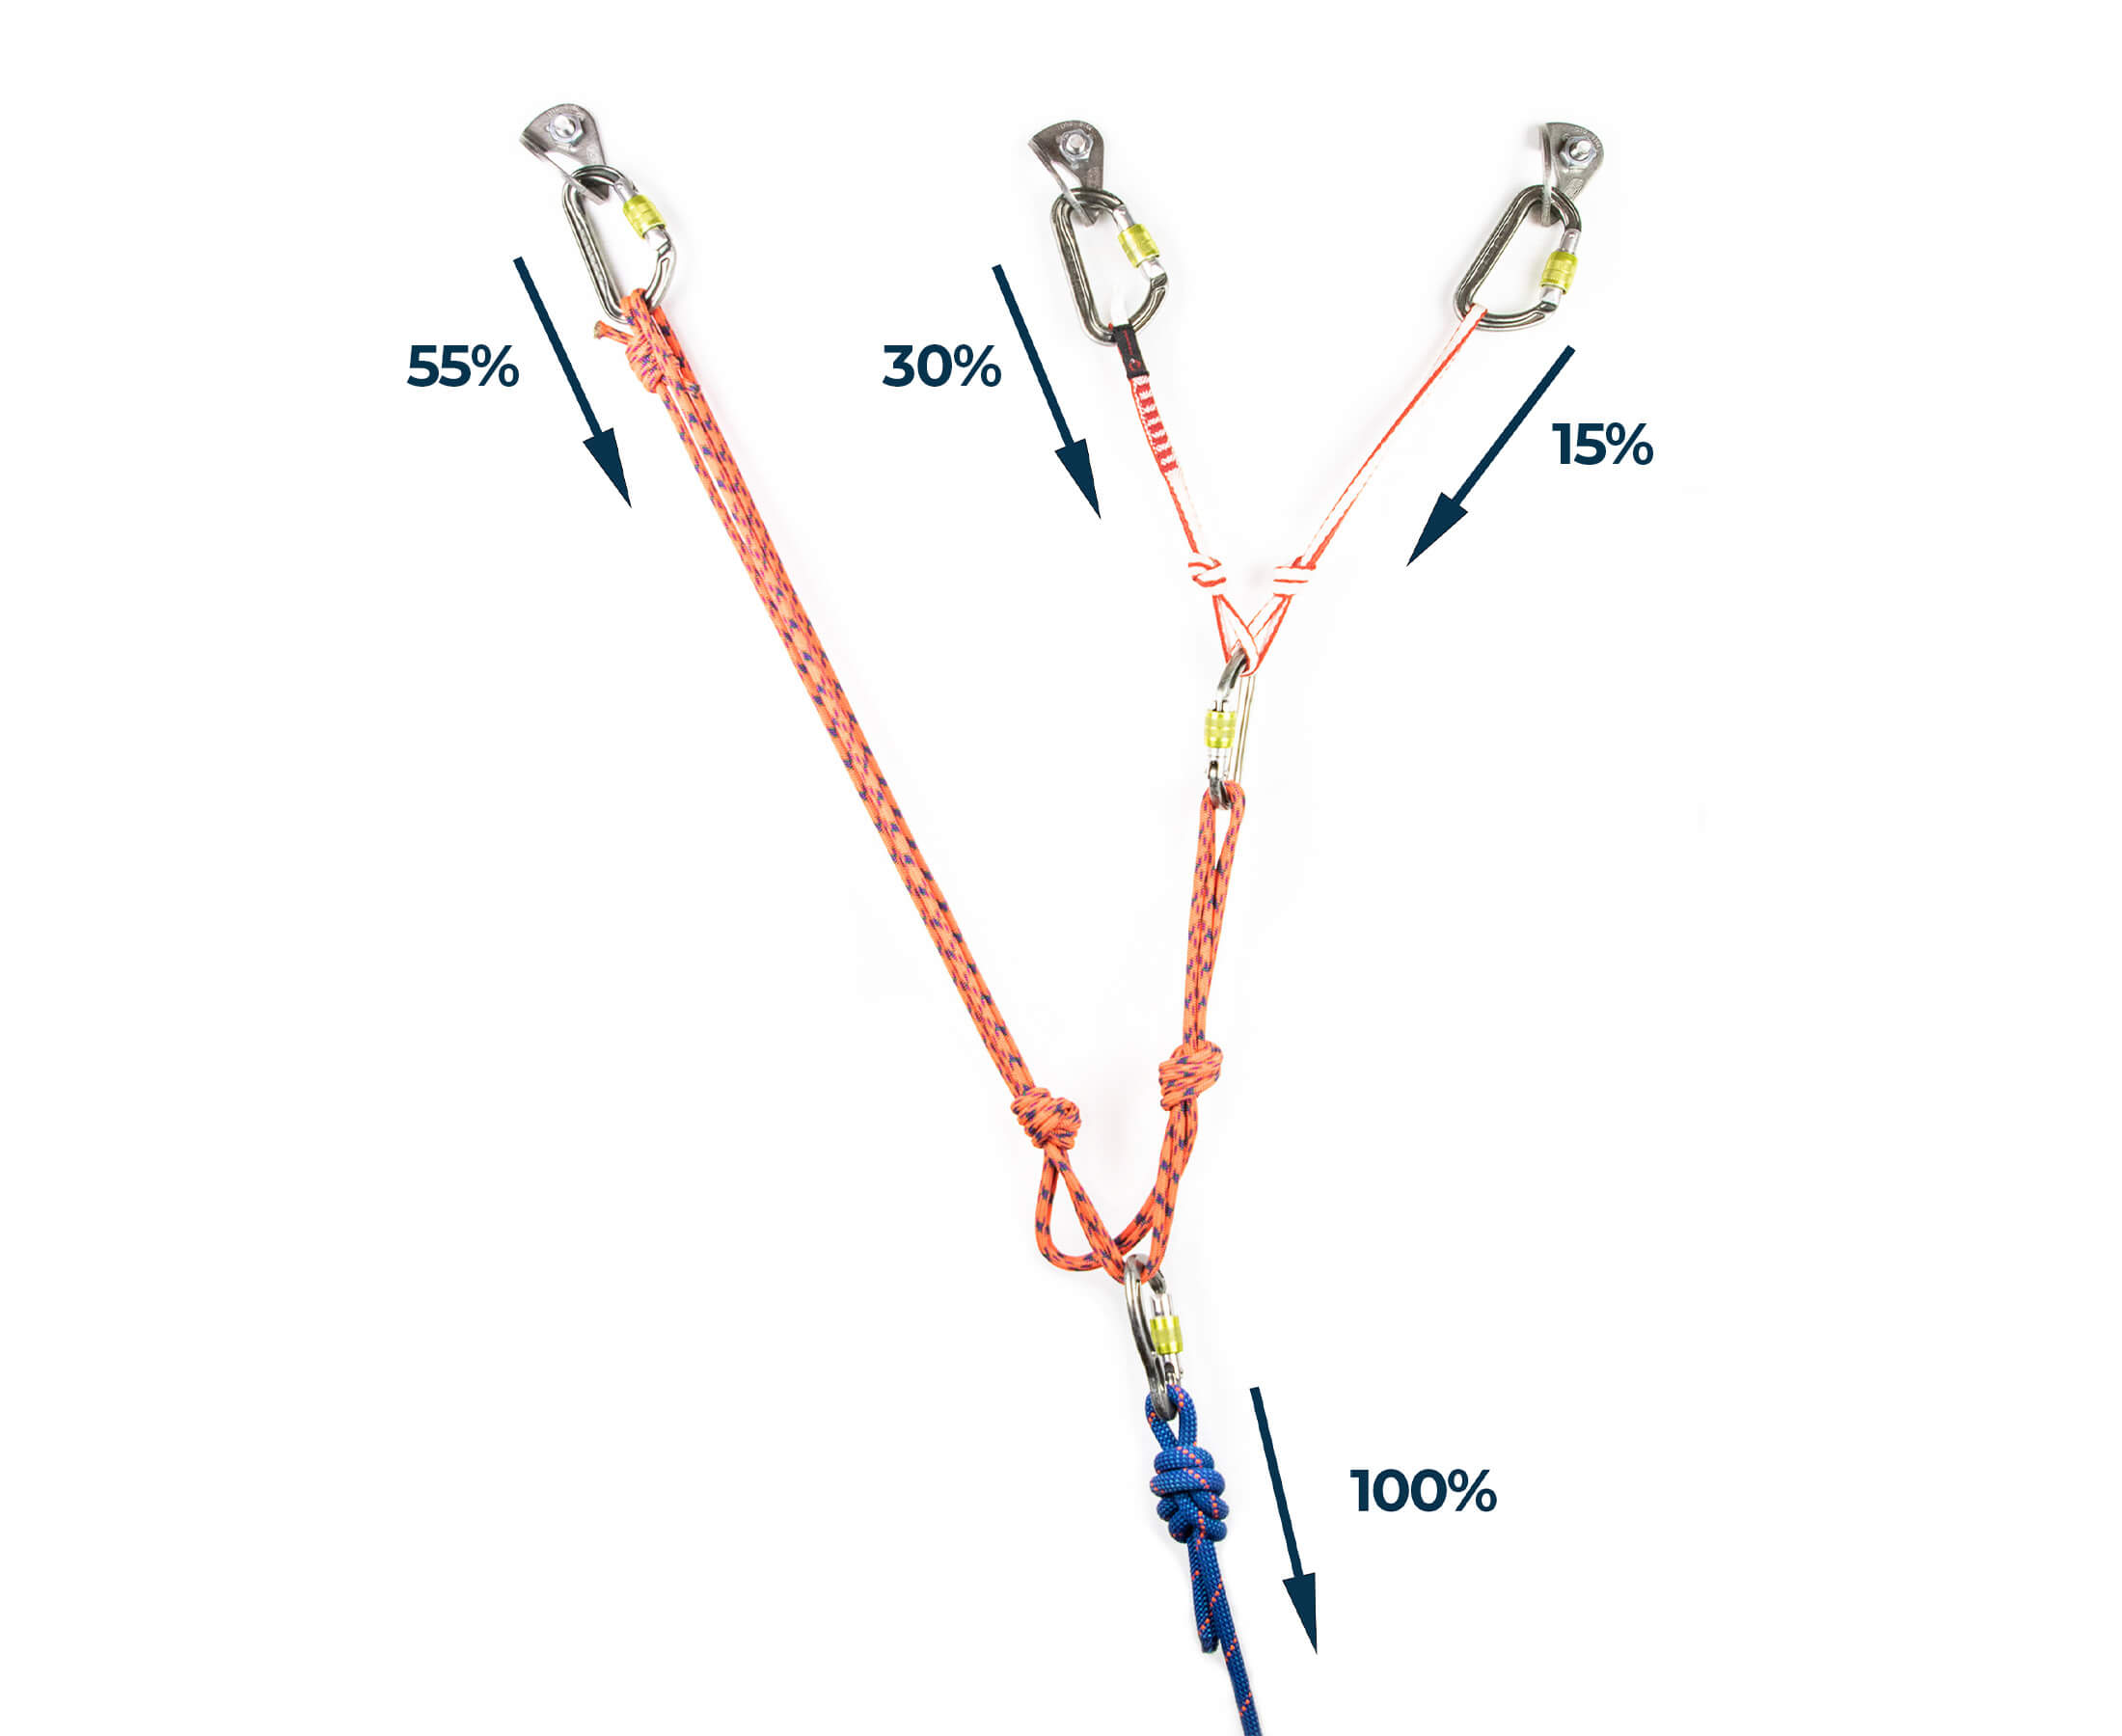
To ensure effective distribution at both distribution points (50/25/25% load distribution), the anchor builder would have to create a composite anchor with a second quad or sliding X at the second distribution point.
Equalisation vs distribution
If up until now, you have been trying to achieve equalisation, a load distribution of 50/25/25% might seem far from ideal. But in many cases, it’s actually what we need. Most trad anchors are comprised of components of different strengths, and the goal in this case should be to distribute load forces more or less according to the strength of those pieces.
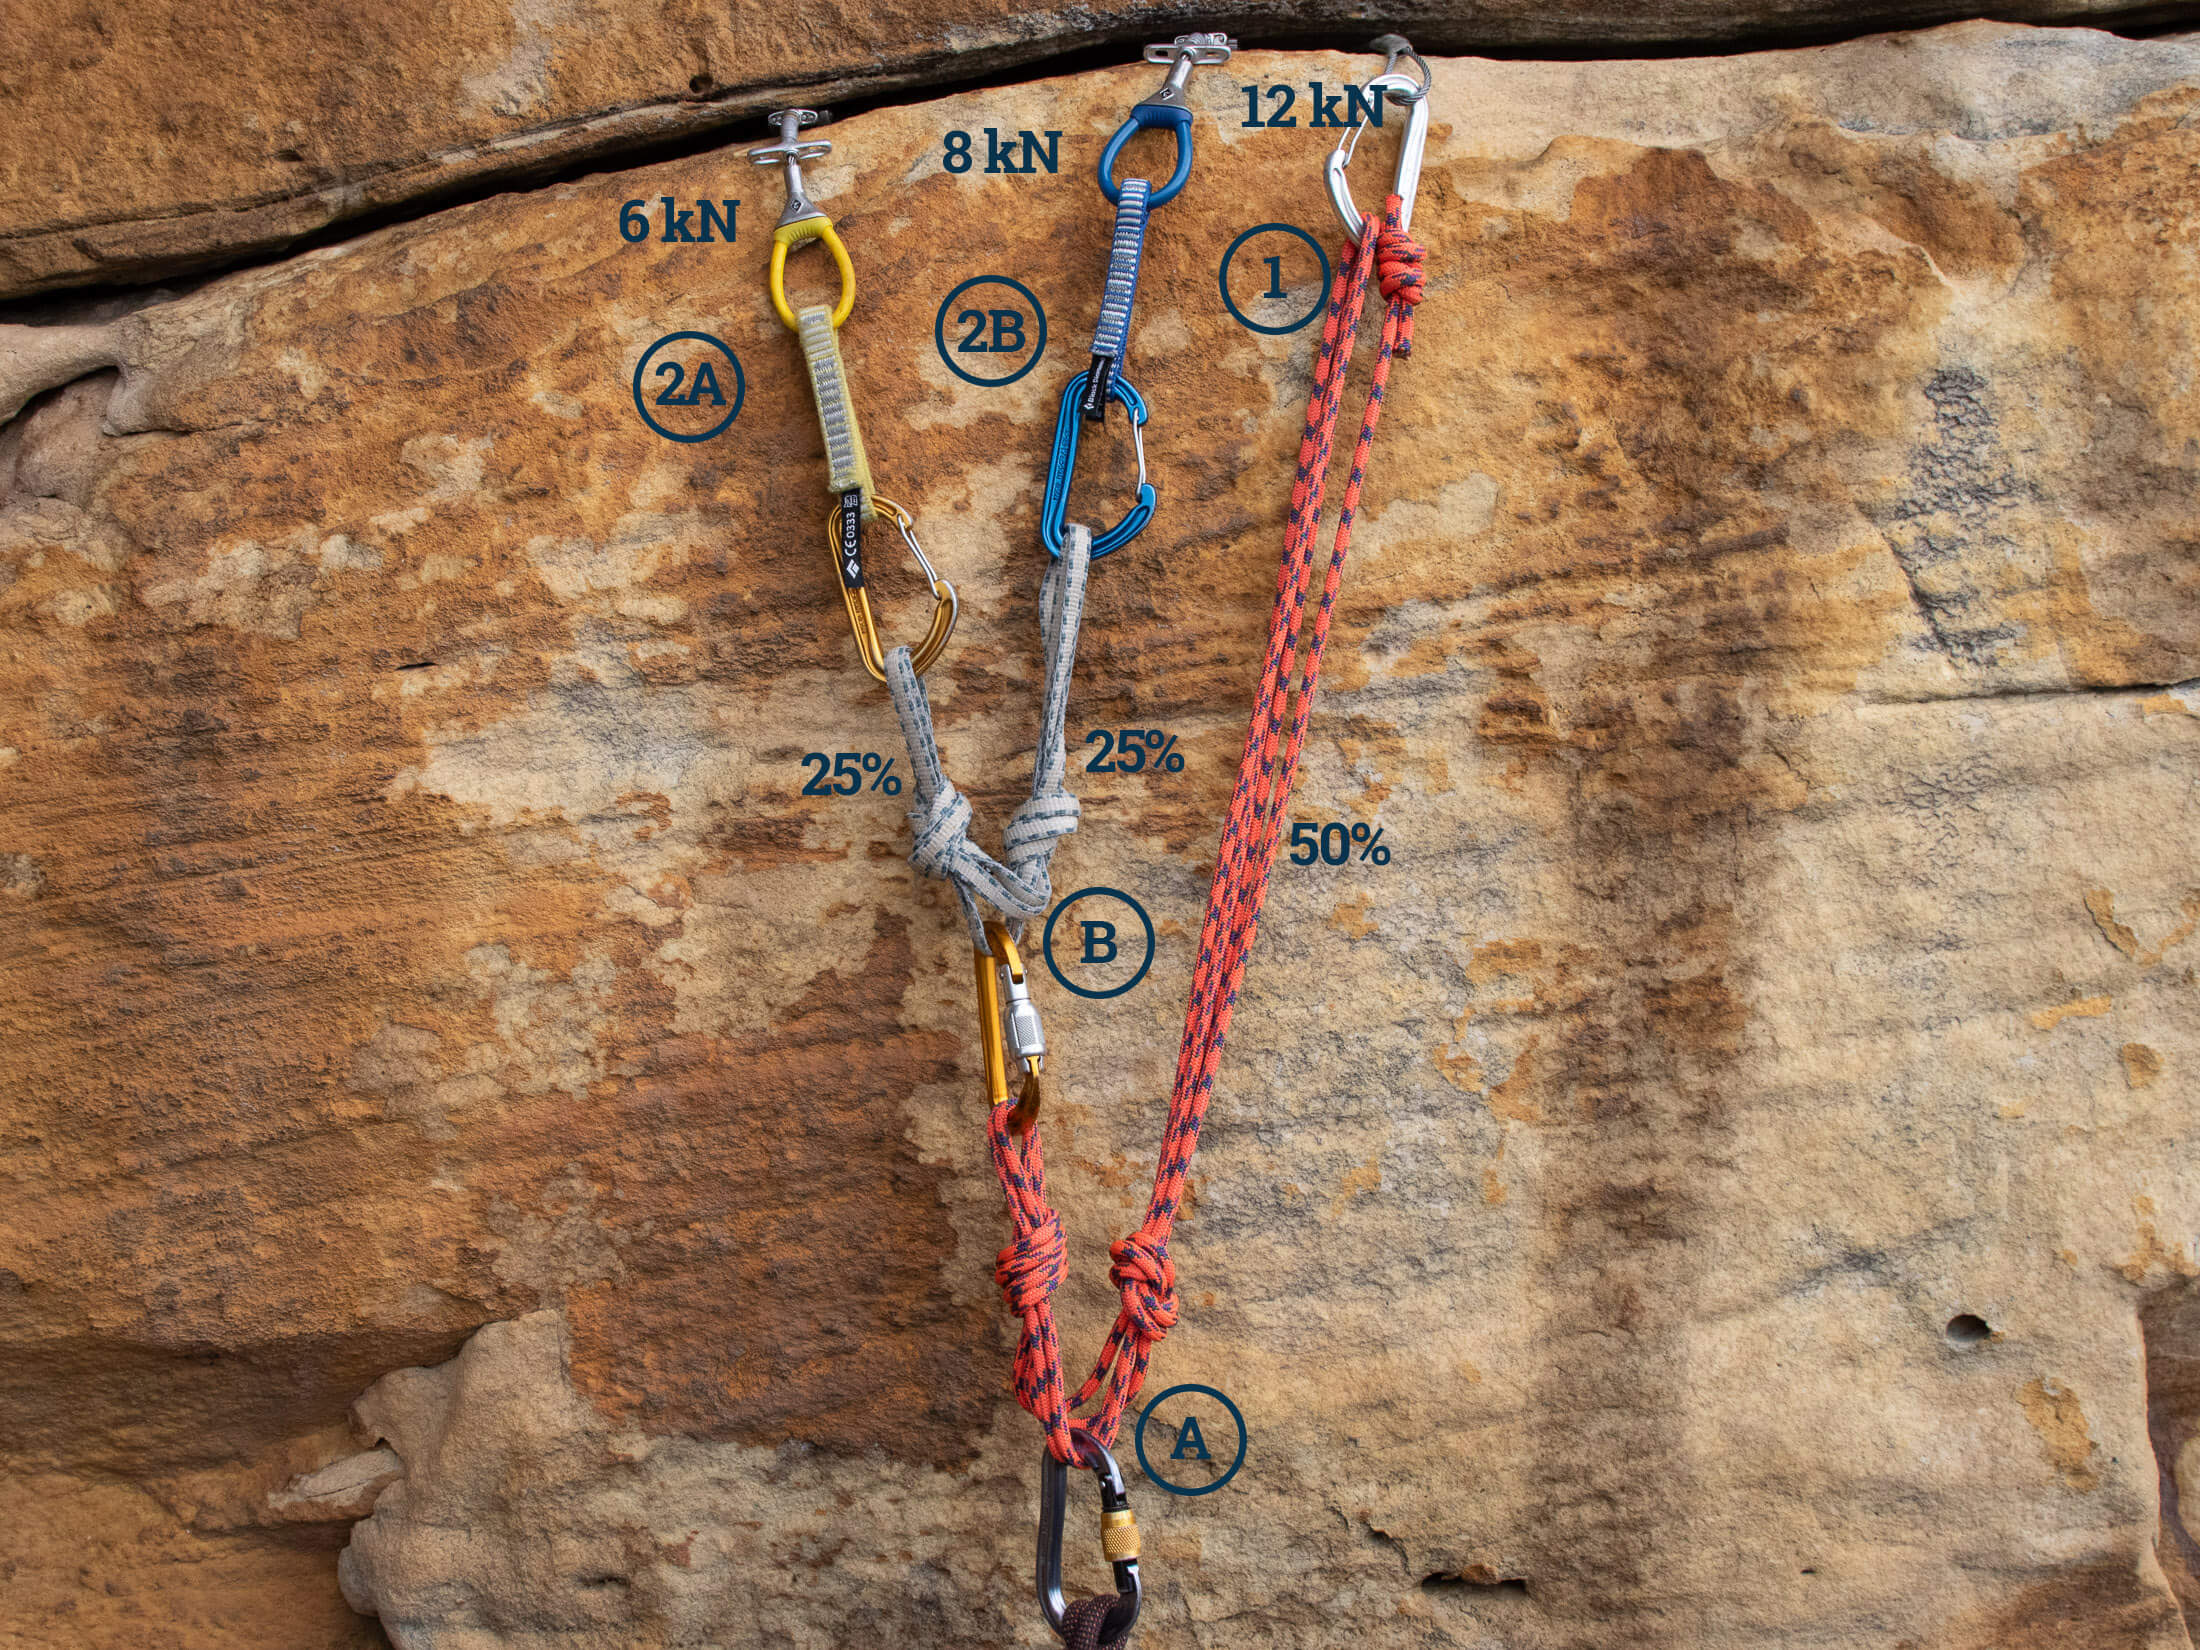
As I’ve already shown, the load on a three-piece composite quad is first split at the master point (first distribution point) and then again at the sliding X (second distribution point). Here I’ve used figures that suggest an even split at both the master point (A) and sliding X (B), but in the real world, where a perfect on-axis pull is unlikely, load distribution at the sliding X would probably be closer to 66% and 34% – not great but still better than what would’ve been achieved with a pre-distributed anchor. Still, the main point is that we can now put 50% of the load on the strongest piece by clipping it to arm 1, and distribute the balance to the weaker components on strands 2A and 2B.
Angles between components
There is one more factor in the load distribution equation, and that is the vector forces created by the angles between components. The larger the angles in an anchor, the greater the additional load on each component. When the angle between components is 30°, the effective load on two equitably distributed components is 52% of the total load. But when the angle between components is 90°, the effective load on each anchor is 71%. To limit this multiplying effect, aim to keep angles in an anchor as small as possible. The IFMGA recommends limiting angles in an anchor to 90°. In the hypothetical situations described below, the angles between the two primary arms in self-distributing systems will be 60°.
The danger of extension
The limitation of self-distributing anchors is that they can create extension in one arm if the components on the other arm fail. Even a little extension can shock load the remaining components, and anchor builders have to weigh up the benefits of self-distribution with the risk of extension. In a standard 3-piece quad or equalette (both hybrid systems), extension will result from the failure of a single component only if that arm isn’t attached to a second piece. If a component failed on an arm connected to two pieces, the load on that arm would shift to the remaining component, and there would be no extension on the other side of the master point.
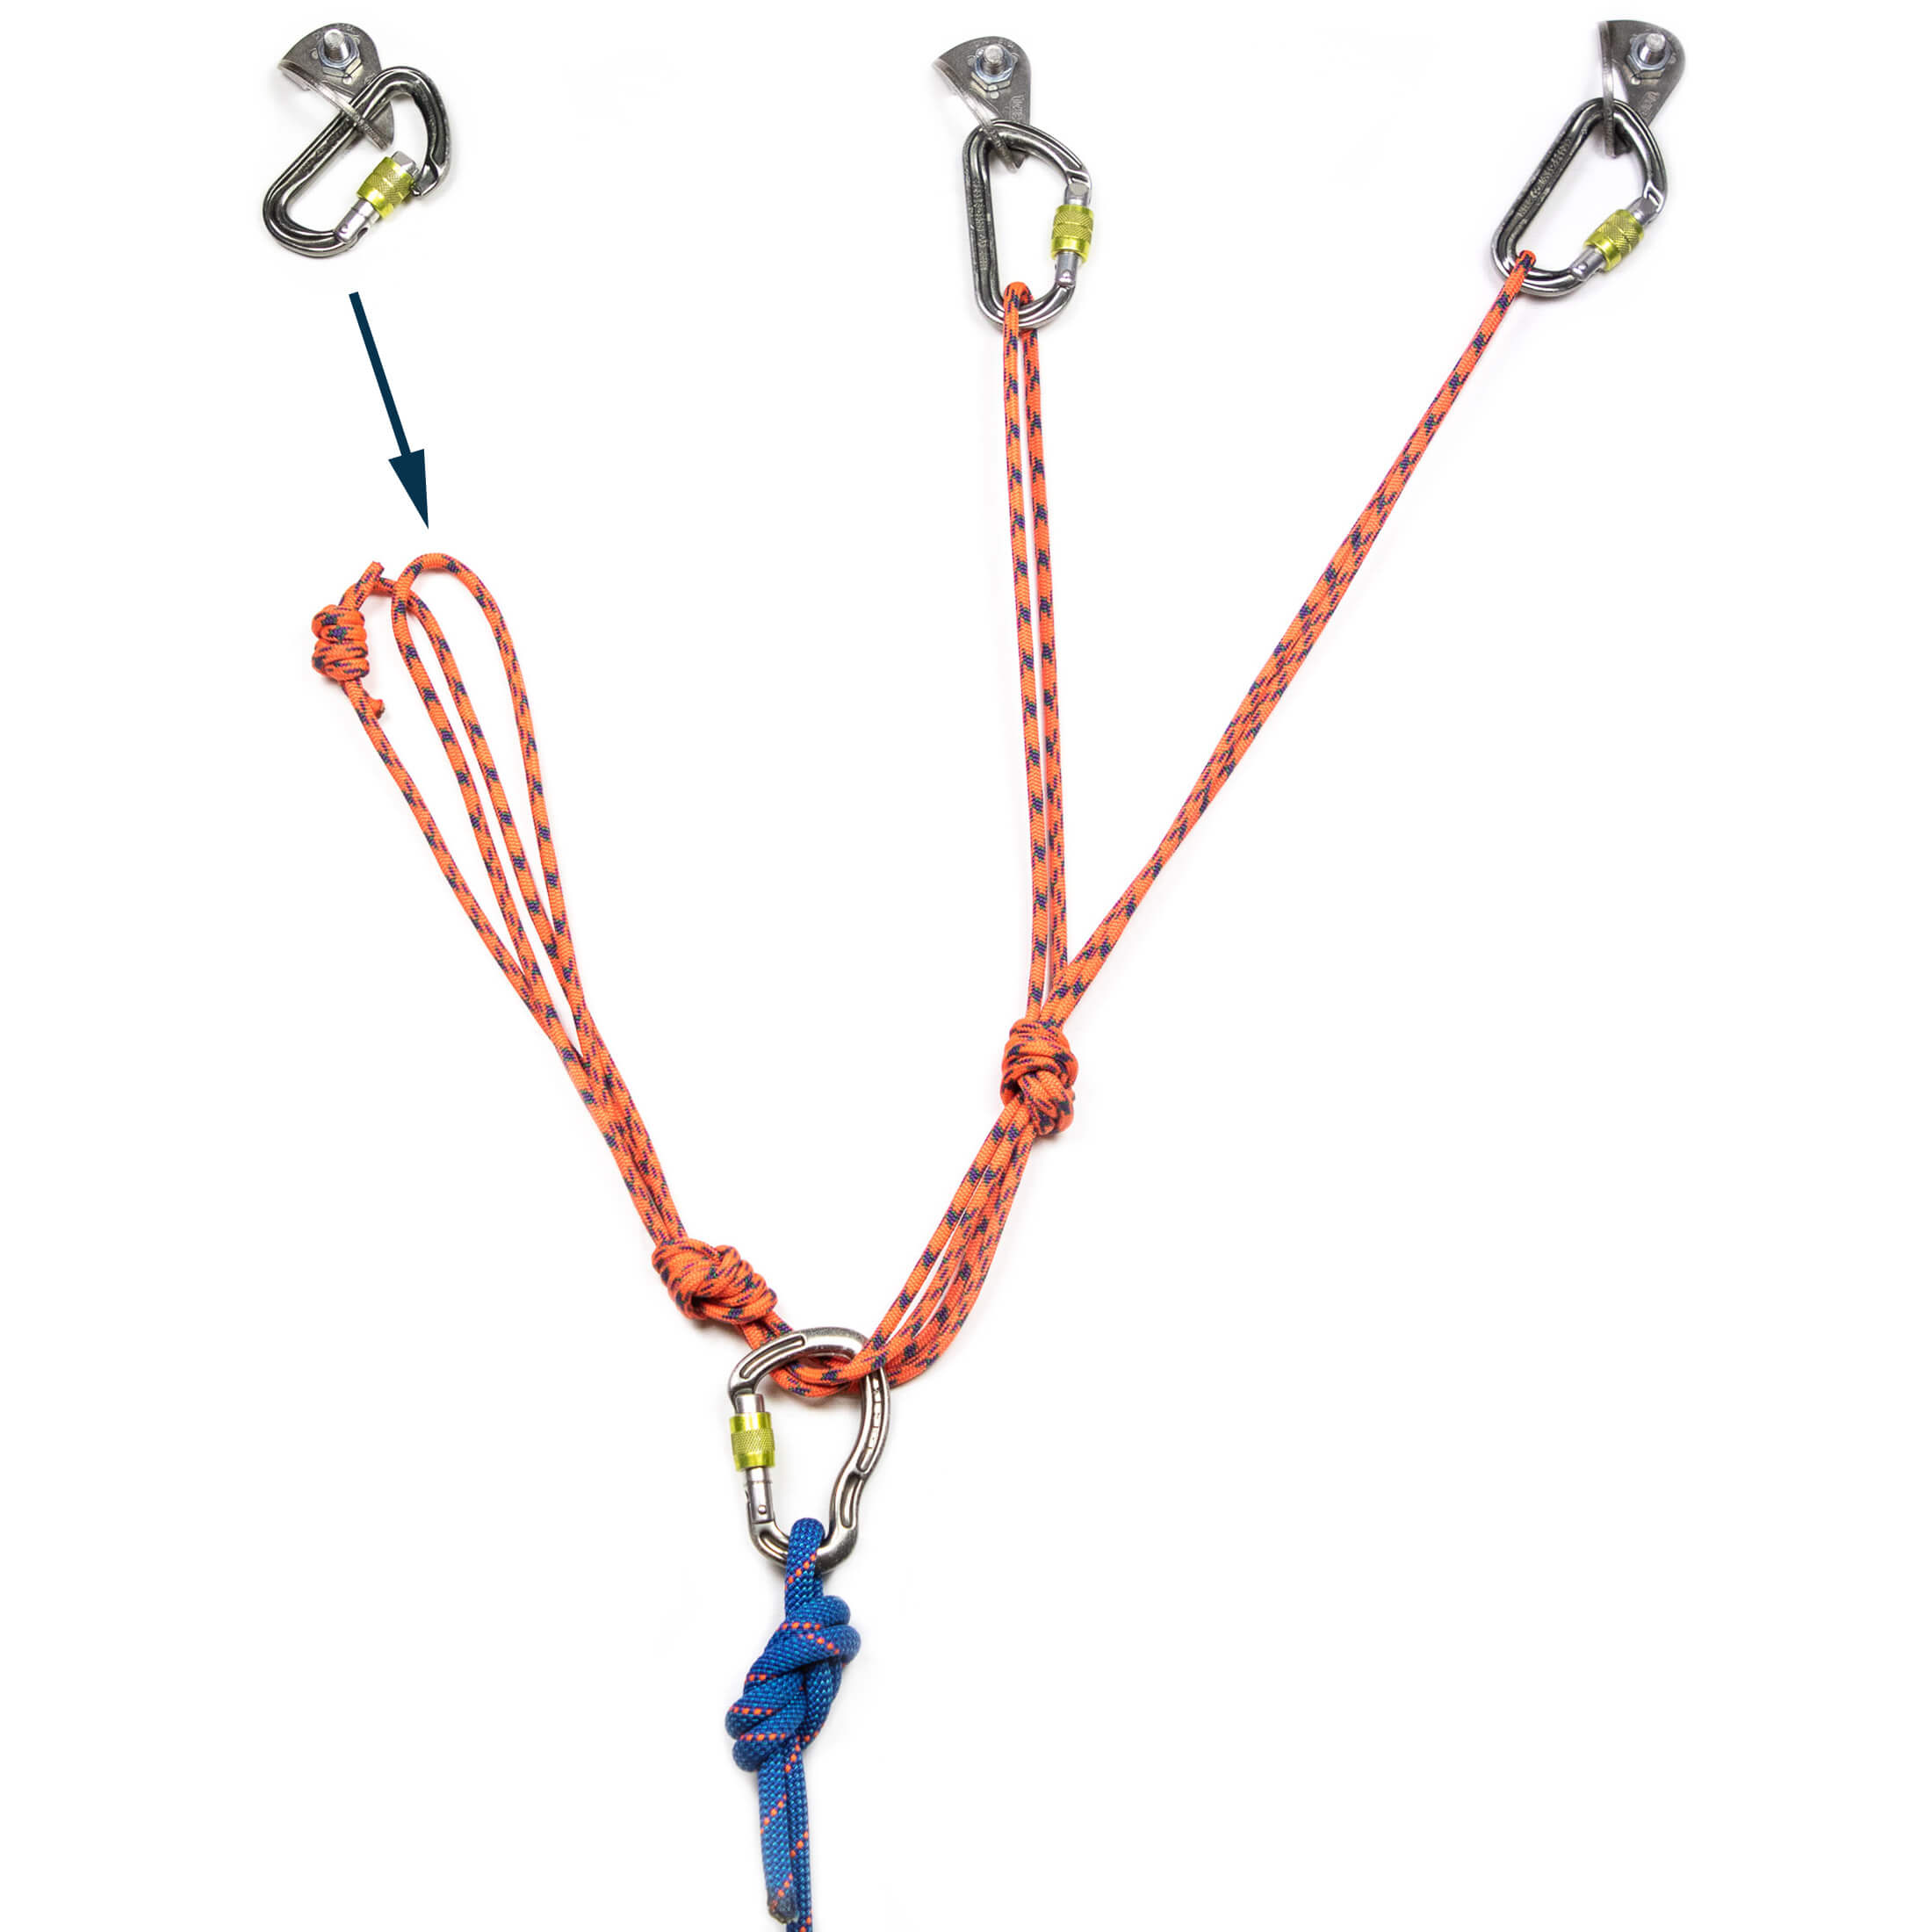
With this kind of setup, it’s essential that the component on arm 1 is bomber. Ideally one of the two pieces on the second arm would also be rated to at least 10 kN. If that wasn’t possible, ensuring the effective distribution of load between the two pieces on this arm would be even more important. A very unequal load could cause a failure in either of the two weaker pieces under the wrong circumstances.
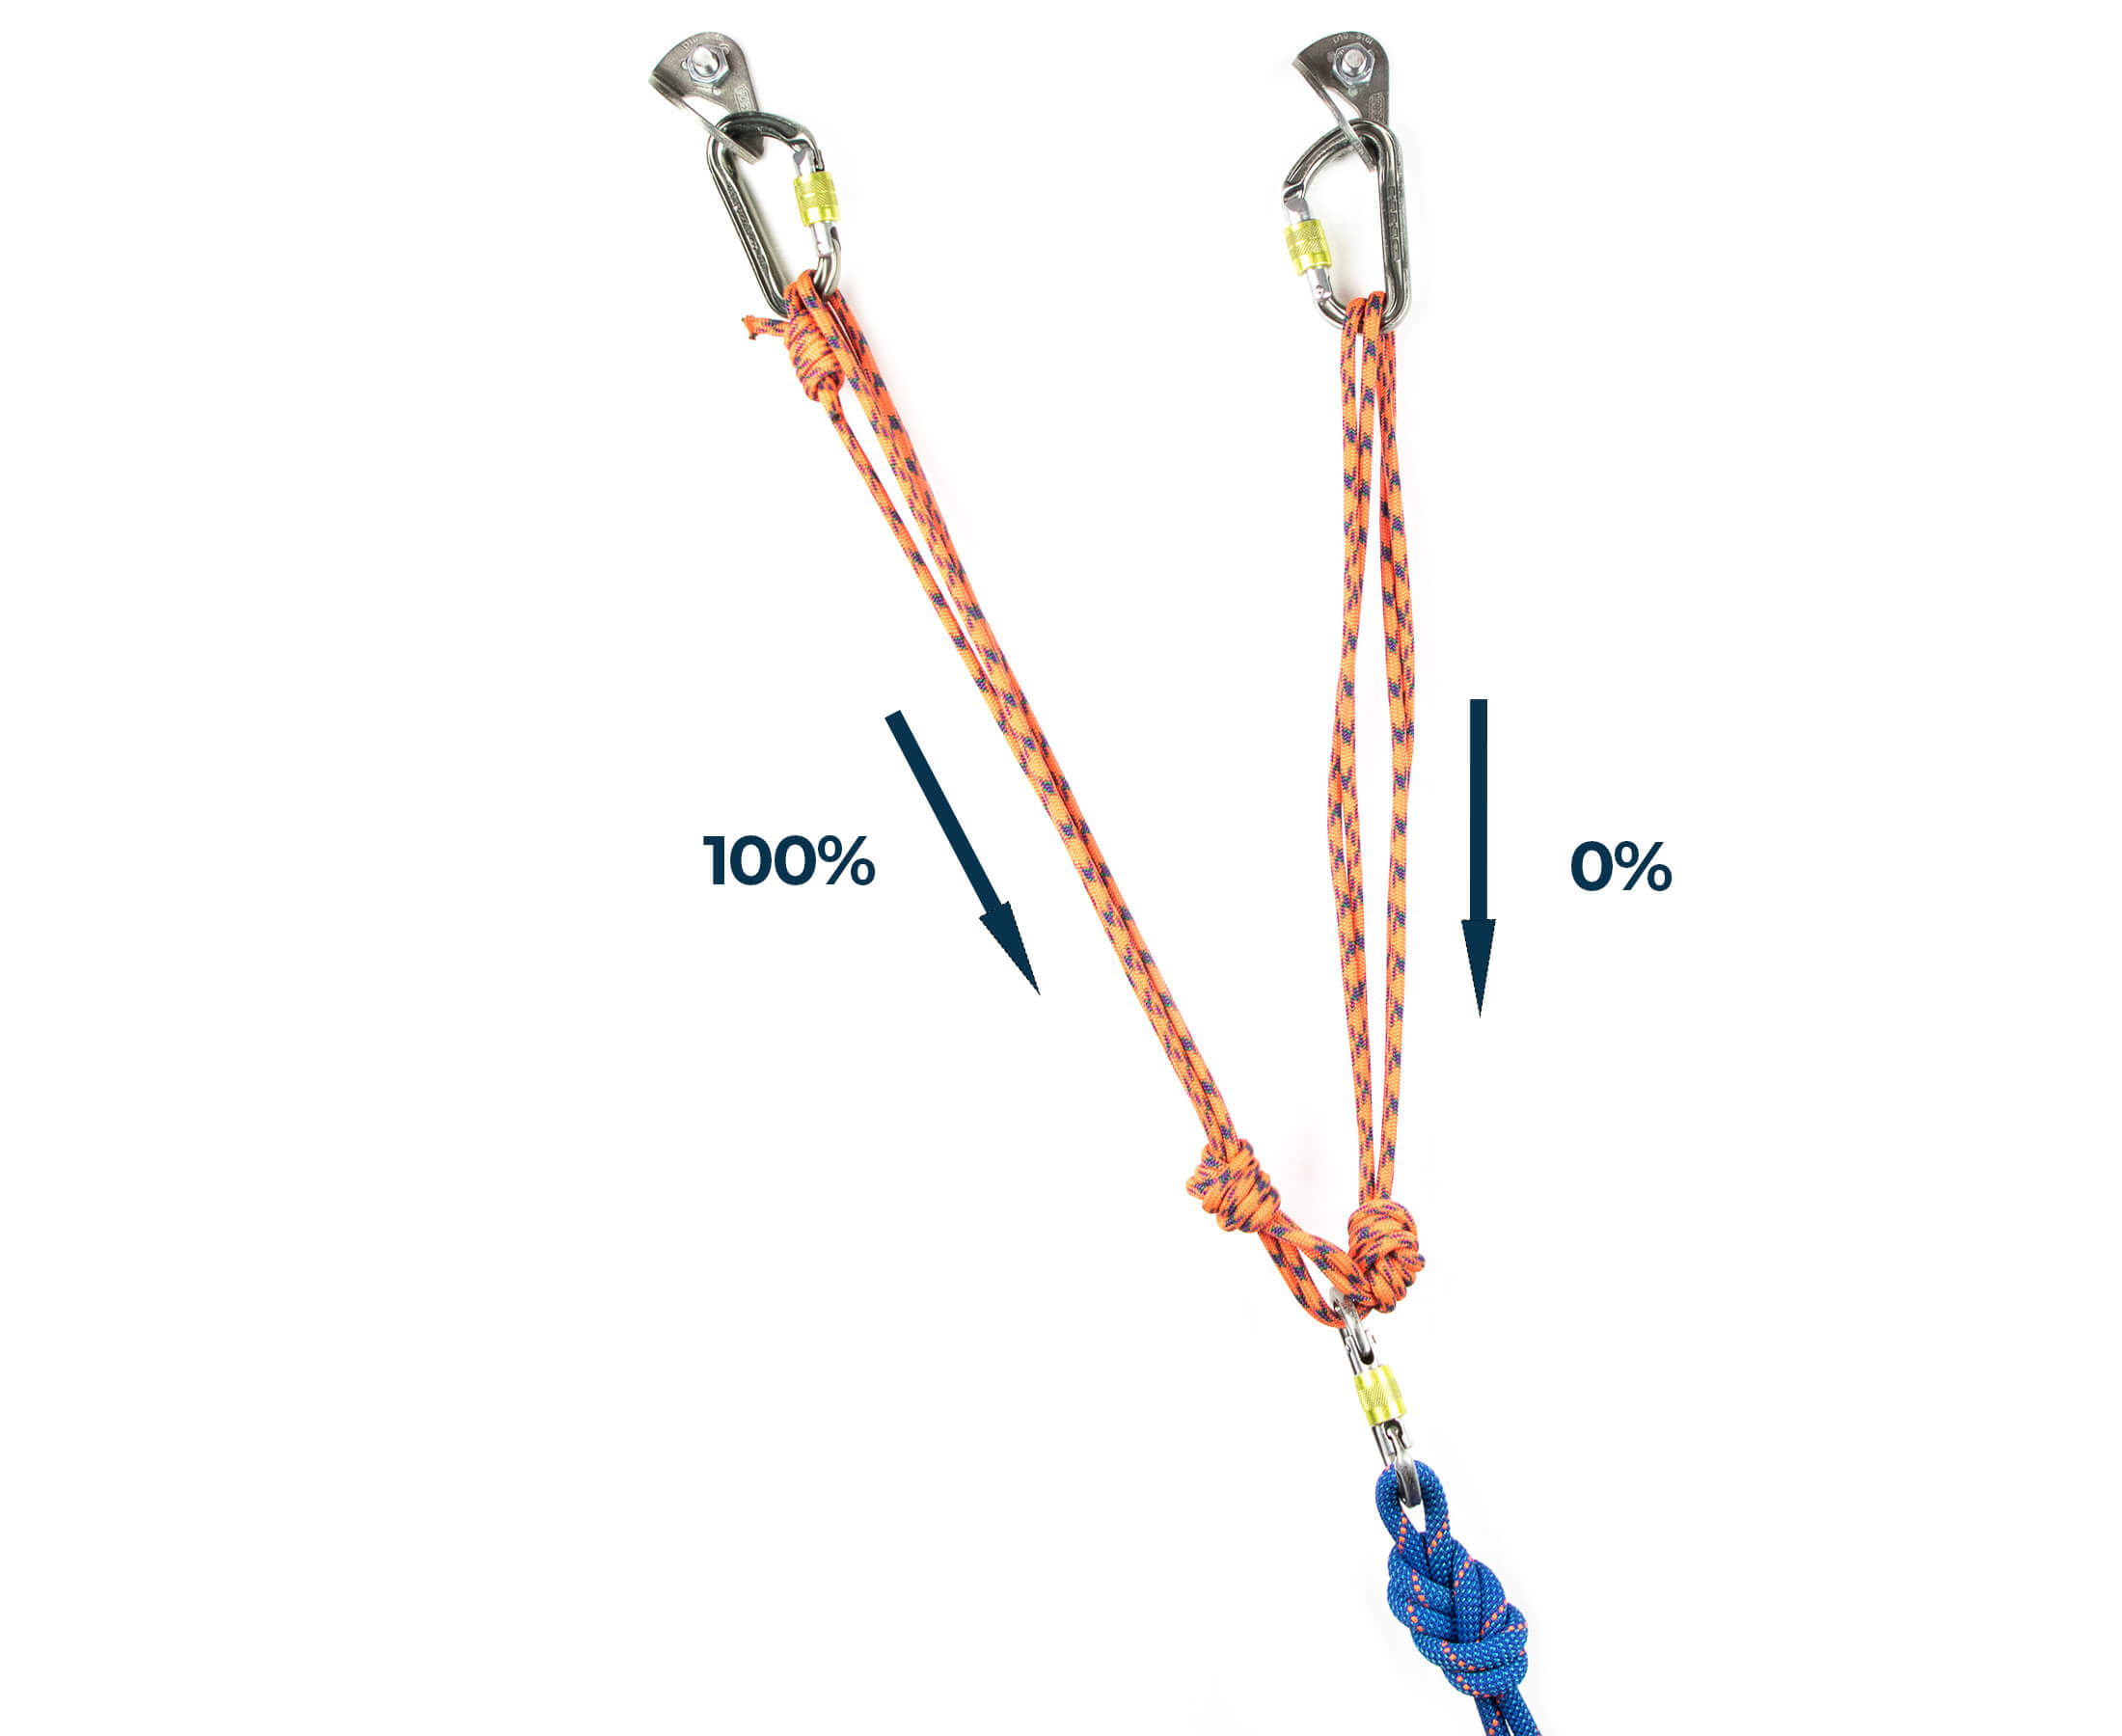
In addition to mitigating the risk of a component failure that would result in extension, anchor builders also have to limit potential for extension by positioning limiting knots properly. The aim should be to put the knots as close to the master point as possible without limiting the range of lateral movement at which the anchor will self-distribute. If the anchor is properly aligned with the direction of pull, you can get away with as little as four centimetres or an inch and a half between the master point and limiting knots.
A system for classifying anchors
For the purpose of determining how important load distribution is for a particular anchor, I have chosen to classify anchors according to three designations: bomber, redundant, and distribution-critical. A bomber anchor is the best you can hope for – you can happily trust your life to it – while a distribution-critical anchor has relatively weak components and has to ensure effective distribution if it is going to survive a 10 kN impact load.
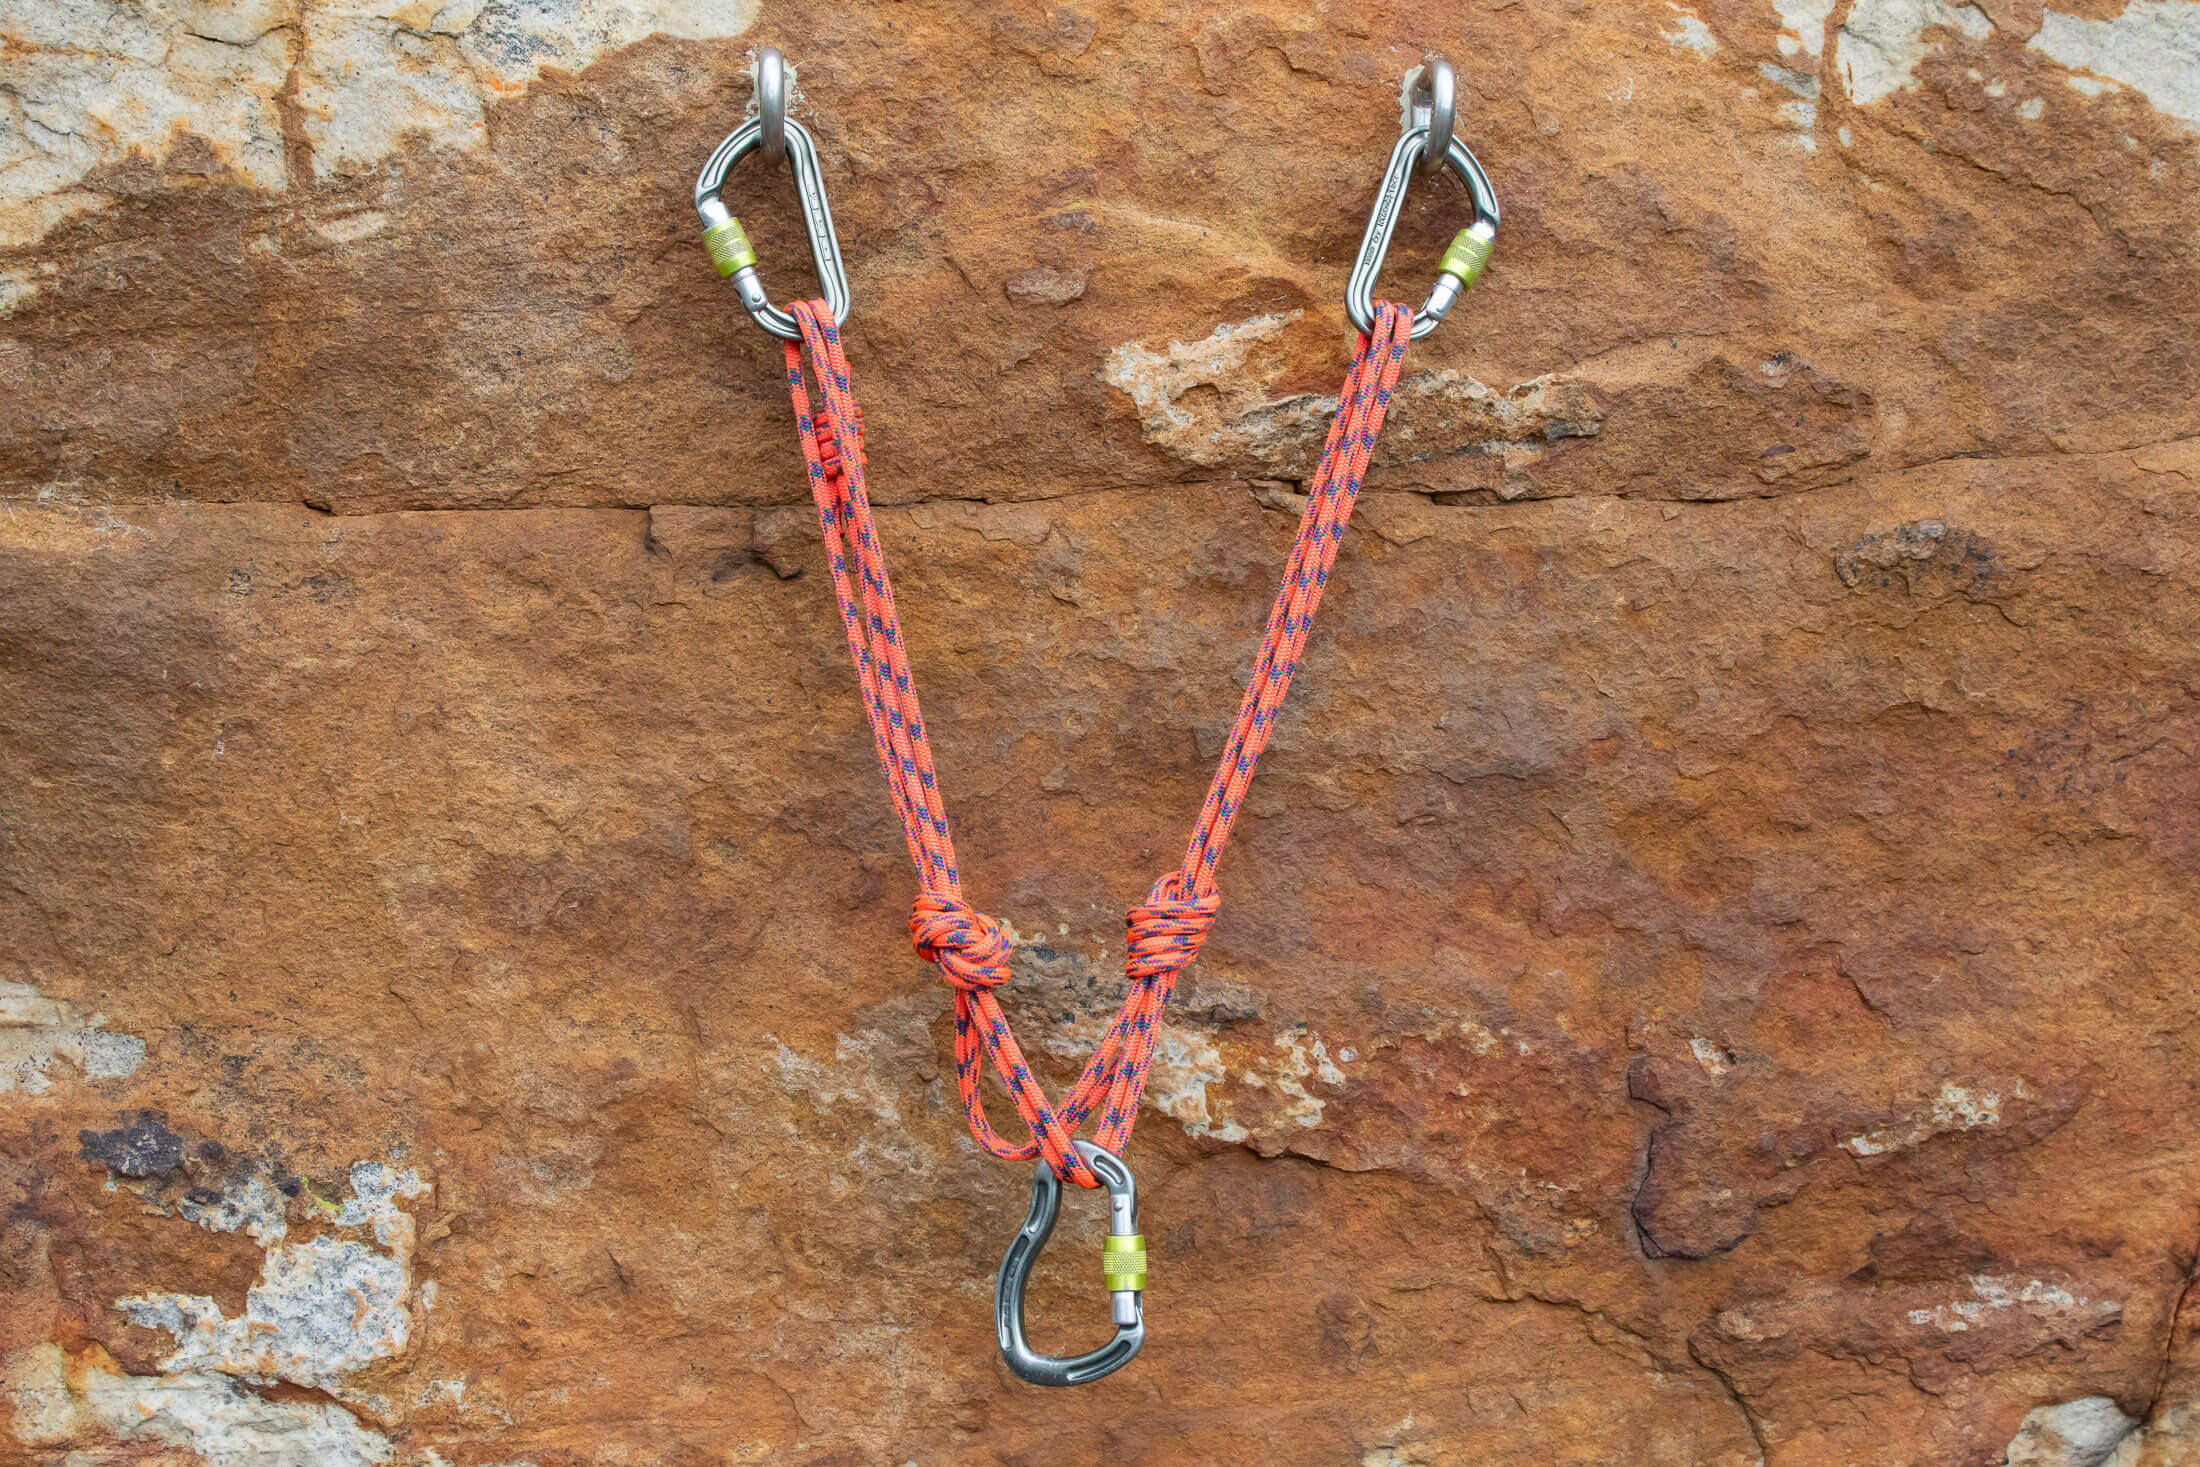
Bomber anchors
An anchor can be considered ‘bomber’ if every component in the system is able to withstand far more than the maximum expected impact force by itself – each is rated to at least 15 kN (correlates to the strength ratings of most mid-sized cams). In such a system, the main purpose of the second and third components is redundancy although the failure of any component is highly unlikely. Given how solid the components are, many anchor builders might choose to incorporate only two components into a bomber anchor. This is comparable to building a two-point anchor from a pair of solid bolts.
Redundant anchors
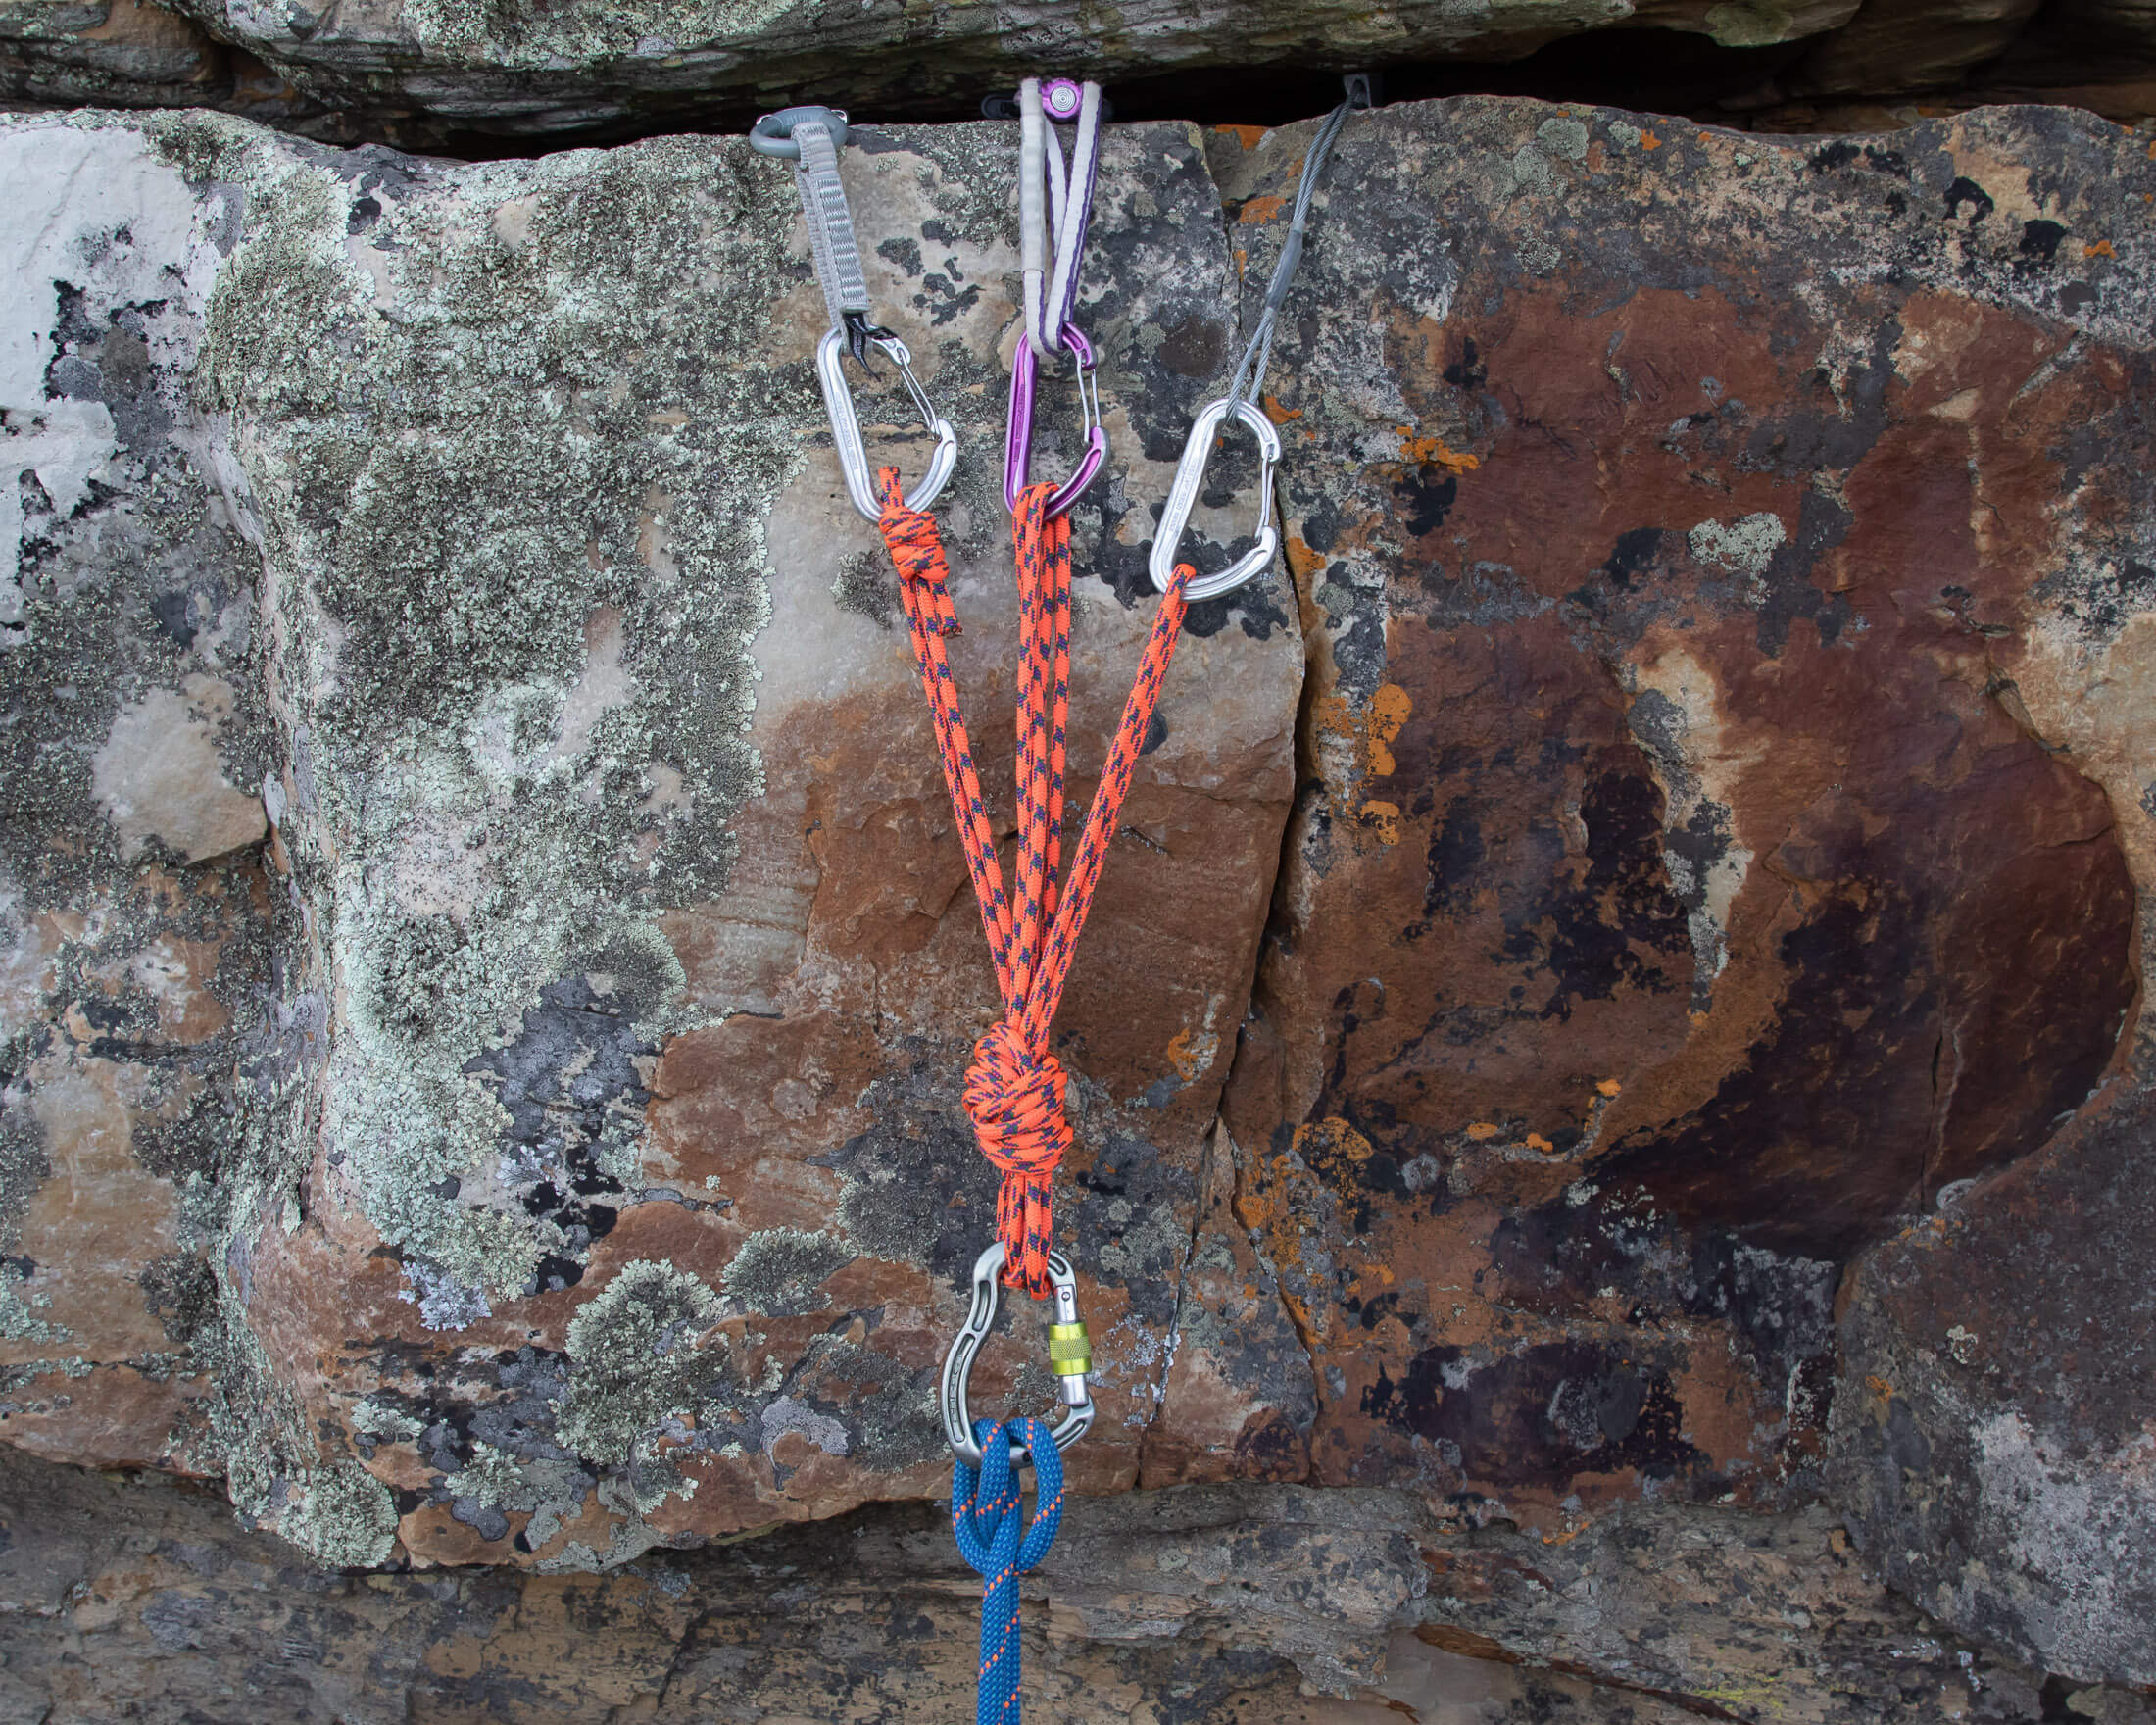
In a ‘redundant anchor’ one of the components is weaker than 10 kN while the other two are stronger than 10 kN but not strong enough to be considered bomber – 15 kN (at least not both of them). While this is not quite as good as a bomber anchor, it’s still pretty solid. A degree of load distribution is desirable, but an even split at the master point isn’t essential. Just try to make sure that loads are on-axis if you use an overhand-knot anchor, and if you use a quad, put the weakest component on an arm with one of the two stronger components.
Distribution-critical anchors
Sometimes you are just out of luck. Even after you’ve given your stance a thorough looking over and have climbed higher and lower in search of better placements, the available features only accept small cams or even smaller nuts. You might be able to place one component rated to 10 kN or stronger but definitely not two. The challenge now is two-fold. You have to ensure effective distribution at the master point so that neither primary arm is subjected to more than 6 kN in the event of a 10 kN load on the anchor. And then you have to ensure a minimum load-bearing capacity of 6 kN on both sides of the primary distribution point.
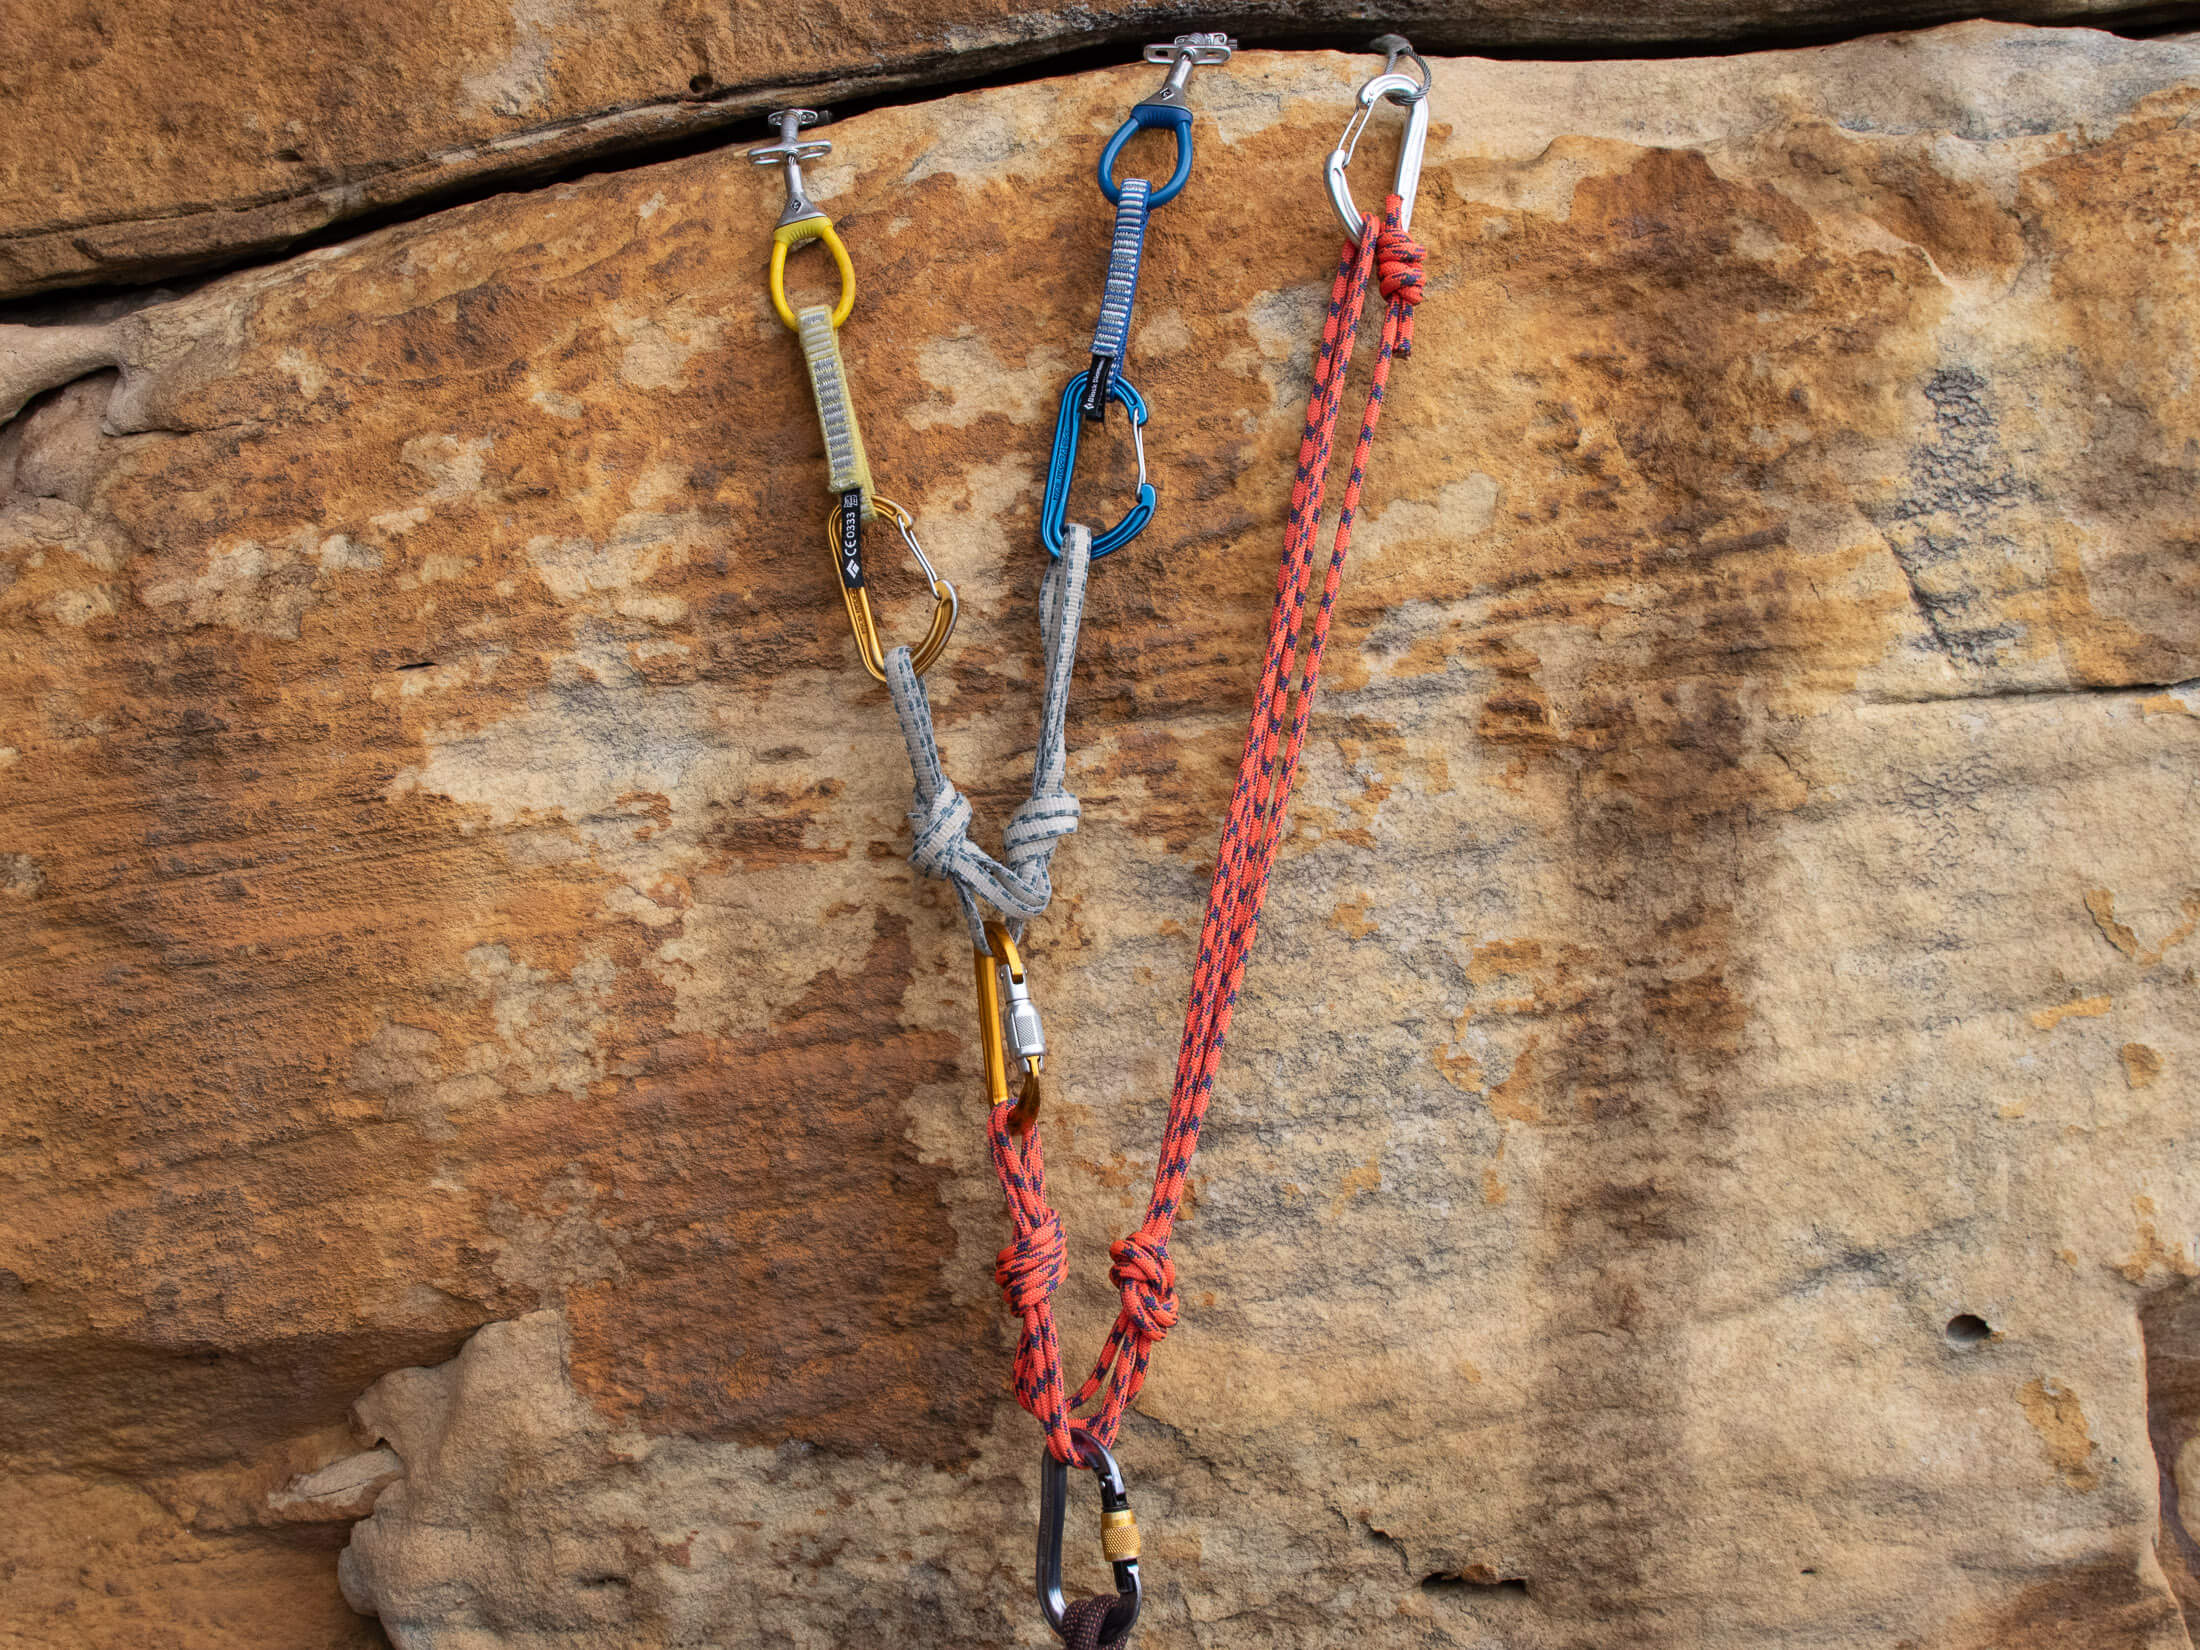
In the real world, it’s easier to achieve effective distribution with a true self-distributing anchor like a quad. Pre-distributed anchors like those made with an overhand knot put the vast majority of a load on one arm when they’re pulled off-axis. And a sliding X, although better, might only achieve a distribution of something like 66% and 34%. A quad, on the other hand, will split the load pretty evenly on either side of the distribution point (A), ensuring that the maximum expected load is kept to under 6 kN. If the two weaker components are both rated to under 7 kN, you will probably need to incorporate another quad at the second distribution point(B).
A protocol for building and assessing anchors
The problem with acronym checklists is that they don’t take into account that anchor building involves choices. There is no one set of anchor-building criteria that will work in the infinite number of different scenarios a climber might face, and anchor builders have to make decisions based on priorities that change from stance to stance. So, instead of a checklist, I’m offering you a protocol that can help you make better decisions during the anchor building process.
Although not perfect, this will be far more useful than any checklist. I have not been able to come up with a handy mnemonic for these steps. Strong primary anchors, Direction of pull, Multi-directional anchors, Different features, Load distribution, Small angles, and Limit extension gives you SDMDLSL, and that doesn’t exactly roll off the tongue. But maybe that’s the point. You shouldn’t need a mnemonic to remember the most important steps in anchor building.
Use strong primary anchors
It’s hard to over-emphasize this. Having strong primary anchors is more important than any other goal in anchor building. If your components are strong enough for the application (rated to at least 10 kN and in solid rock), distribution isn’t essential, and it’s enough just to ensure redundancy in an anchor. That doesn’t mean you shouldn’t try to share the load across components. It just means a traditional overhand-knot anchor will suffice.
Rig for the direction of pull
None of the commonly used acronym checklists mention direction of pull, and yet it’s one of the most important factors in anchor building. Make sure that your primary anchors will be able to withstand the expected direction of pull, bearing in mind that the anchor will probably be loaded in more than one direction. In some circumstances, you might have to adjust the anchor before the climber starts leading the next pitch.
Use a multi-directional primary anchor to oppose an upward pull
In addition to withstanding a load from below, most anchors should be designed to withstand an upward pull in case the leader takes a big fall. Always know where the direction of load can come from for both the follow and for the next lead, and construct the anchor accordingly. If your anchor incorporates directional pieces like nuts or slung features, know that you’ll probably need to limit an upward pull in the anchor to protect these components from being pulled out of their placements. To do this, you’ll have to include a multi-directional component below the master point.
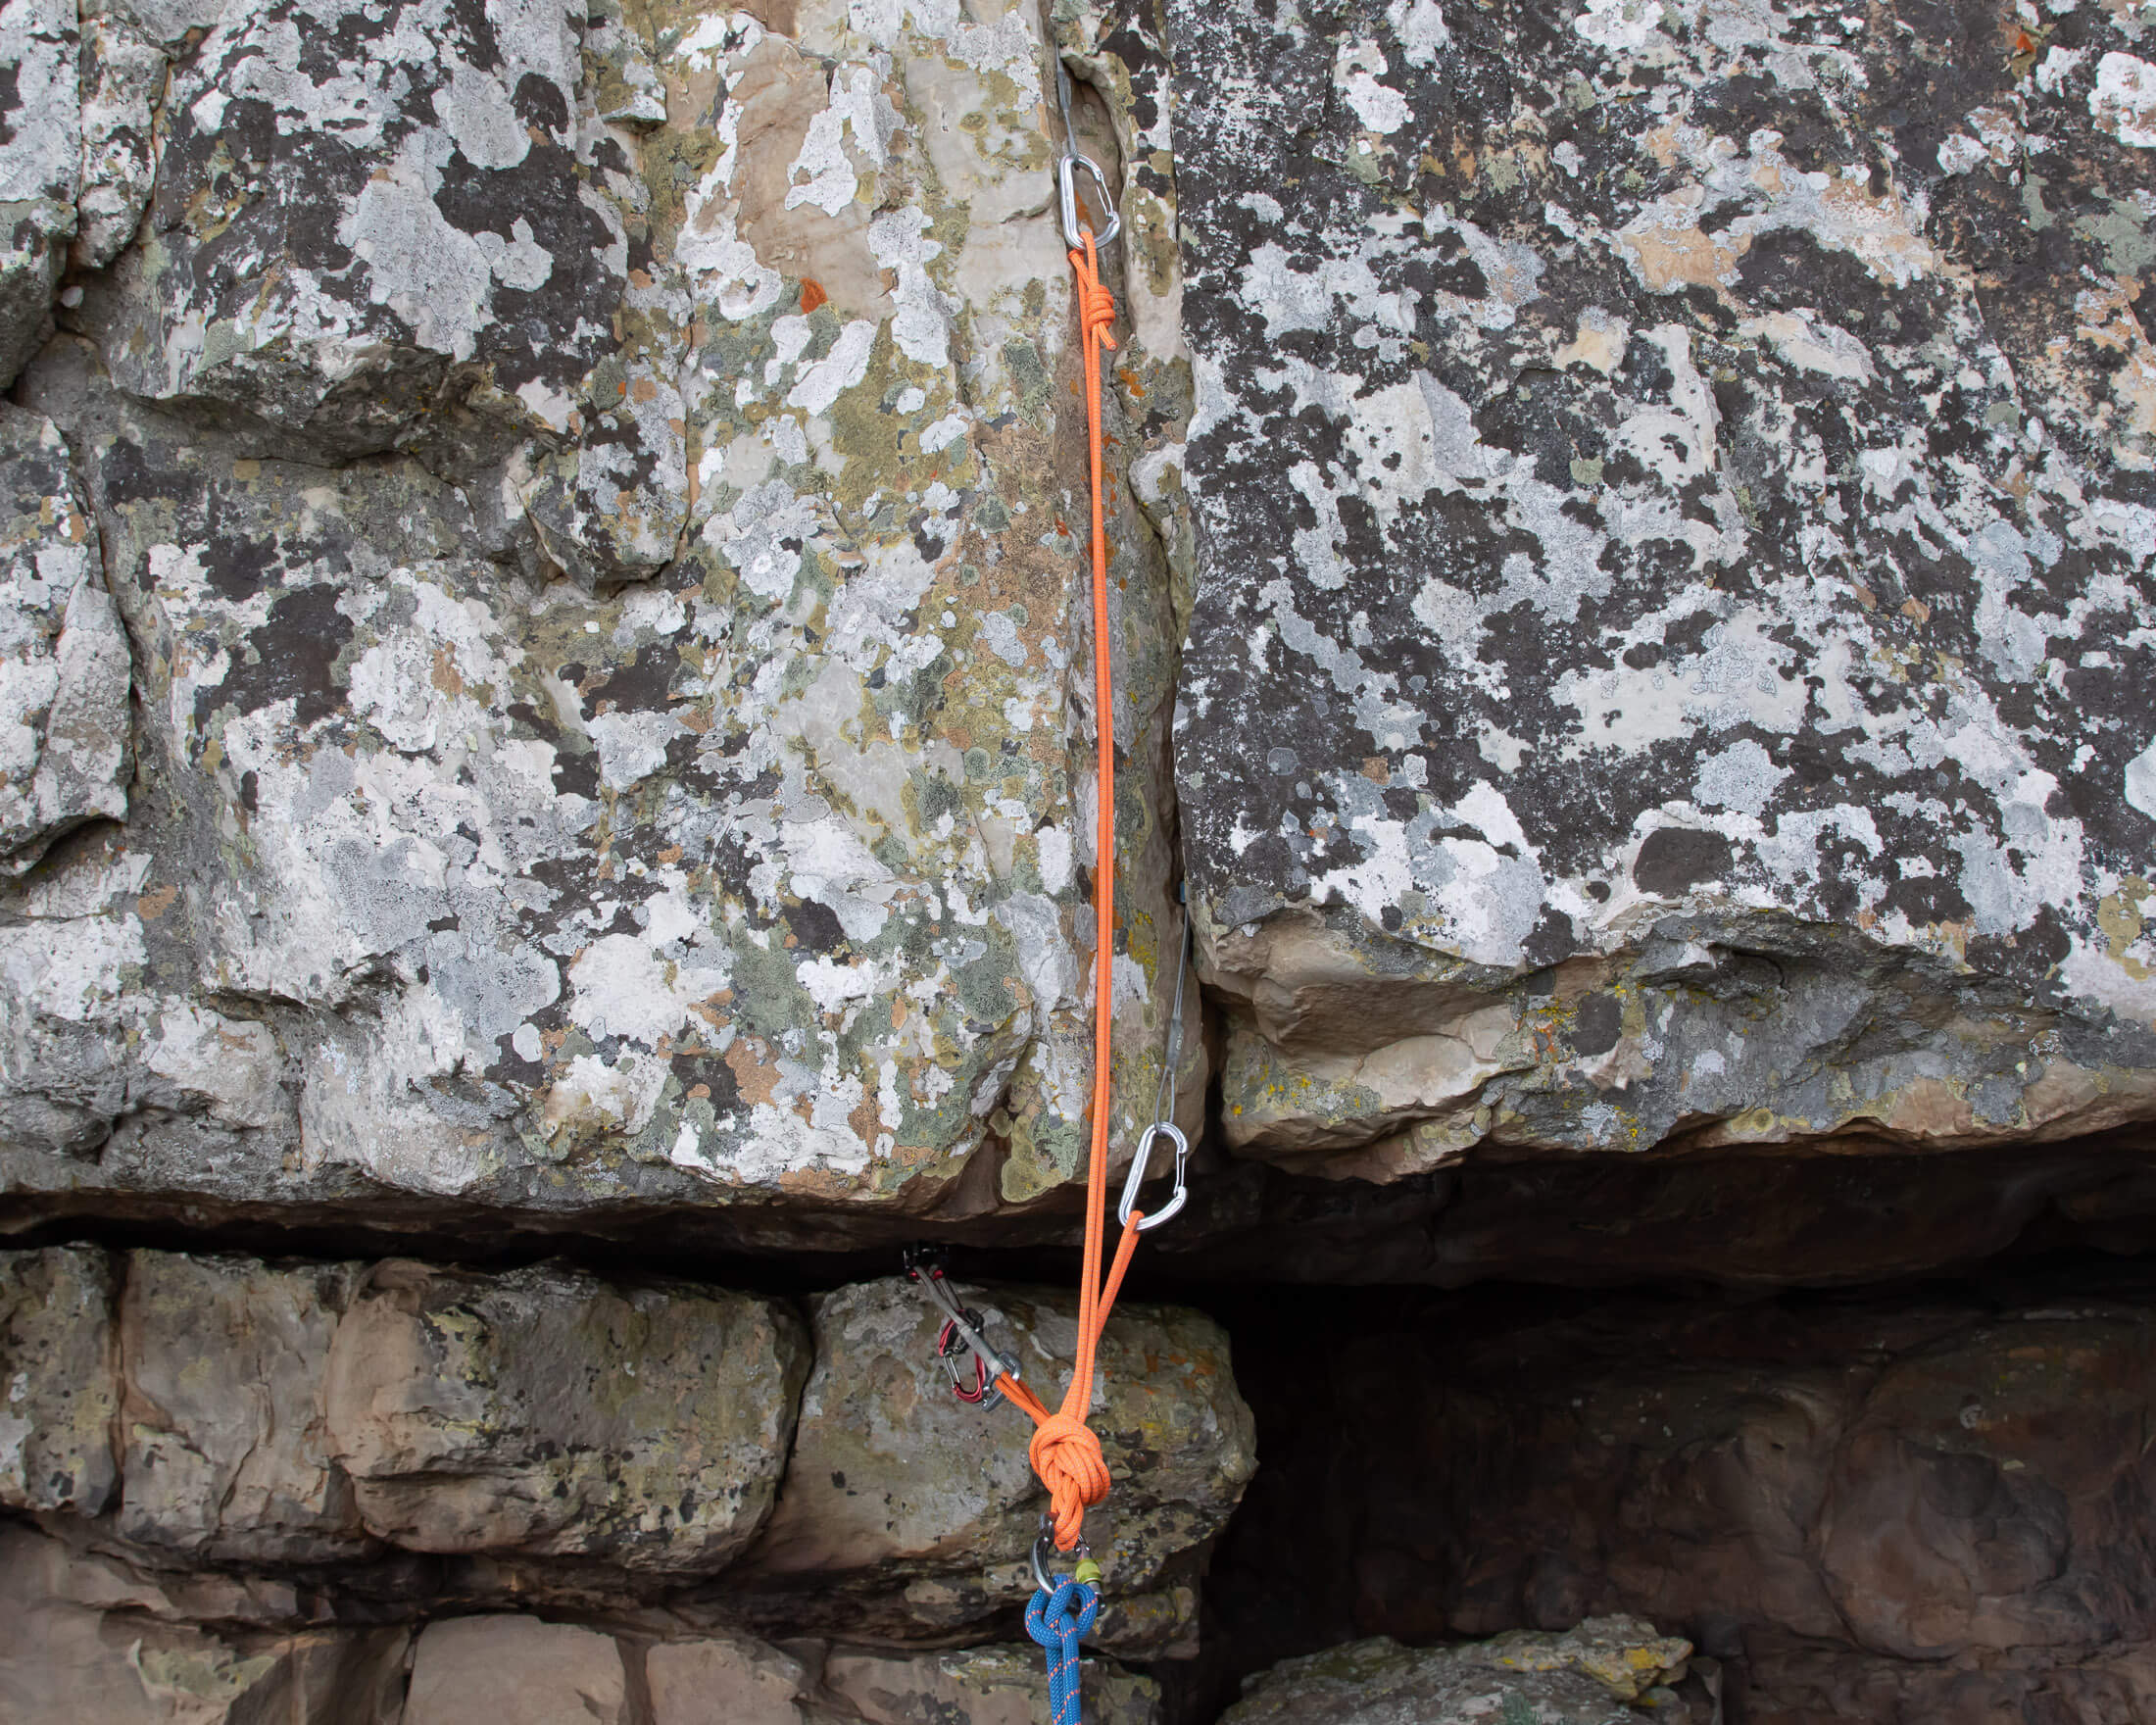
In this anchor, the cam ensures that the master point cannot lift and pull the nuts out of their placements.
Put primary anchors in different features where possible
To ensure a greater degree of redundancy, you should aim to put your primary anchors in or behind different features. If you placed all your gear in the same feature and the rock around the feature broke, the anchor would fail catastrophically. Always aim to put your gear in multiple features where this is possible, especially if the rock is less than stellar. I personally know two climbers whose lives were saved because they took this precaution.
Ensure sufficient load distribution
Whether or not you need to distribute the load between an anchor’s components will depend on the strength and security of your primary placements. If you have two or three components rated to 15 kN (the prerequisites for a ‘bomber anchor’) load distribution isn’t necessary. If you have a few moderately strong components (10 kN or more) and one weaker component, you should try to achieve a degree of load distribution. And if you only have components weaker than 10 kN (or maybe just one component this strong), you will need to build a ‘distribution-critical anchor’.
Limit extension
If you use a quad, limit the potential for extension by tying limiting knots as close to the master point as possible without restricting the lateral range of the anchor to less than 7° in either direction. In a standard three-piece quad, positioning the limiting knots close to the anchor will also reduce the angle between components on the same arm. If you create a composite anchor in which one of the two primary arms is extended with a two-piece quad or sliding X, you should limit extension in this connection as well. See my article How to Tie and Use a Quad for instructions on how to build a composite quad.
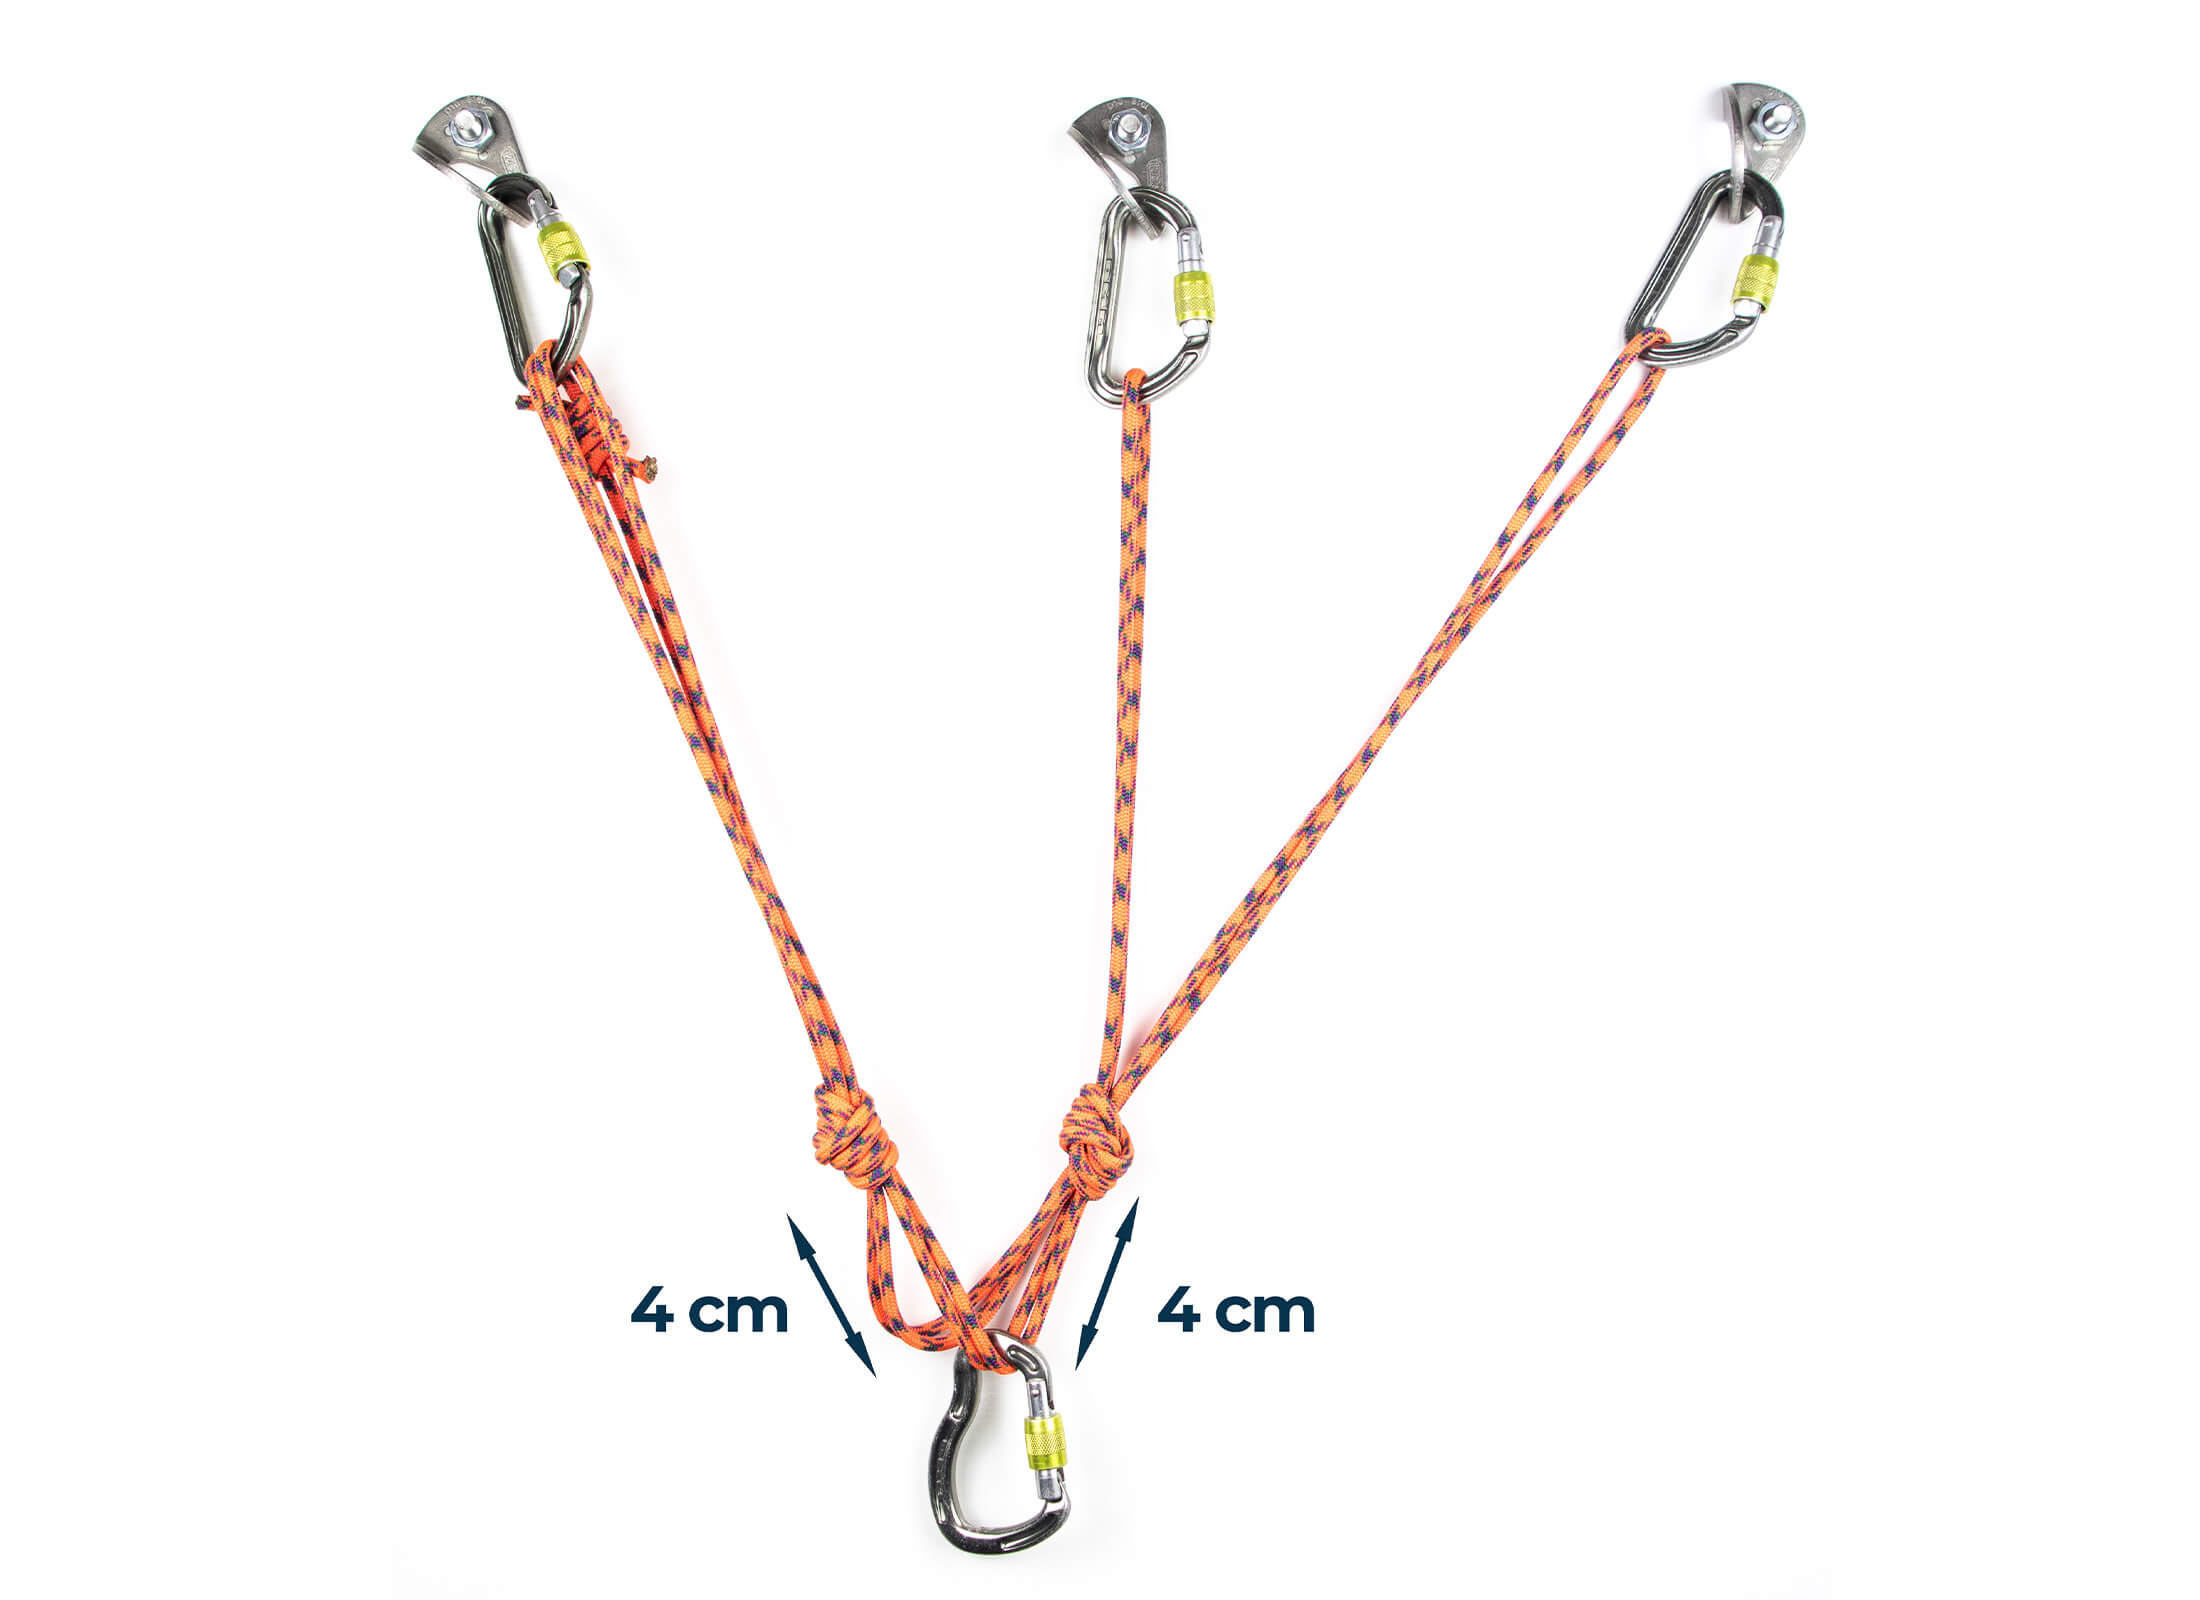
Keep angles small
The angles in an anchor act as levers and increase the load on its components. The larger the angle, the larger the vector force. Obviously we don’t want any additional load on our components, so we need to try to keep angles as narrow as possible or at least within 45°, which would limit the increase in load to just several percent. It’s also important to note that reach, angles, and working height are inextricably linked. If you change one, you will almost certainly change another. Raise the master point, and angles will widen. Extend the arms of your anchor, and angles will narrow – but the master point will drop. In many cases, you will need to make compromises. In these situations, aim to strike a balance that matches your priorities.
Learn more about anchor building
Given that this was the last and most in-depth article in my series on anchor building, you have probably read my other articles on the topic and already have some anchor building experience. If you don’t, I strongly recommend that you practise your anchor building skills under the supervision of an experienced trad climber before entrusting your life to your handiwork. An experienced climber or guide will be able to point out errors in your technique and give you solutions to the novel anchor building challenges you could encounter while honing your craft. And, if it’s more theory that you are after, know that there’s a lot more where this came from. In this series on belay anchors, I cover everything from trad anchors to monolithic anchors and everything in between.
