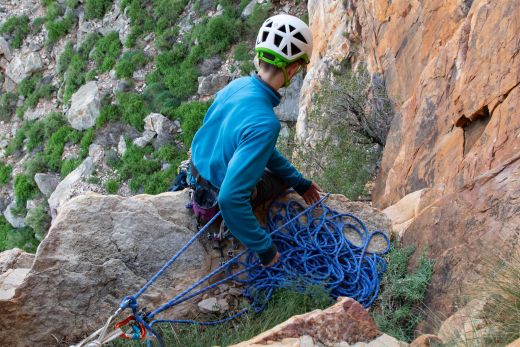
If you’re just getting into trad or multi-pitch sport climbing, you probably already know that belaying a follower from above is very different to belaying a leading climber. Not only do you have to attach yourself and the belay device to the anchor but then you also have to adapt the setup according to the stance and the direction your follower is approaching from. Luckily this article explains just how to do that. If you’ve ever wanted to know how to set up a guide-mode device, how to use the shelf on an overhand-knot anchor, or how to set up a belay several meters from the anchor, you’re about to have your questions answered.
- Definitions
- Belay devices
- Belaying directly off the anchor
- Belaying from a position some distance from the anchor
- Belaying with a redirect
- Belaying off your harness
- Rope management
- Protecting the anchor
Definitions
Before this gets too technical, let’s go over some definitions. That way you’ll know exactly what I mean when I say ‘component’ or ‘off-axis’.
Master point
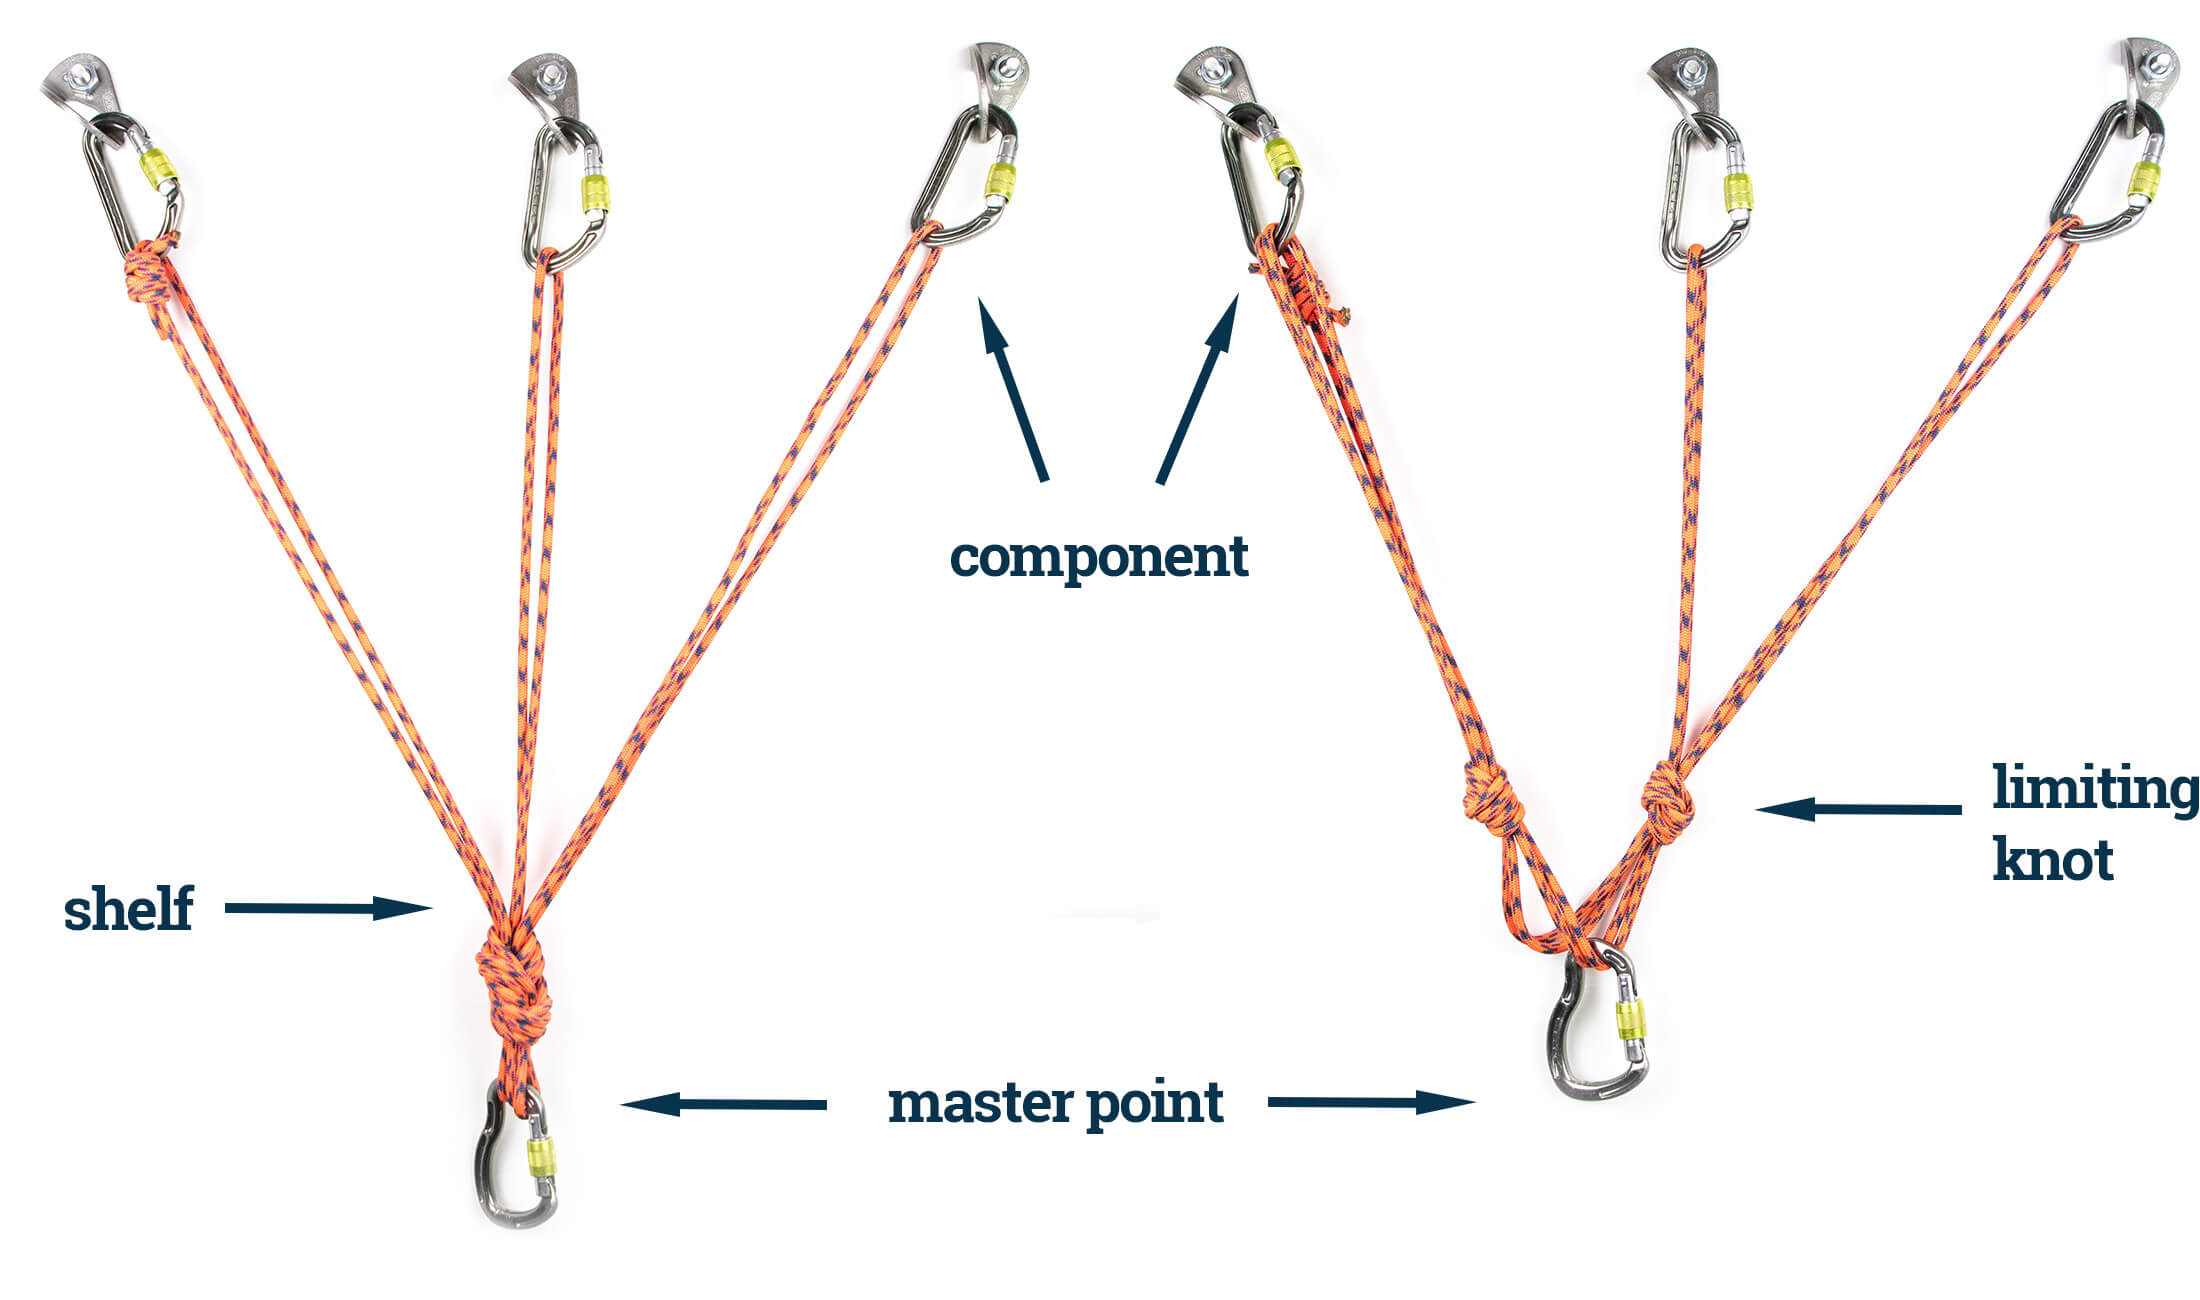
The master point is the part of the anchor you connect yourself and often the belay device to. In the case of an overhand-knot anchor, there’s only one master point – the short loops of the bundled strands below the knot. Quads, on the hand, have two master points, each with two strands.
Shelf
The shelf is a second attachment point created by clipping a carabiner through the loops that make up each arm of an overhand-knot anchor. It gives the belayer an alternative point for attaching the belay – useful if the master point is too low to make for easy belaying.
Component
In this article I will use ‘component’ to refer to the separate primary anchors that make up an anchor. These could be bolts, cams, nuts, or natural features like boulders or trees that have been secured with a sling. I will use this term interchangeably with ‘primary anchor’.
Limiting knot
The knots in either arm of a quad can be tied further or closer to the master point. Their position determines how much the anchor would extend if a component failed, so they are also known as limiting knots.
Belay devices
If you climb on a single rope, you can use almost any device for a multi-pitch belay, but if you’re going to use double-ropes or will need to rappel, there is one type of device far better suited to your needs than any other.
How to use a guide-mode device
The advantage of a guide-mode device over a regular tubular belay device is that it can be secured directly to the anchor in a way that makes the device brake automatically when your seconder falls or rests on the rope. To set up this kind of device in guide mode, secure it to the anchor using the second attachment point on the back of the device. The belay carabiner, which would normally be clipped through your belay loop, is clipped only through the loop of rope (two loops if using double ropes) on the inside of the device and not the belay loop.
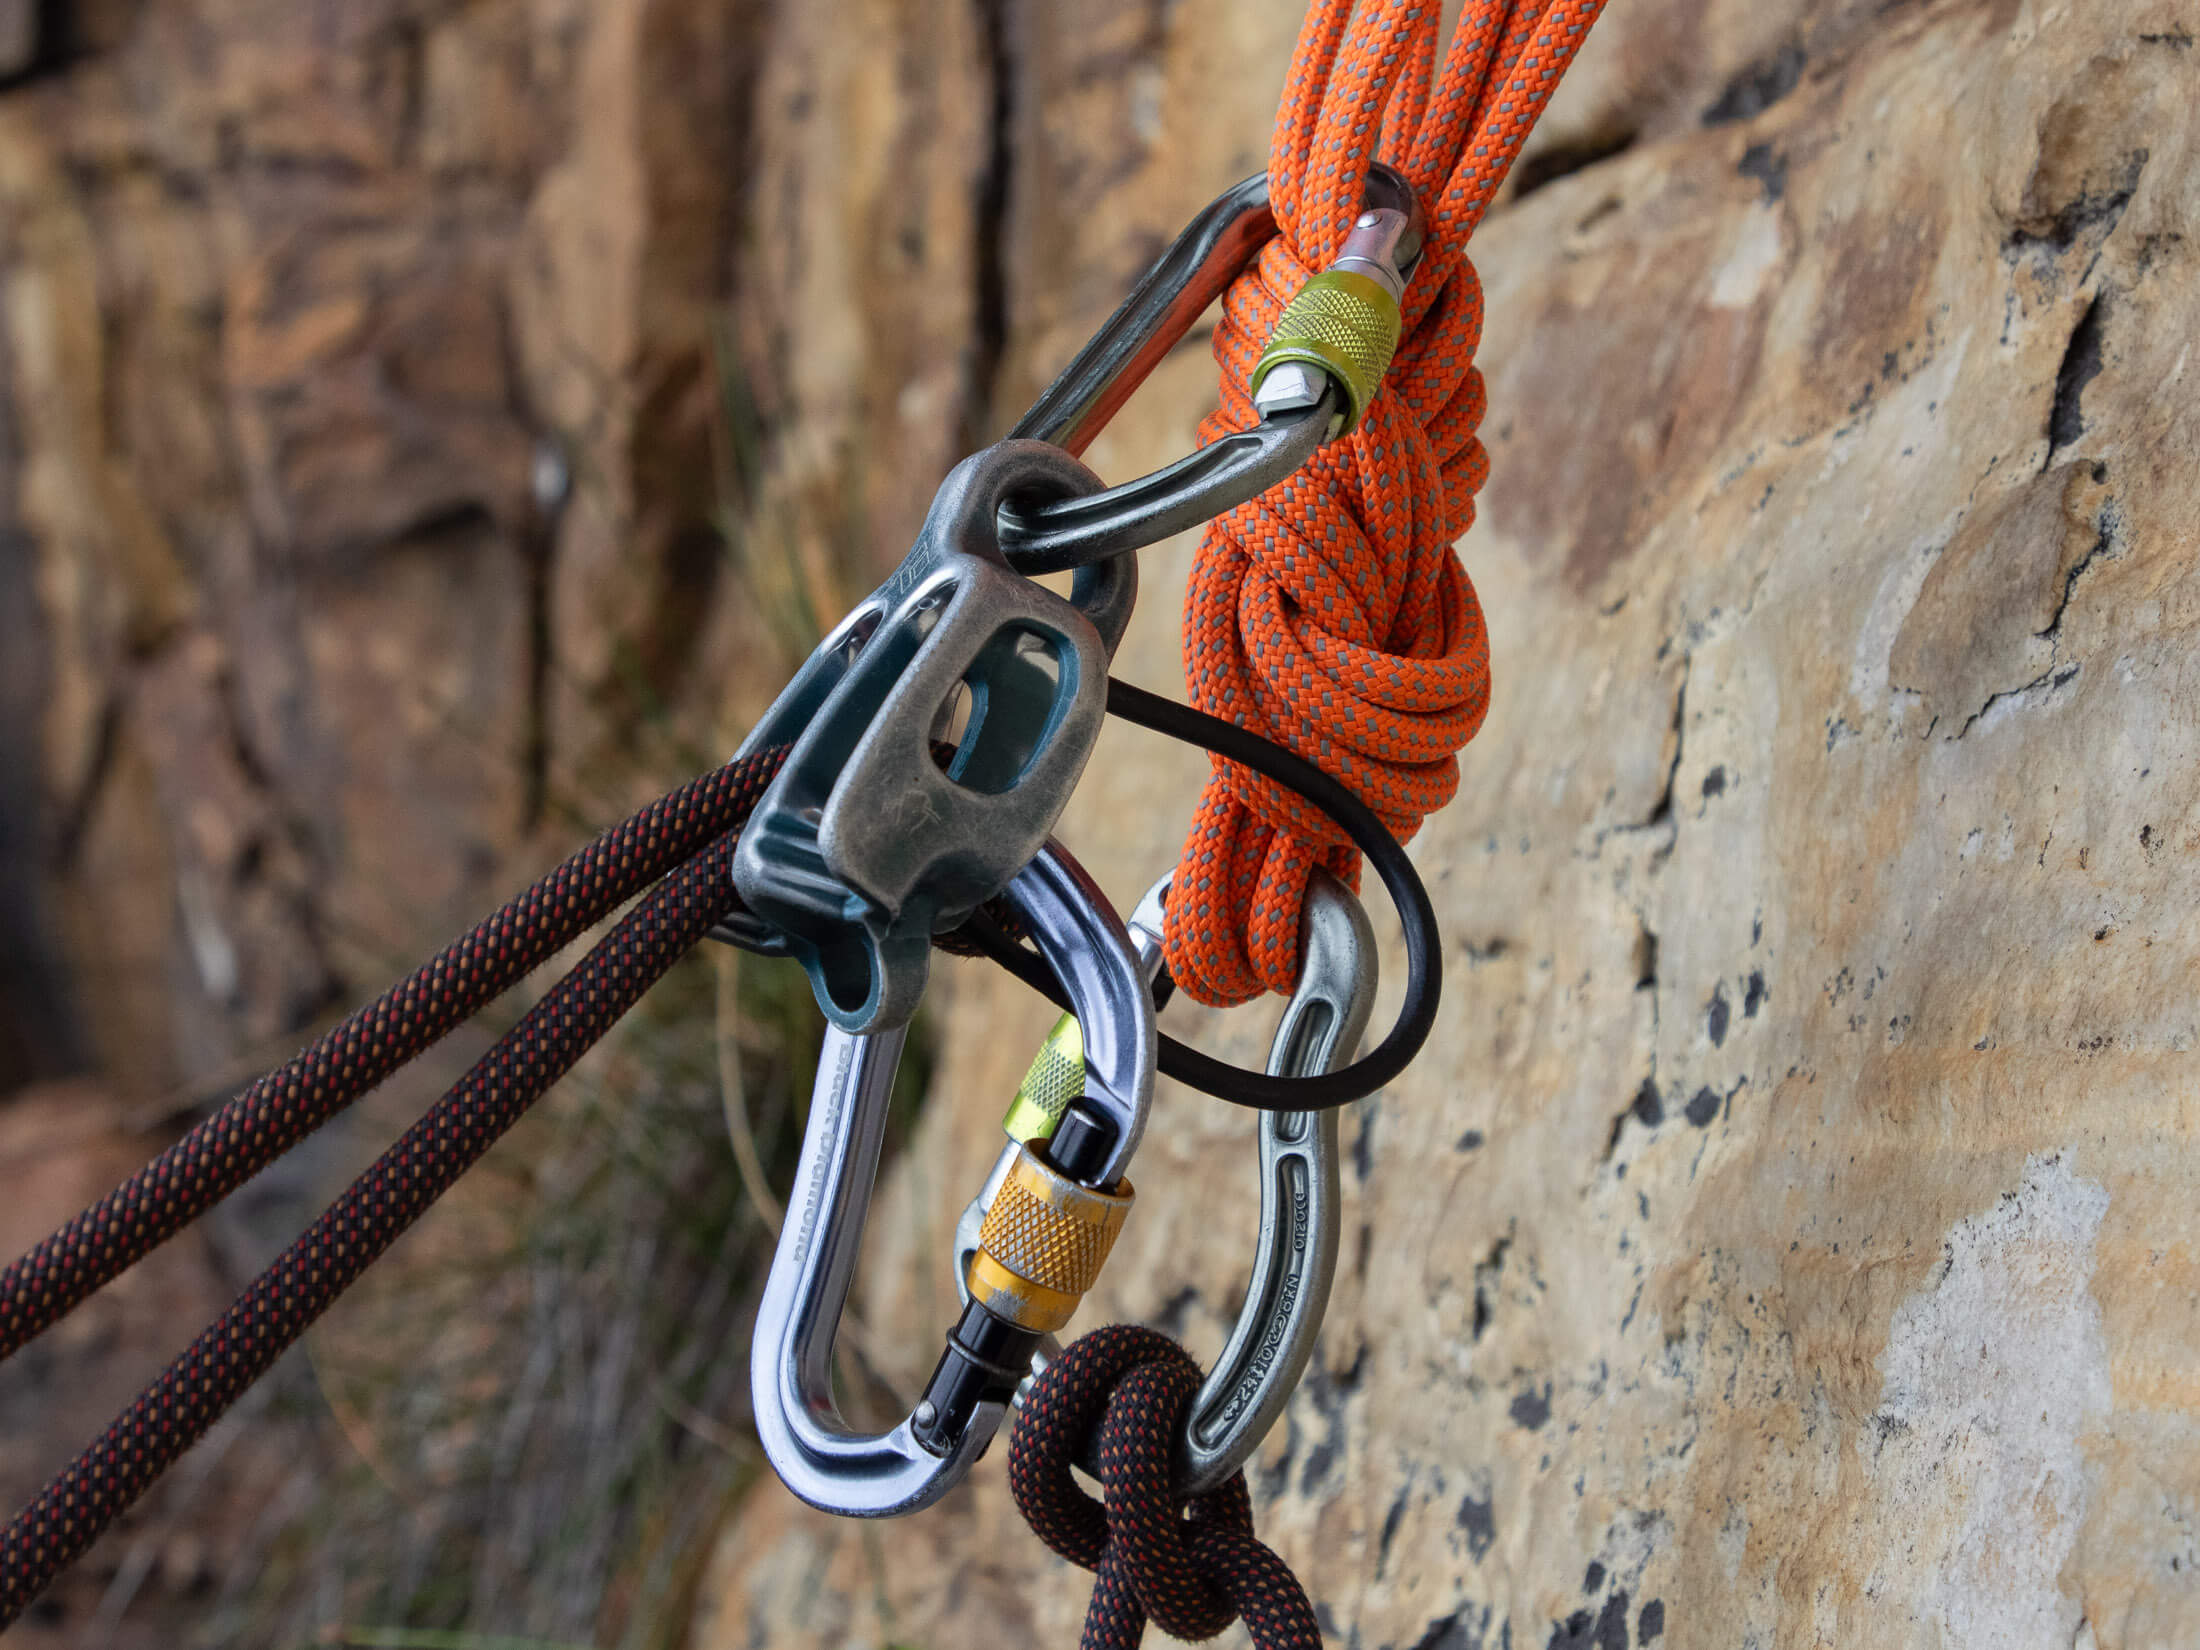
It’s important to note that it can be difficult to release a device in guide mode once it has been weighted. For this reason, I always suggest belaying with a little slack in the system when using a device in guide mode. This way you reduce the chances that the device will lock up if your seconder reverses a move or steps down - a situation that could leave the climber tugging against a tight rope.
Guide-mode devices vs auto-braking devices
Because they can also be used for rappelling and double-rope belaying, guide-mode devices are by far the most popular type of device for multi-pitch climbing, but some teams also carry a single auto-braking device for lead belaying when climbing on a single rope. Besides having their own advantages and disadvantages, these different devices can also have implications for how anchors are rigged.
When they are used to belay a follower, the most obvious difference between a guide-mode device and auto-braking device is that a guide-mode device is rigged one way when used to belay a leader and another way (guide mode) when used to belay a follower. Auto-braking devices are simpler in that they are rigged the same way regardless of the situation. However, you will need to run the brake strand through a redirect when lowering a climber with a Grigri. Still, this is easier than lowering someone with a guide-mode device.
Belaying directly off the anchor
There are several reasons this is the preferred way to set up a belay stance for a follower. Firstly, it’s easy to set up and usually puts you a comfortable working distance from the anchor. Secondly, it allows you to use a guide-mode device, which is safer if used properly. And thirdly, it keeps the belay and the weight of the climber off your harness. This makes it easier to escape the system in an emergency. It’s also easier and more comfortable to catch a fall when the load is put on the anchor and not your harness. Lastly, you can belay up two climbers at the same time - useful if you are climbing in a group of three.
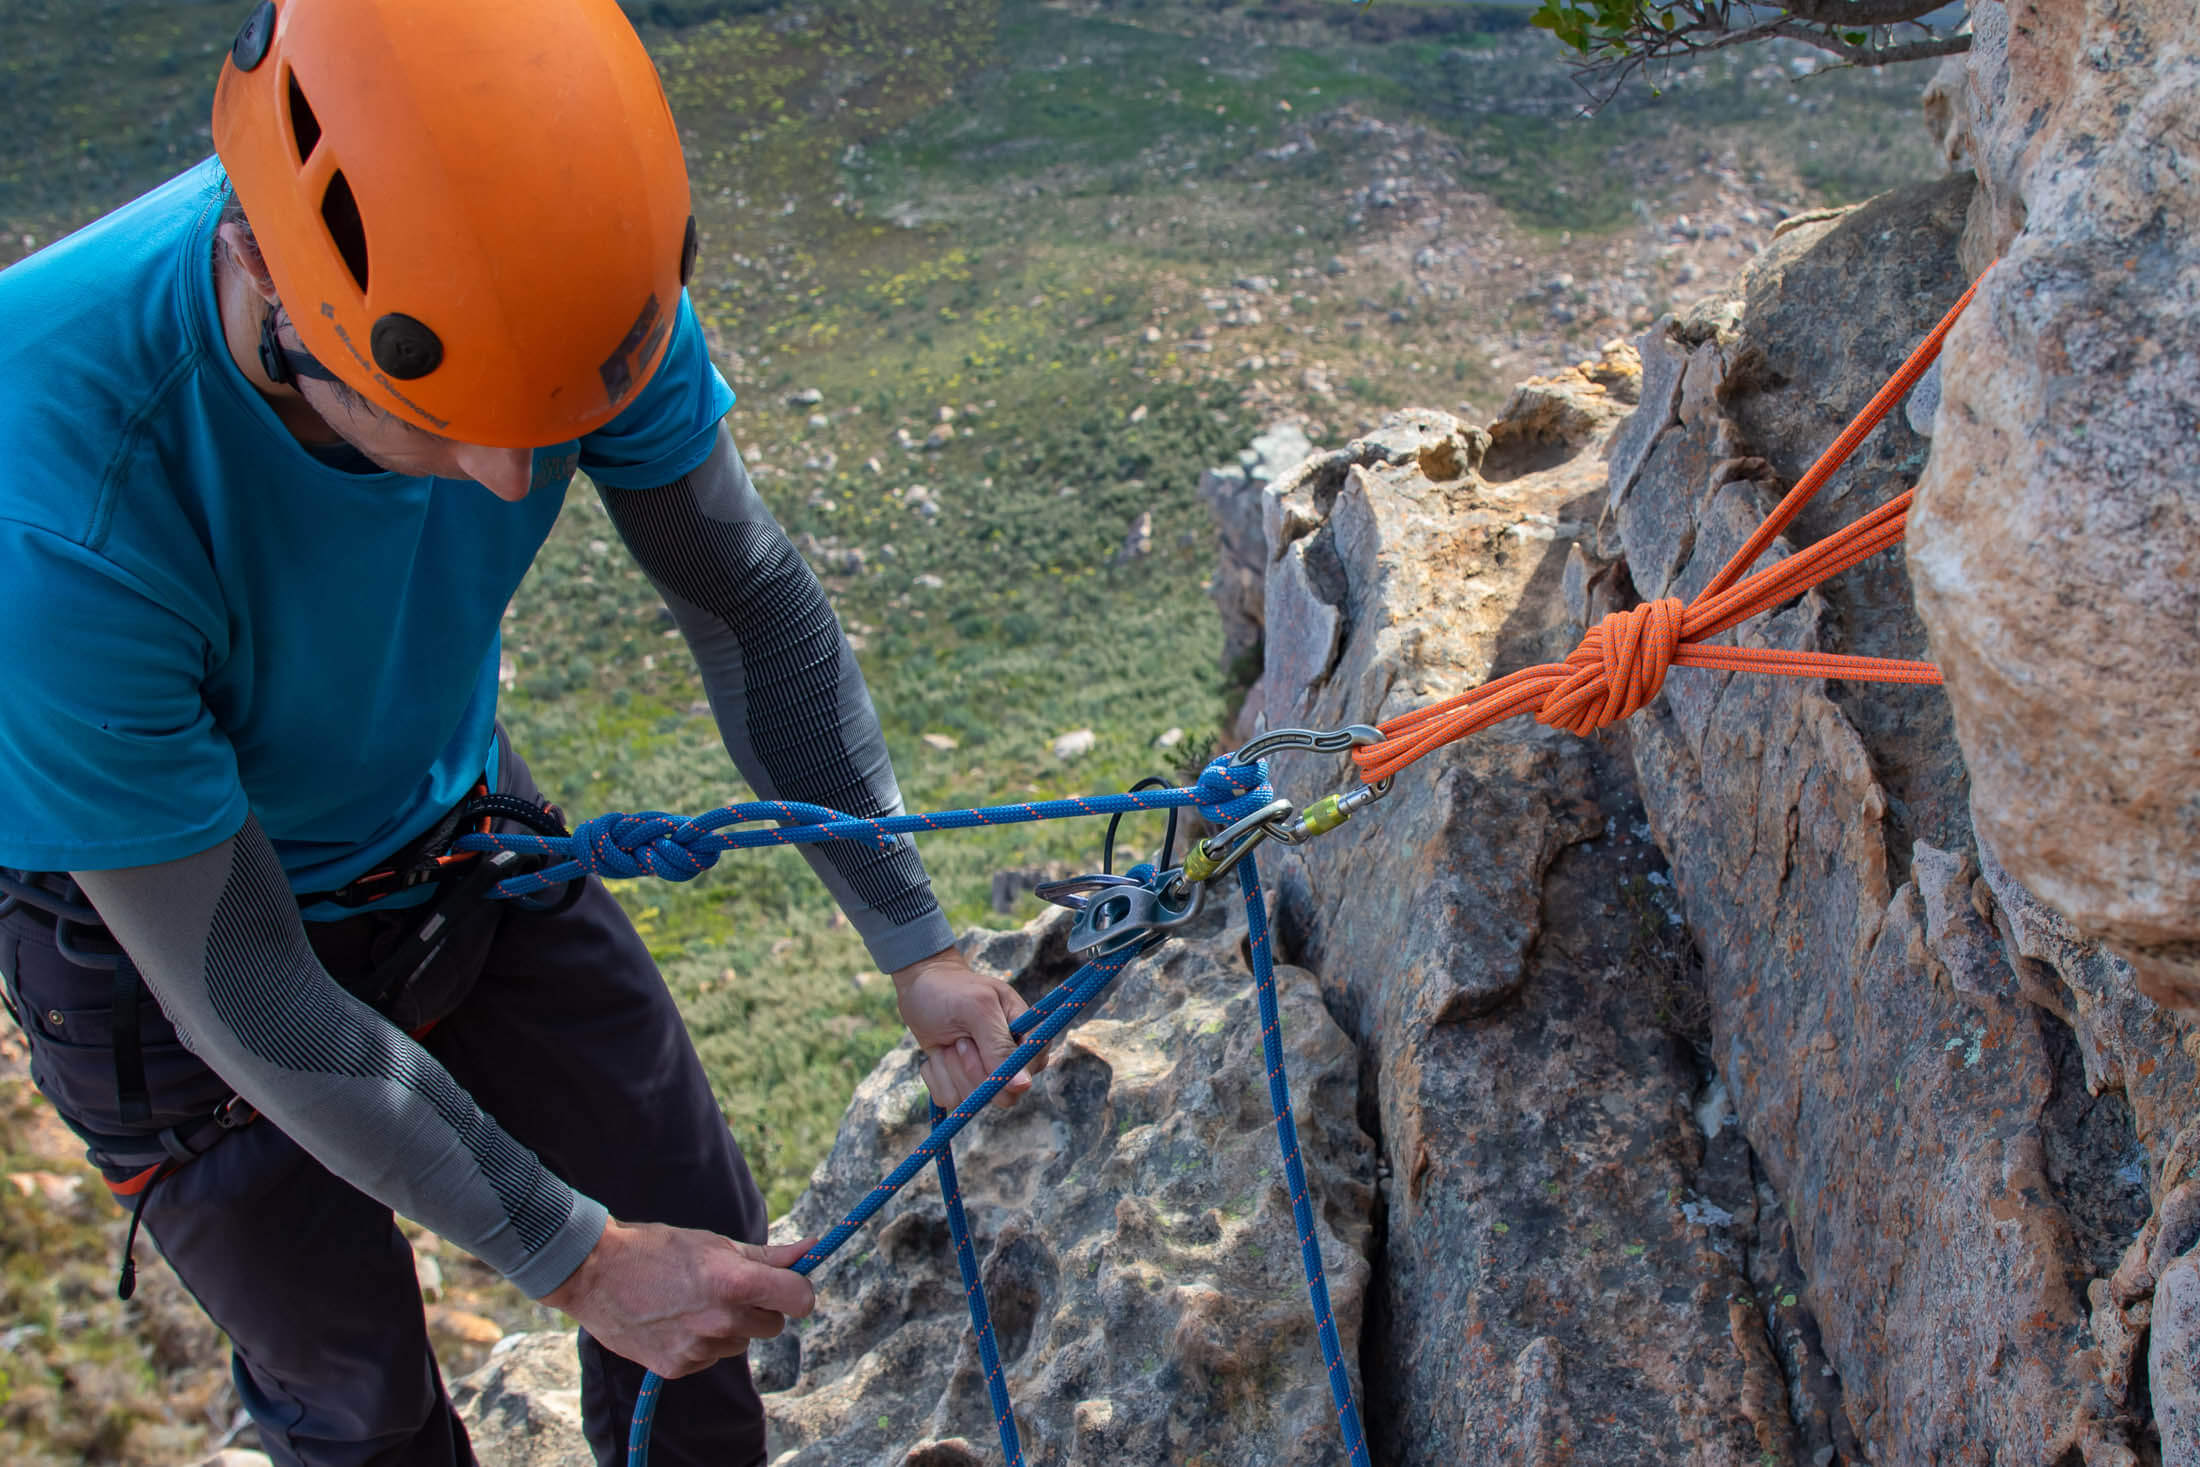
When there’s only a short distance between you and the anchor, it's best to attach the belay device directly to a master point or shelf as this is the strongest part of an anchor. If you have to attach the belay device to a primary anchor, it’s essential that this component is strong and solid not only because it will support the entire load of the belay but also because a failure in this piece would result in the maximum amount of extension and a severe shock load.
Secure yourself to the master point with the rope or PAS
You can secure yourself to an anchor using the rope or a PAS. If using the rope, secure it to the master point carabiner with a clove hitch. It doesn’t matter if the belayer secures herself to the anchor using the one-handed clove hitch method or the ‘air clove’ method. Just don’t try to secure the follower to the anchor using the one-handed method. If you did and she fell while you only had only the first loop of rope in the carabiner, this hardware could prevent the device from auto-braking. Always use an ‘air clove’ when securing the seconder to the anchor.
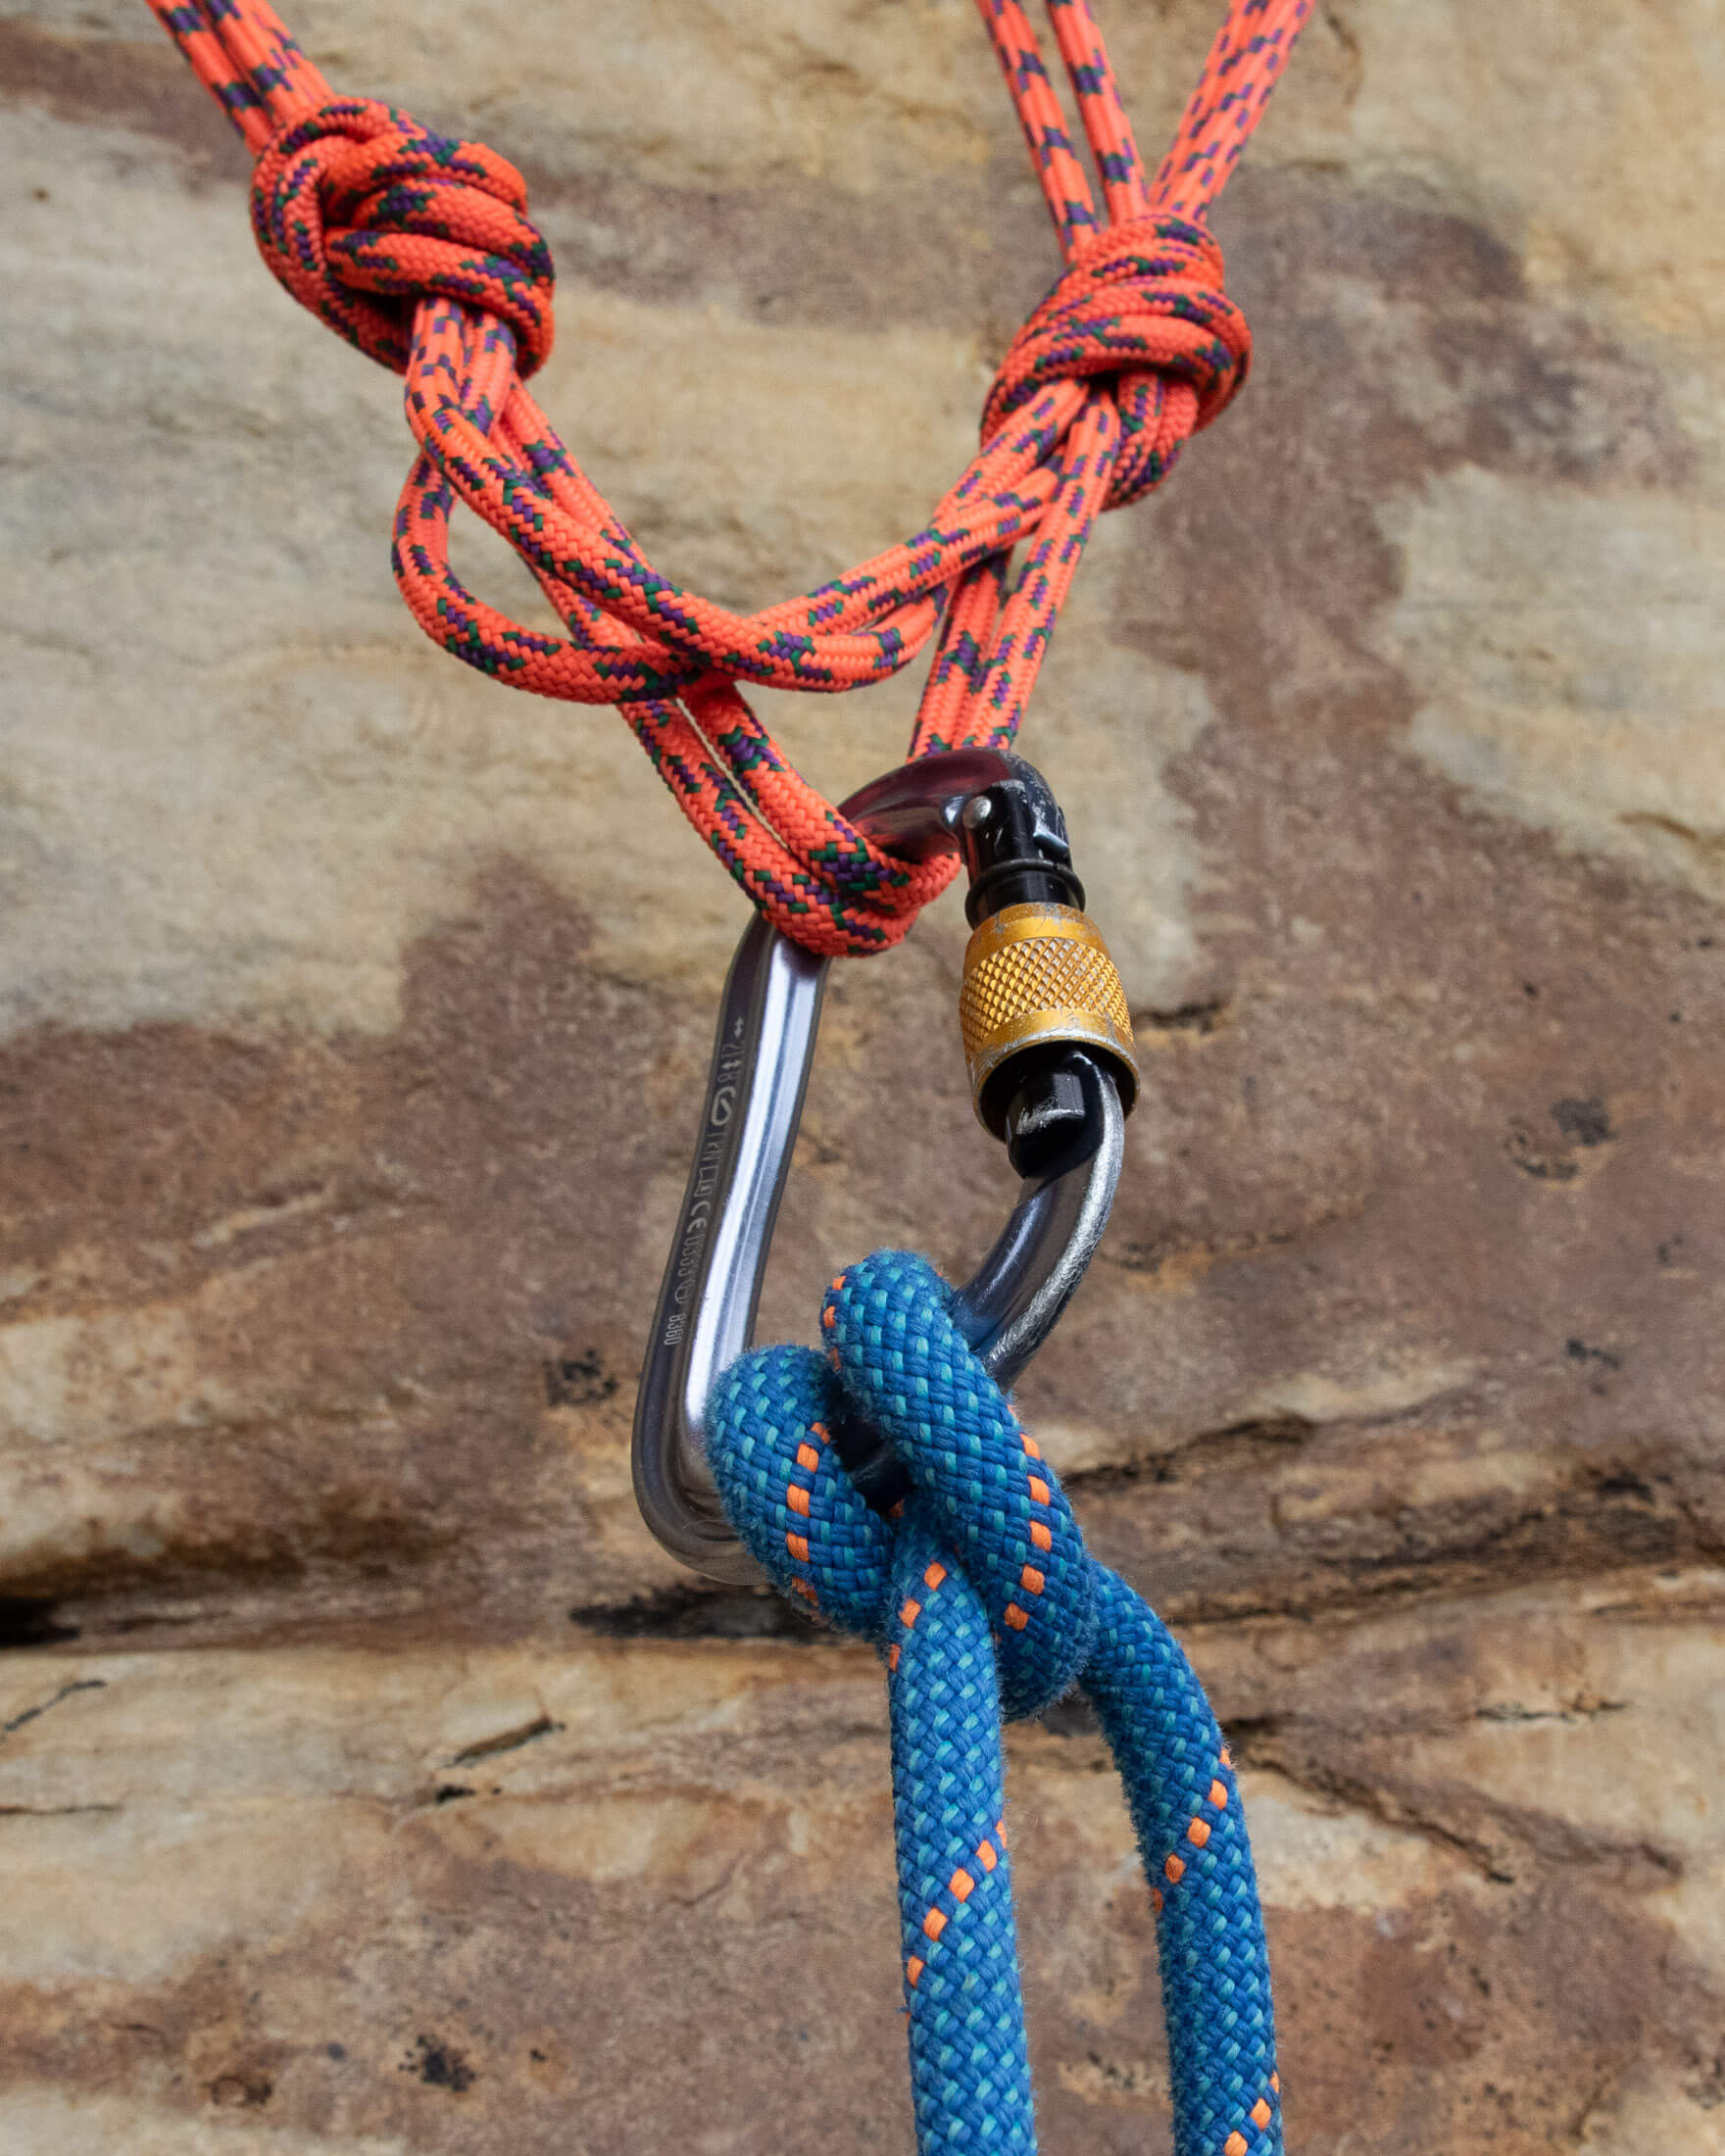
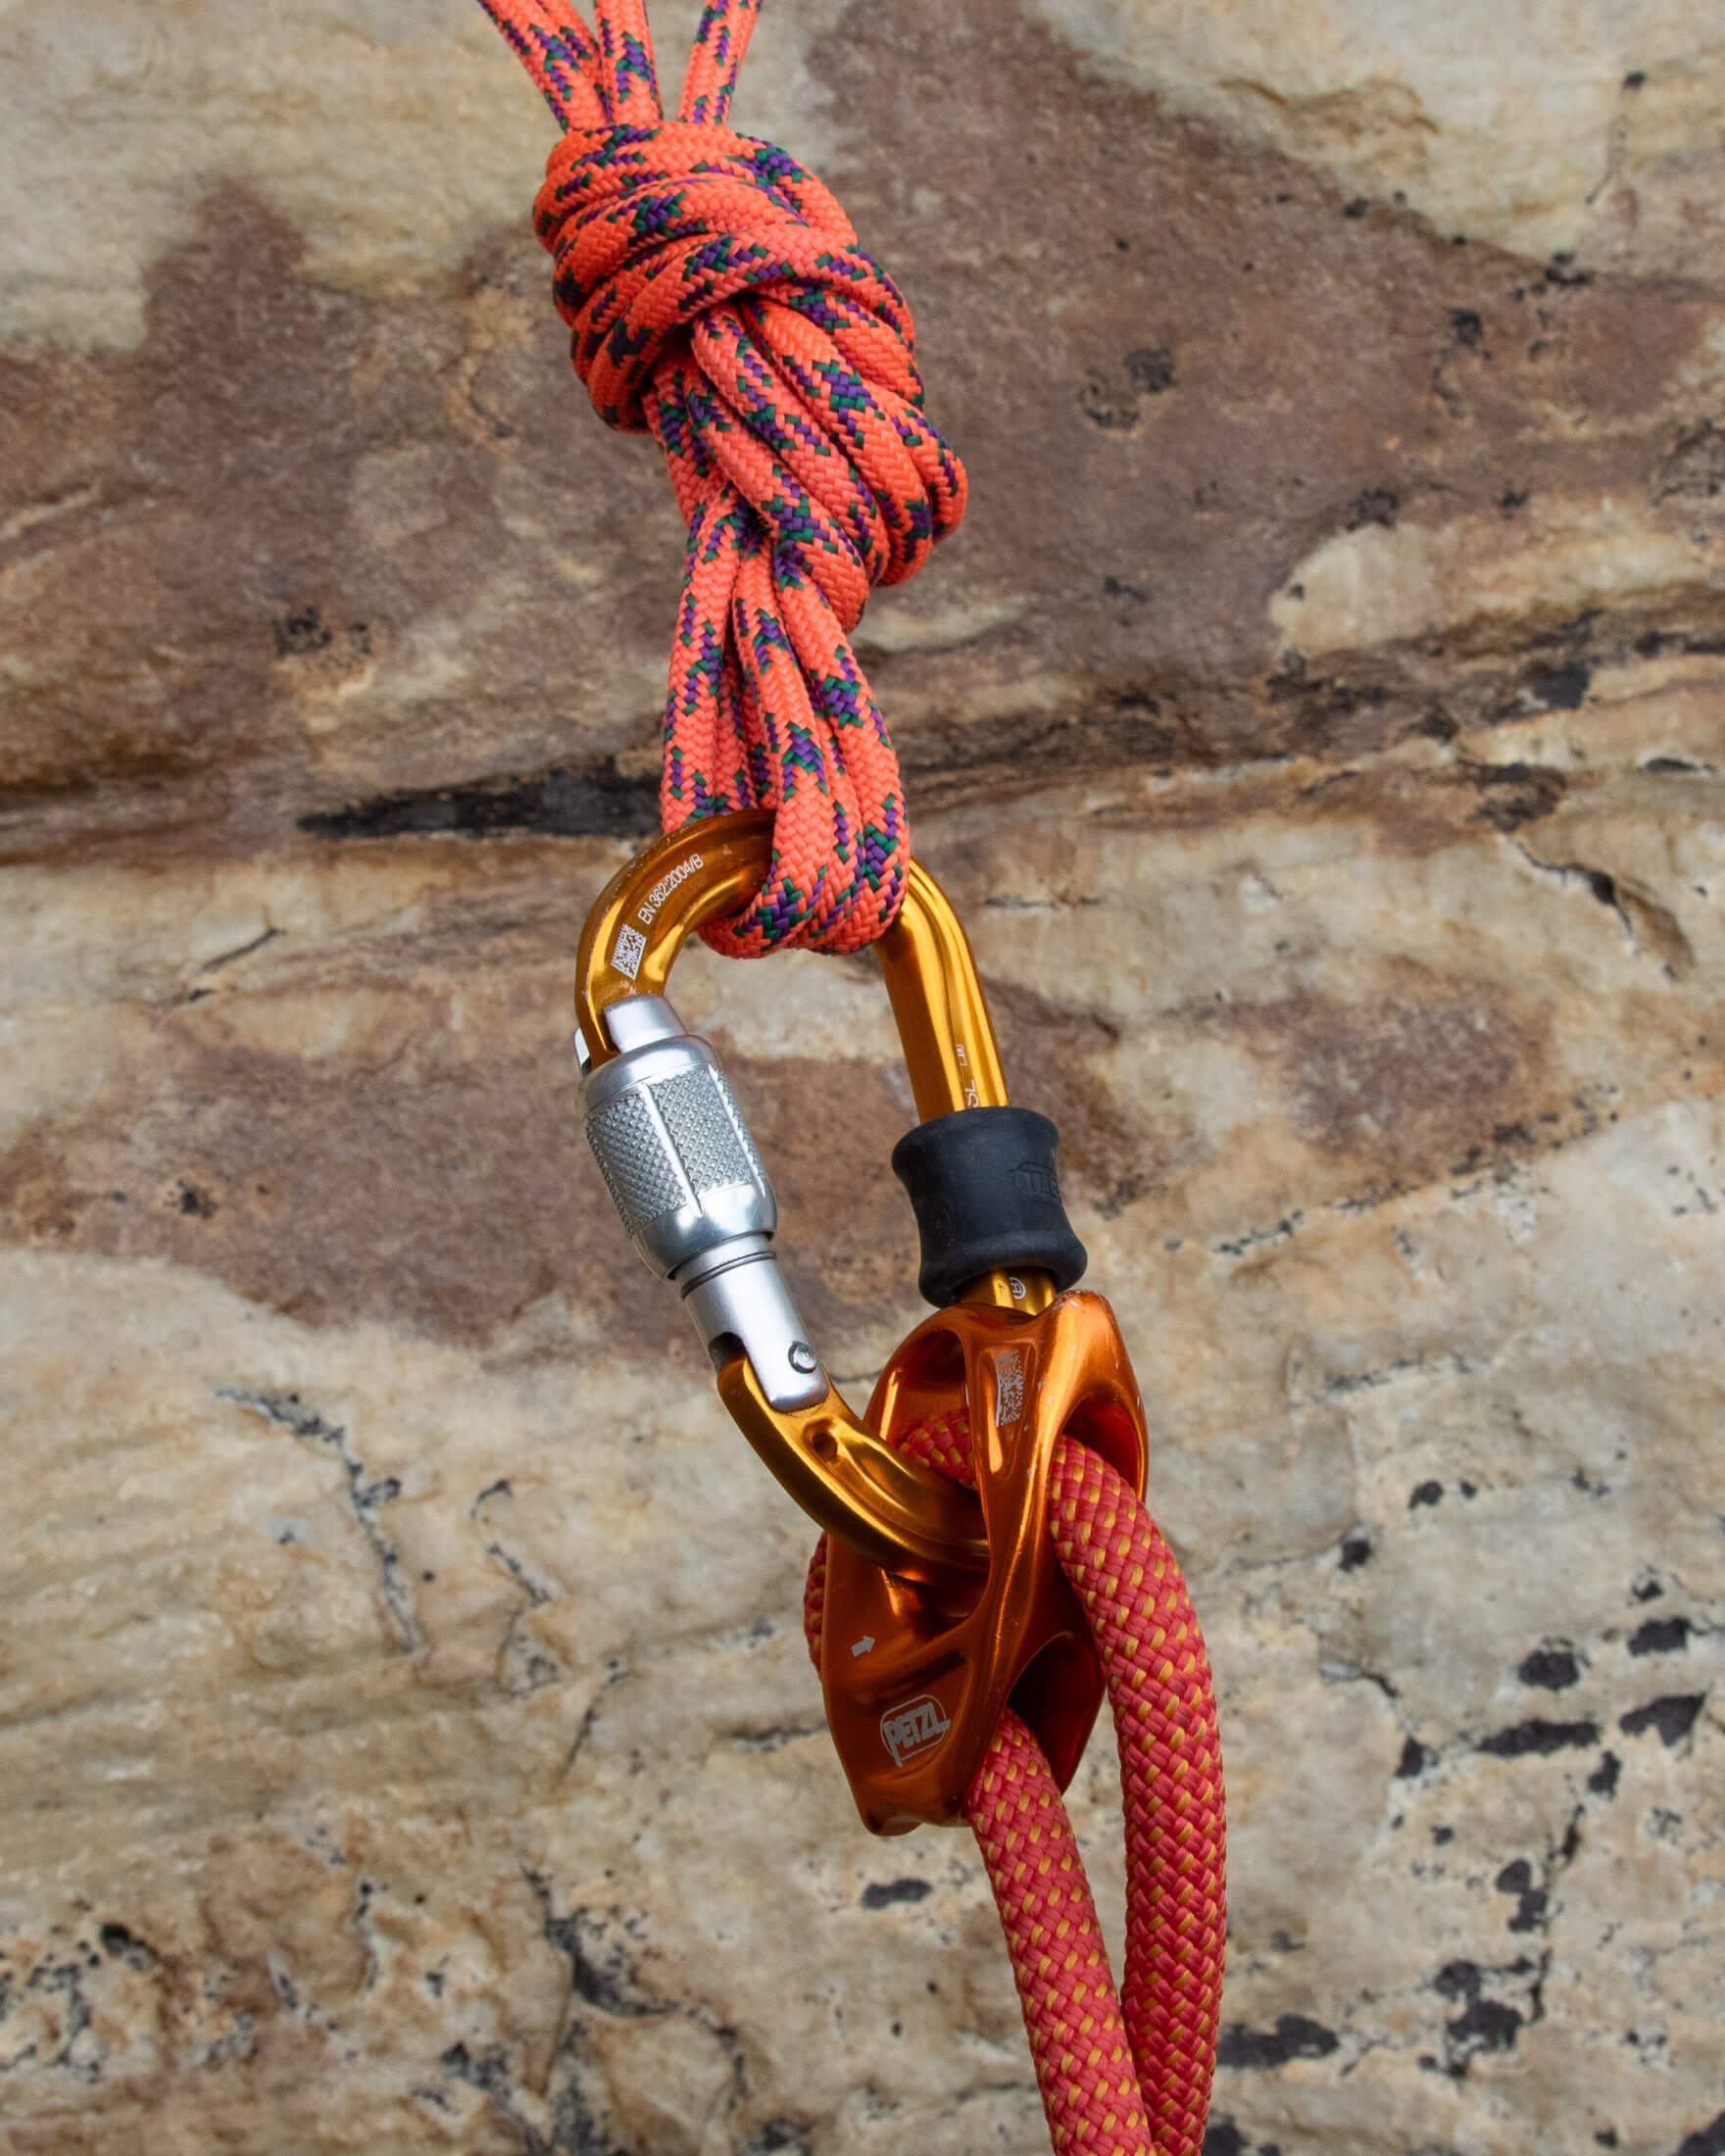
If you’re going to use a personal anchor system, I strongly recommend that you use one with a section of dynamic rope for the lanyard (I use the Petzl Connect Adjust). A rope connection will have some dynamic properties and will take some of the force out of a fall onto the anchor. Obviously, you should always do what you can to avoid putting slack in your connection to the anchor, but this is even more important if your lanyard is made from Dynex or Dyneema. Even a short fall onto a sling or PAS made from these materials can create a huge amount of force - enough to cause serious injury or a failure in your anchor.
Attach the belay device to the shelf or master point
Anchor attachment points vary from configuration to configuration. With a quad, you have two master points: one for you and one for the belay device. As with the overhand-knot anchor, it would be difficult to belay off one of these if you were clipped directly to the other. However, if you can just put a few inches between yourself and the anchor, this setup becomes a lot more user friendly.
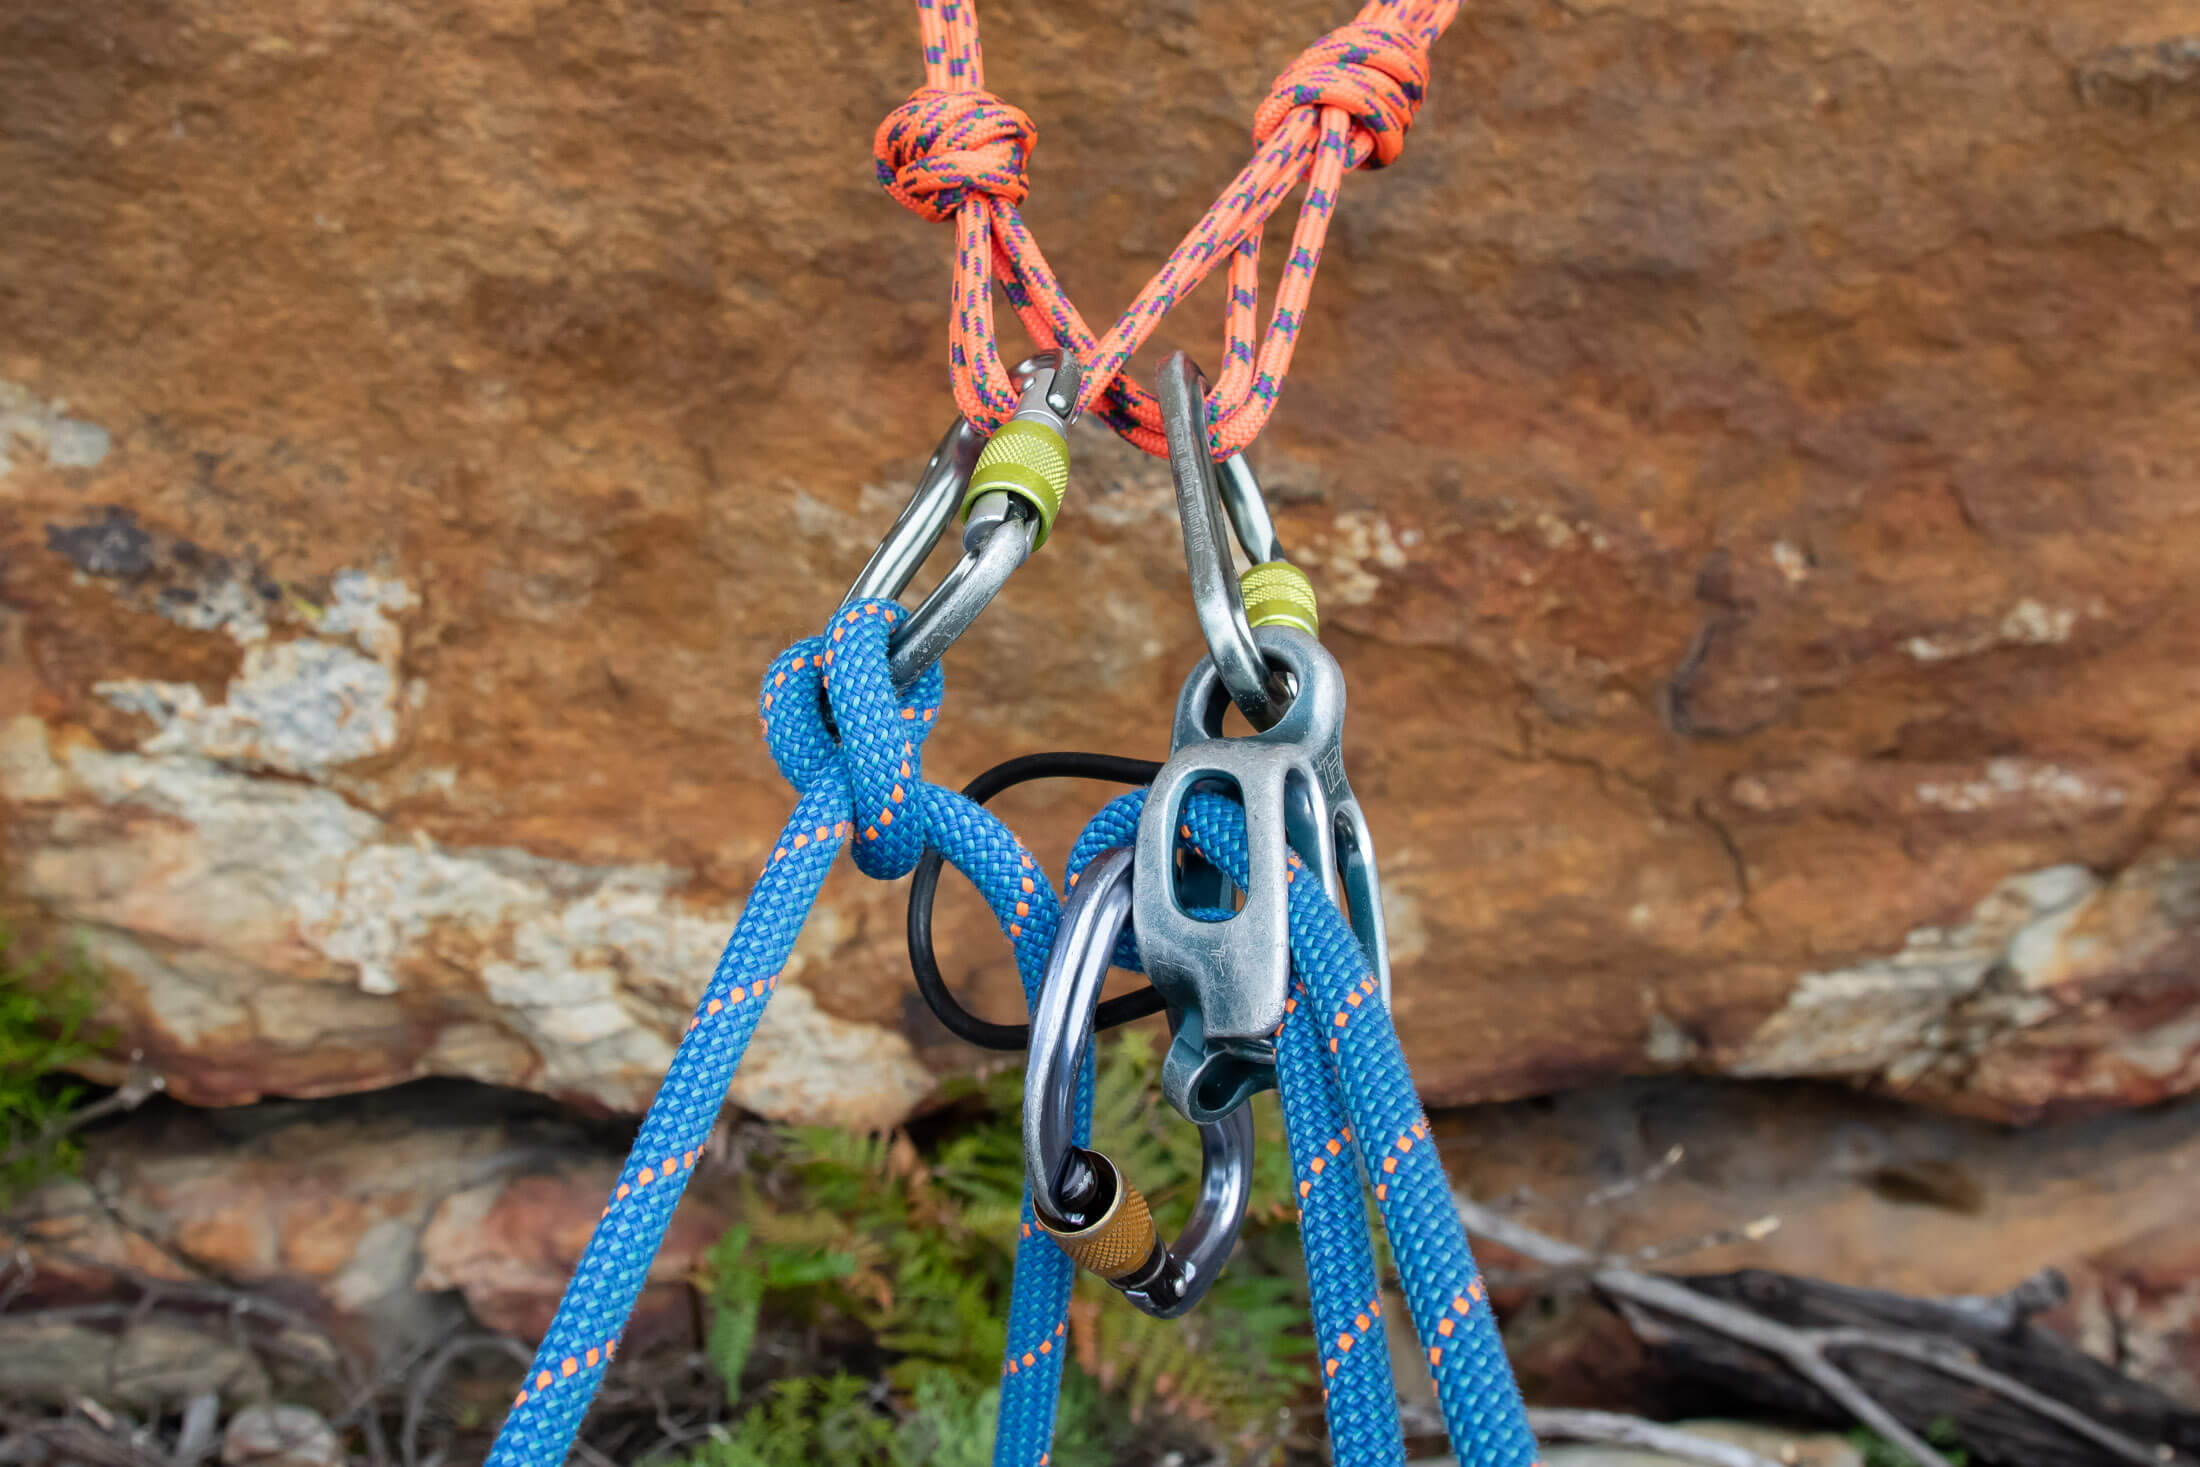
When using an overhand-knot anchor, you can attach the belay device to either the master point or the shelf. If you clip the belay device to the master point, use a second locking carabiner to secure it to the master point carabiner or the master point itself. This way, you won’t have to open the master point carabiner to swap from guide mode to lead mode.
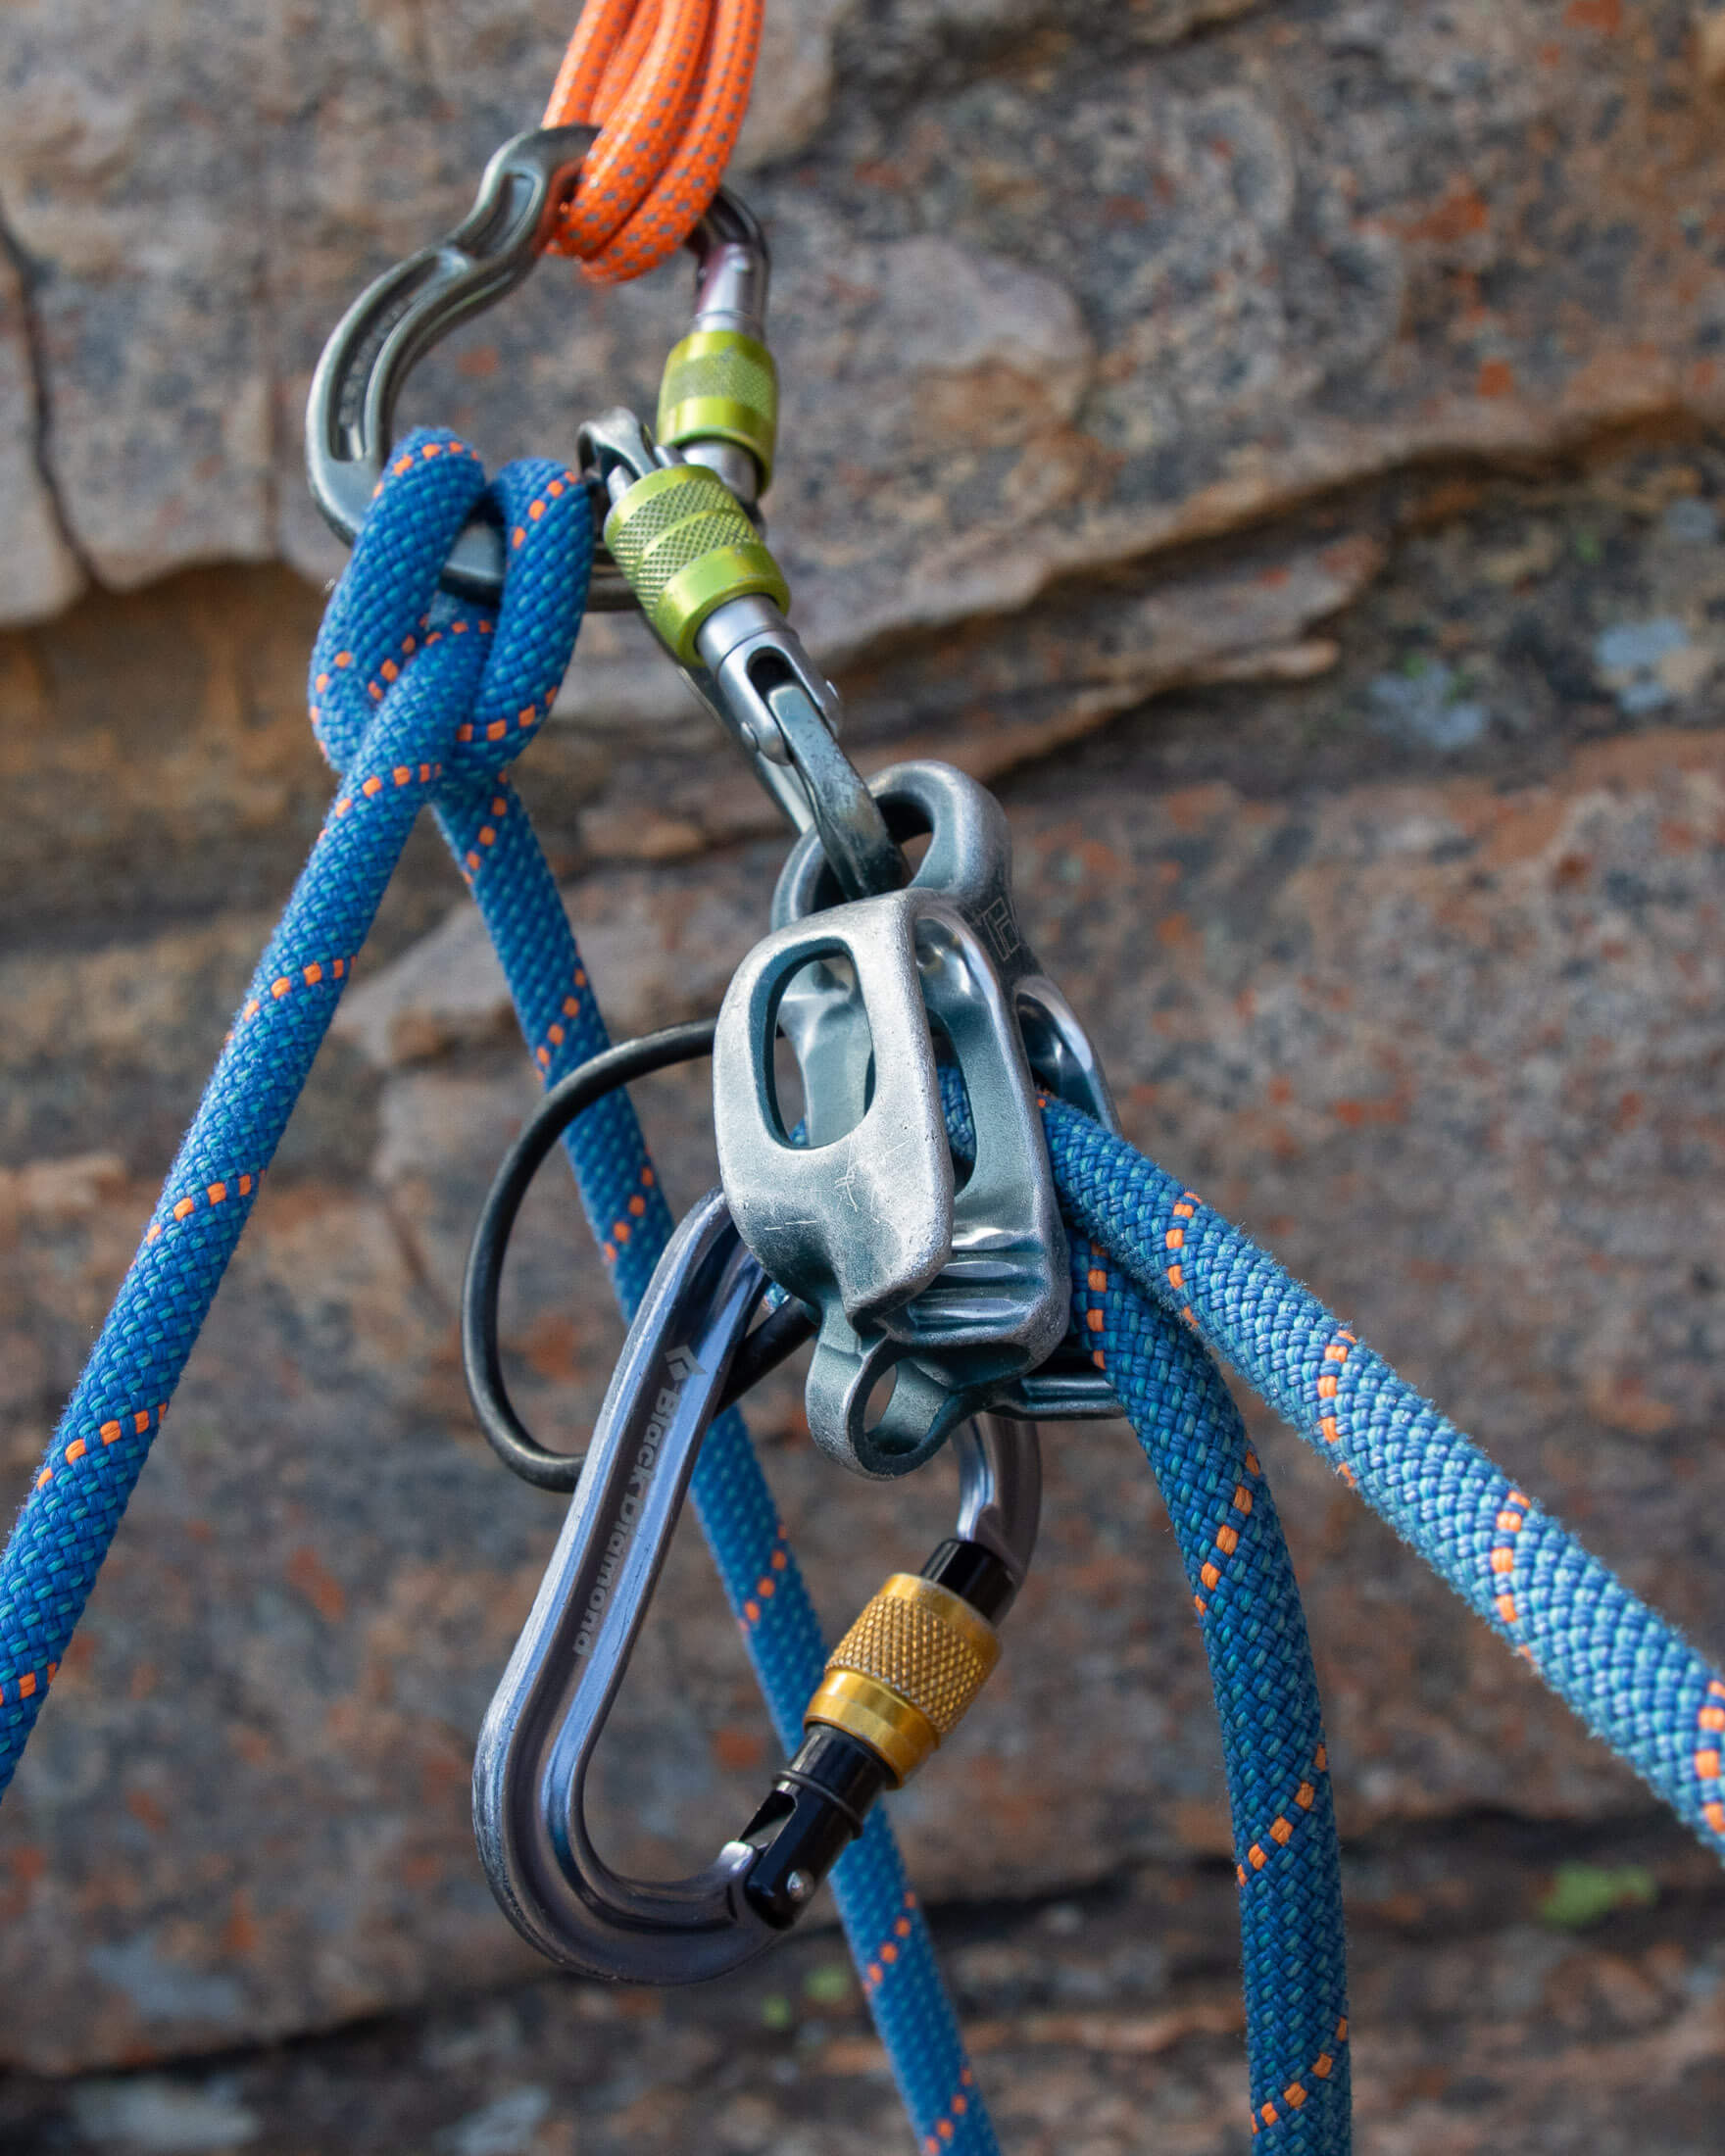
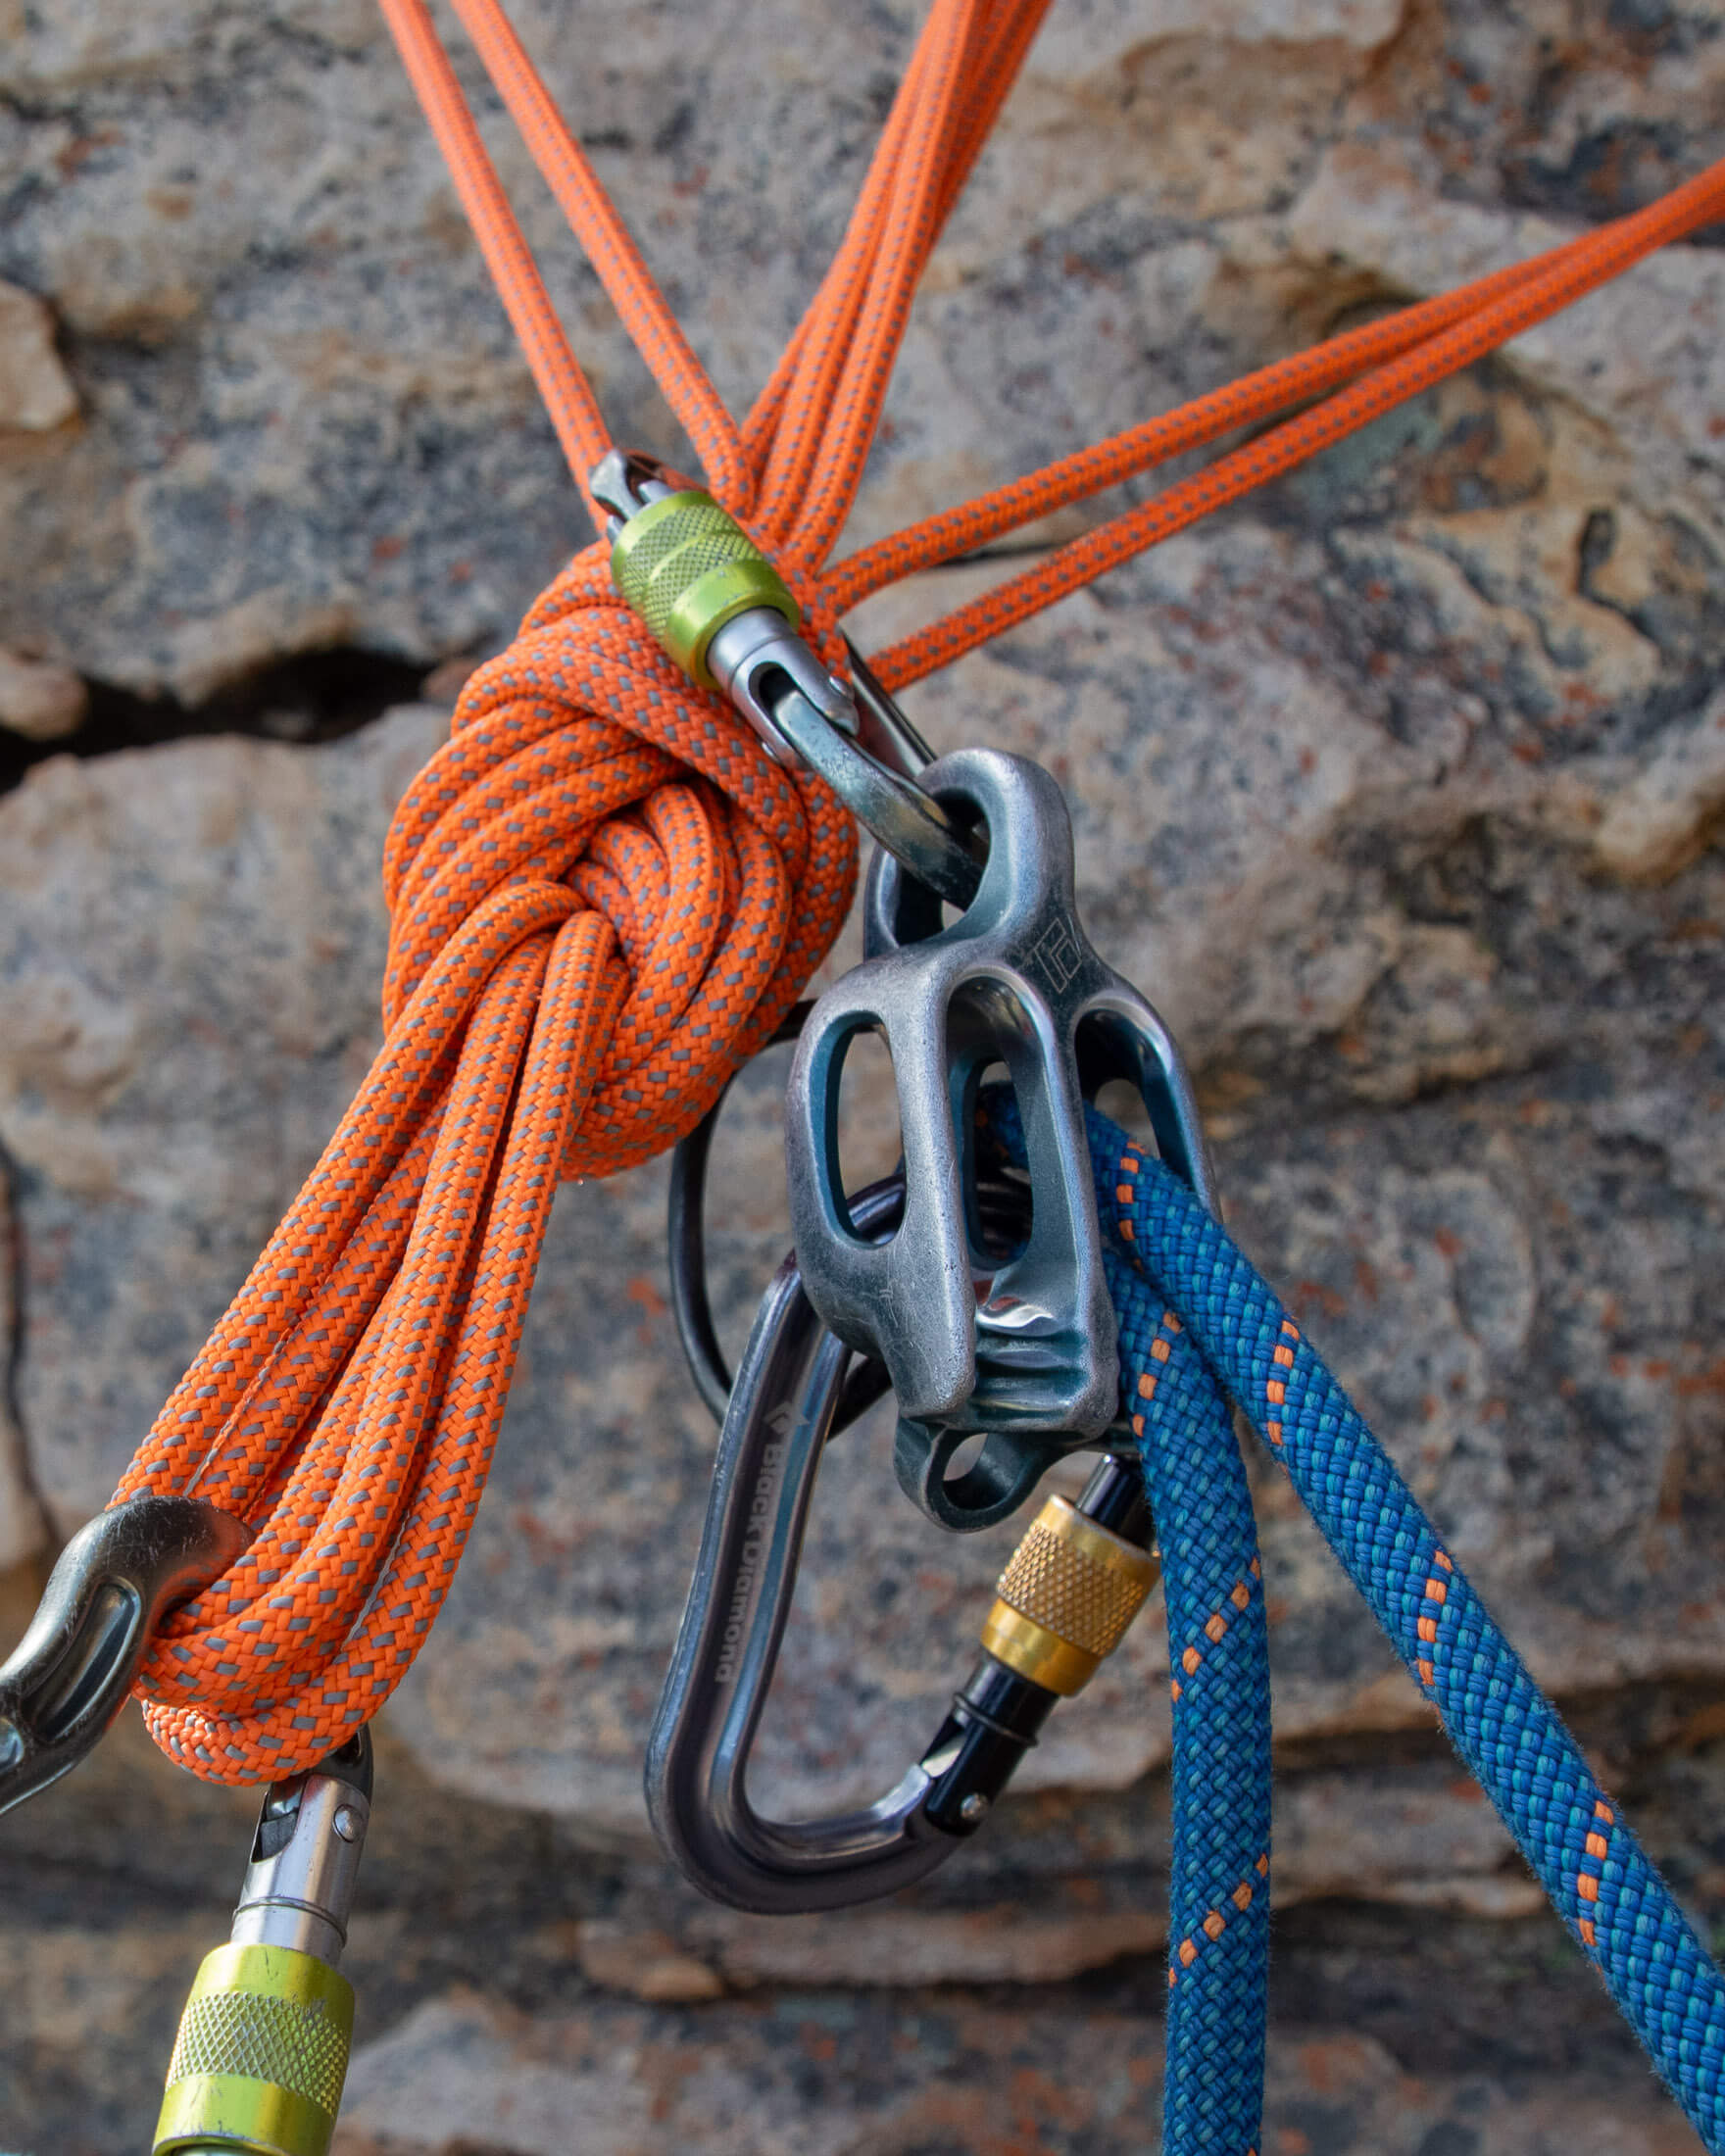
The advantage of the shelf is that it gives you a higher attachment point that is supported by all components. This reduces the risk of extension and shock loading in the event that a primary anchor failed. Just make sure that you clip the carabiner through the loop in every arm.
Belaying from a position some distance from the anchor
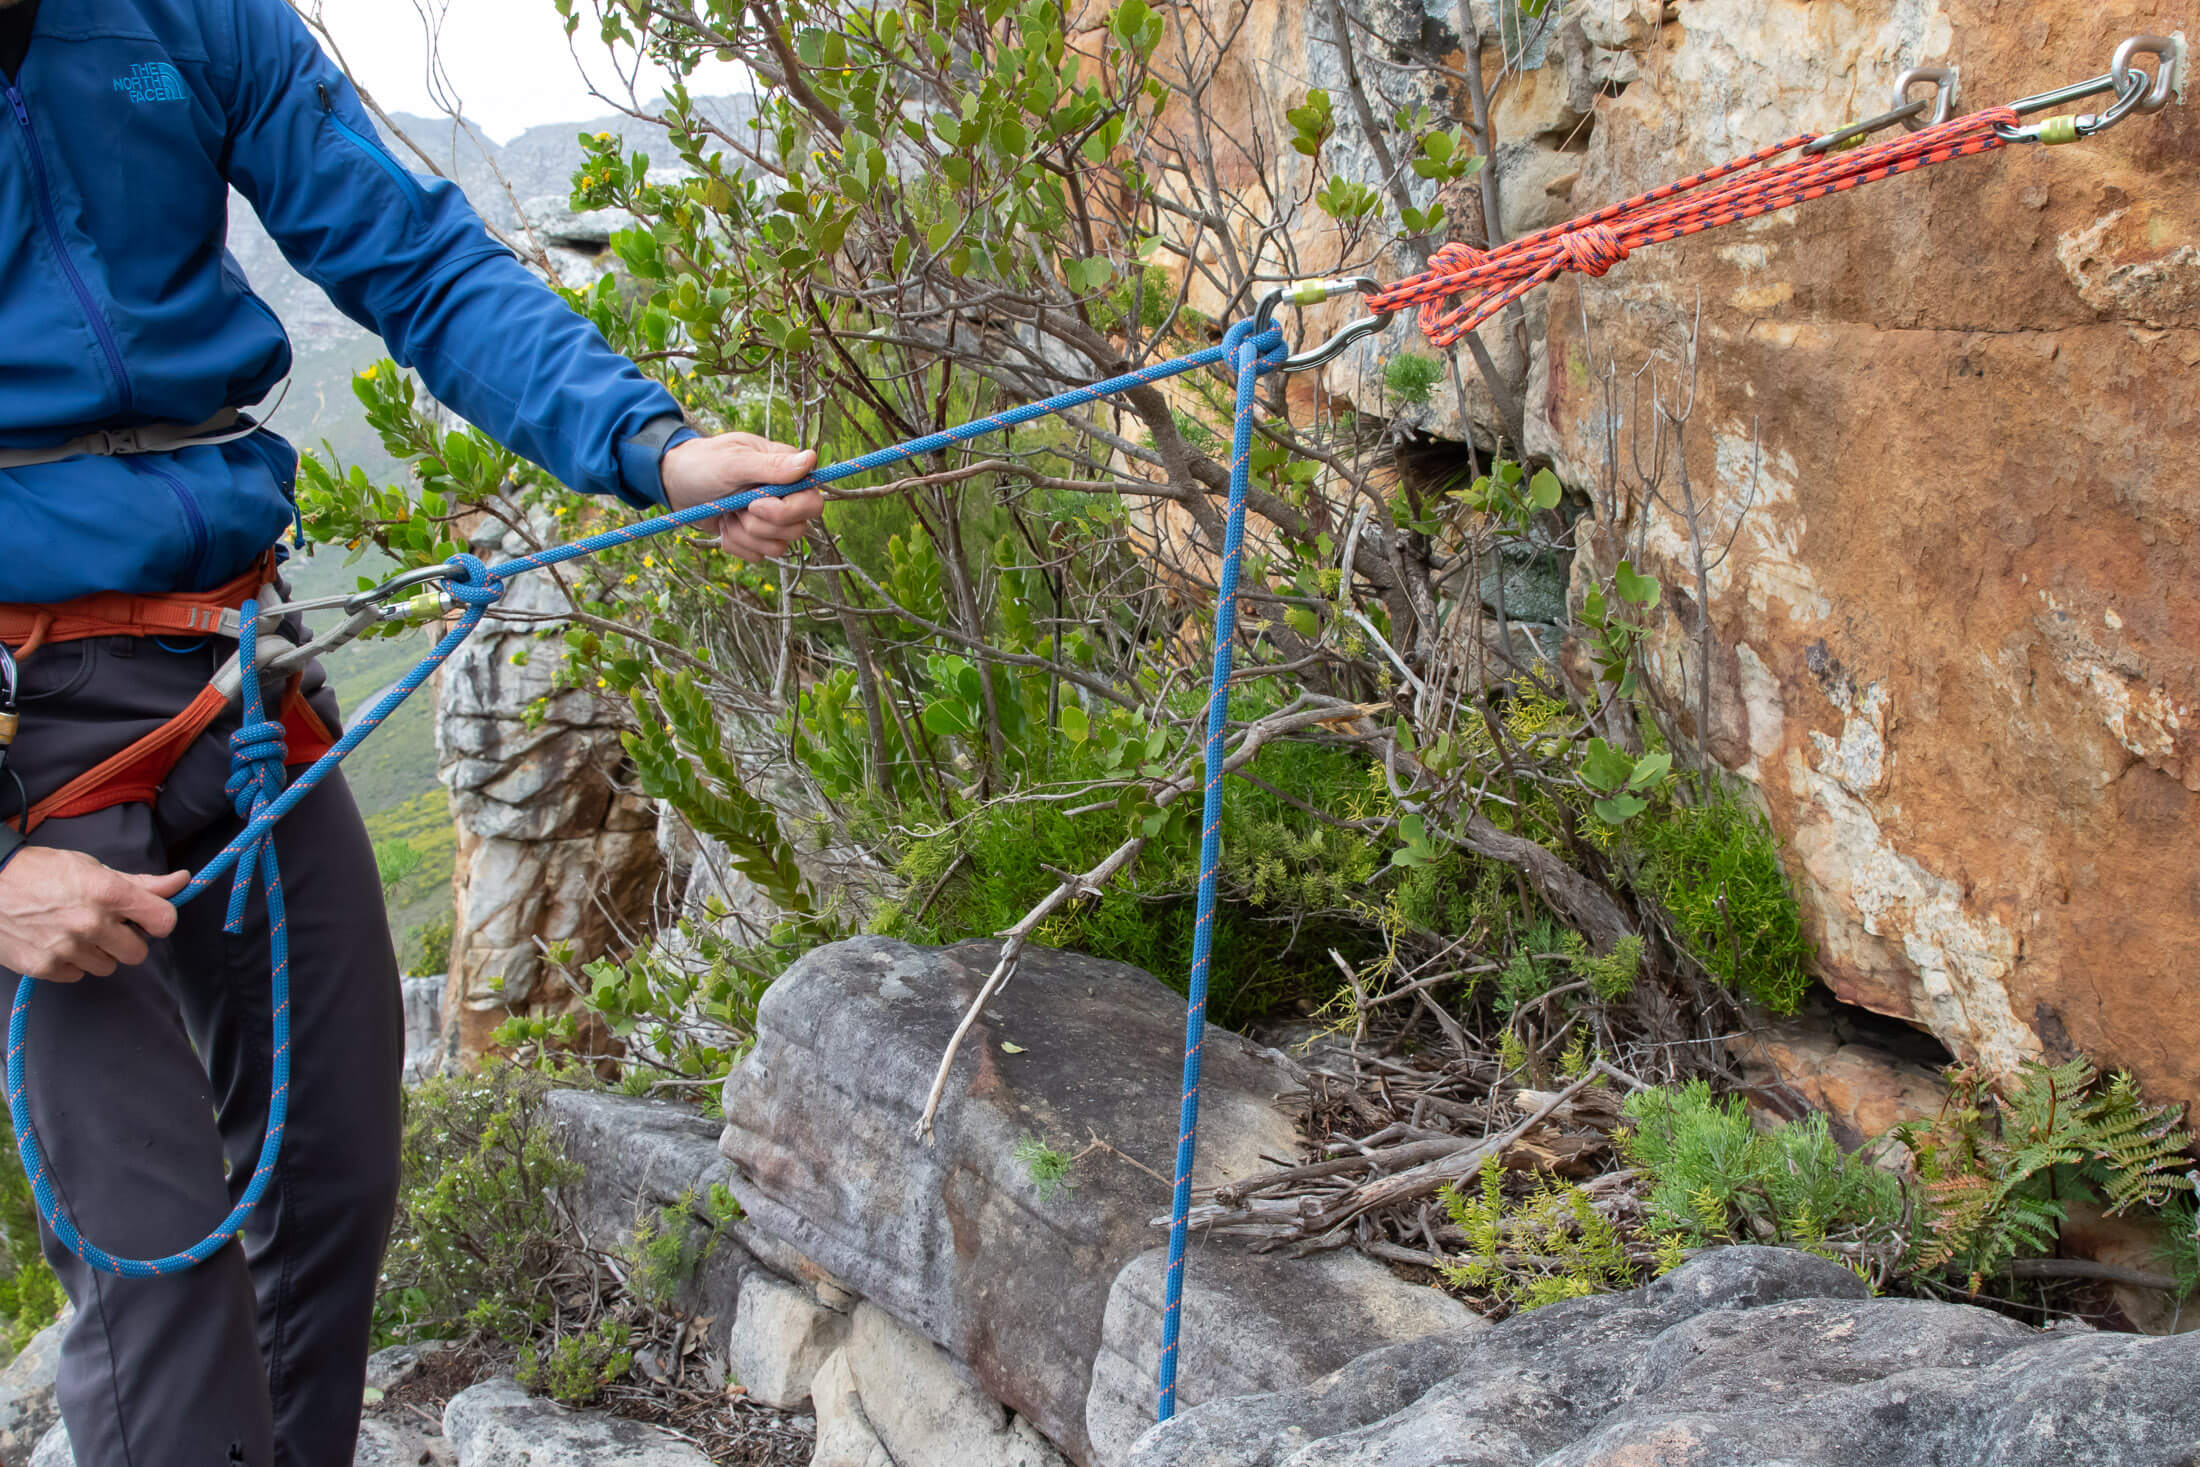
If you need to position yourself more than 1.5 m (5 ft) from the anchor), simply clove-hitching yourself to the anchor can present a challenge: you might have to return to the anchor several times to adjust the length of rope out before you get the distance right. To avoid this faff, it’s best to connect yourself to the master point with a loop that you can adjust on your end.
Create an adjustable loop between yourself and the anchor
To create your adjustable loop, simply clip the rope through the master point and then bring it full circle back to your belay loop. Next, close the loop with a clove hitch secured to a locking carabiner on your belay loop. You can now make the loop longer or shorter by loosening and adjusting the clove hitch.
Extend your belay device from the anchor using the rope
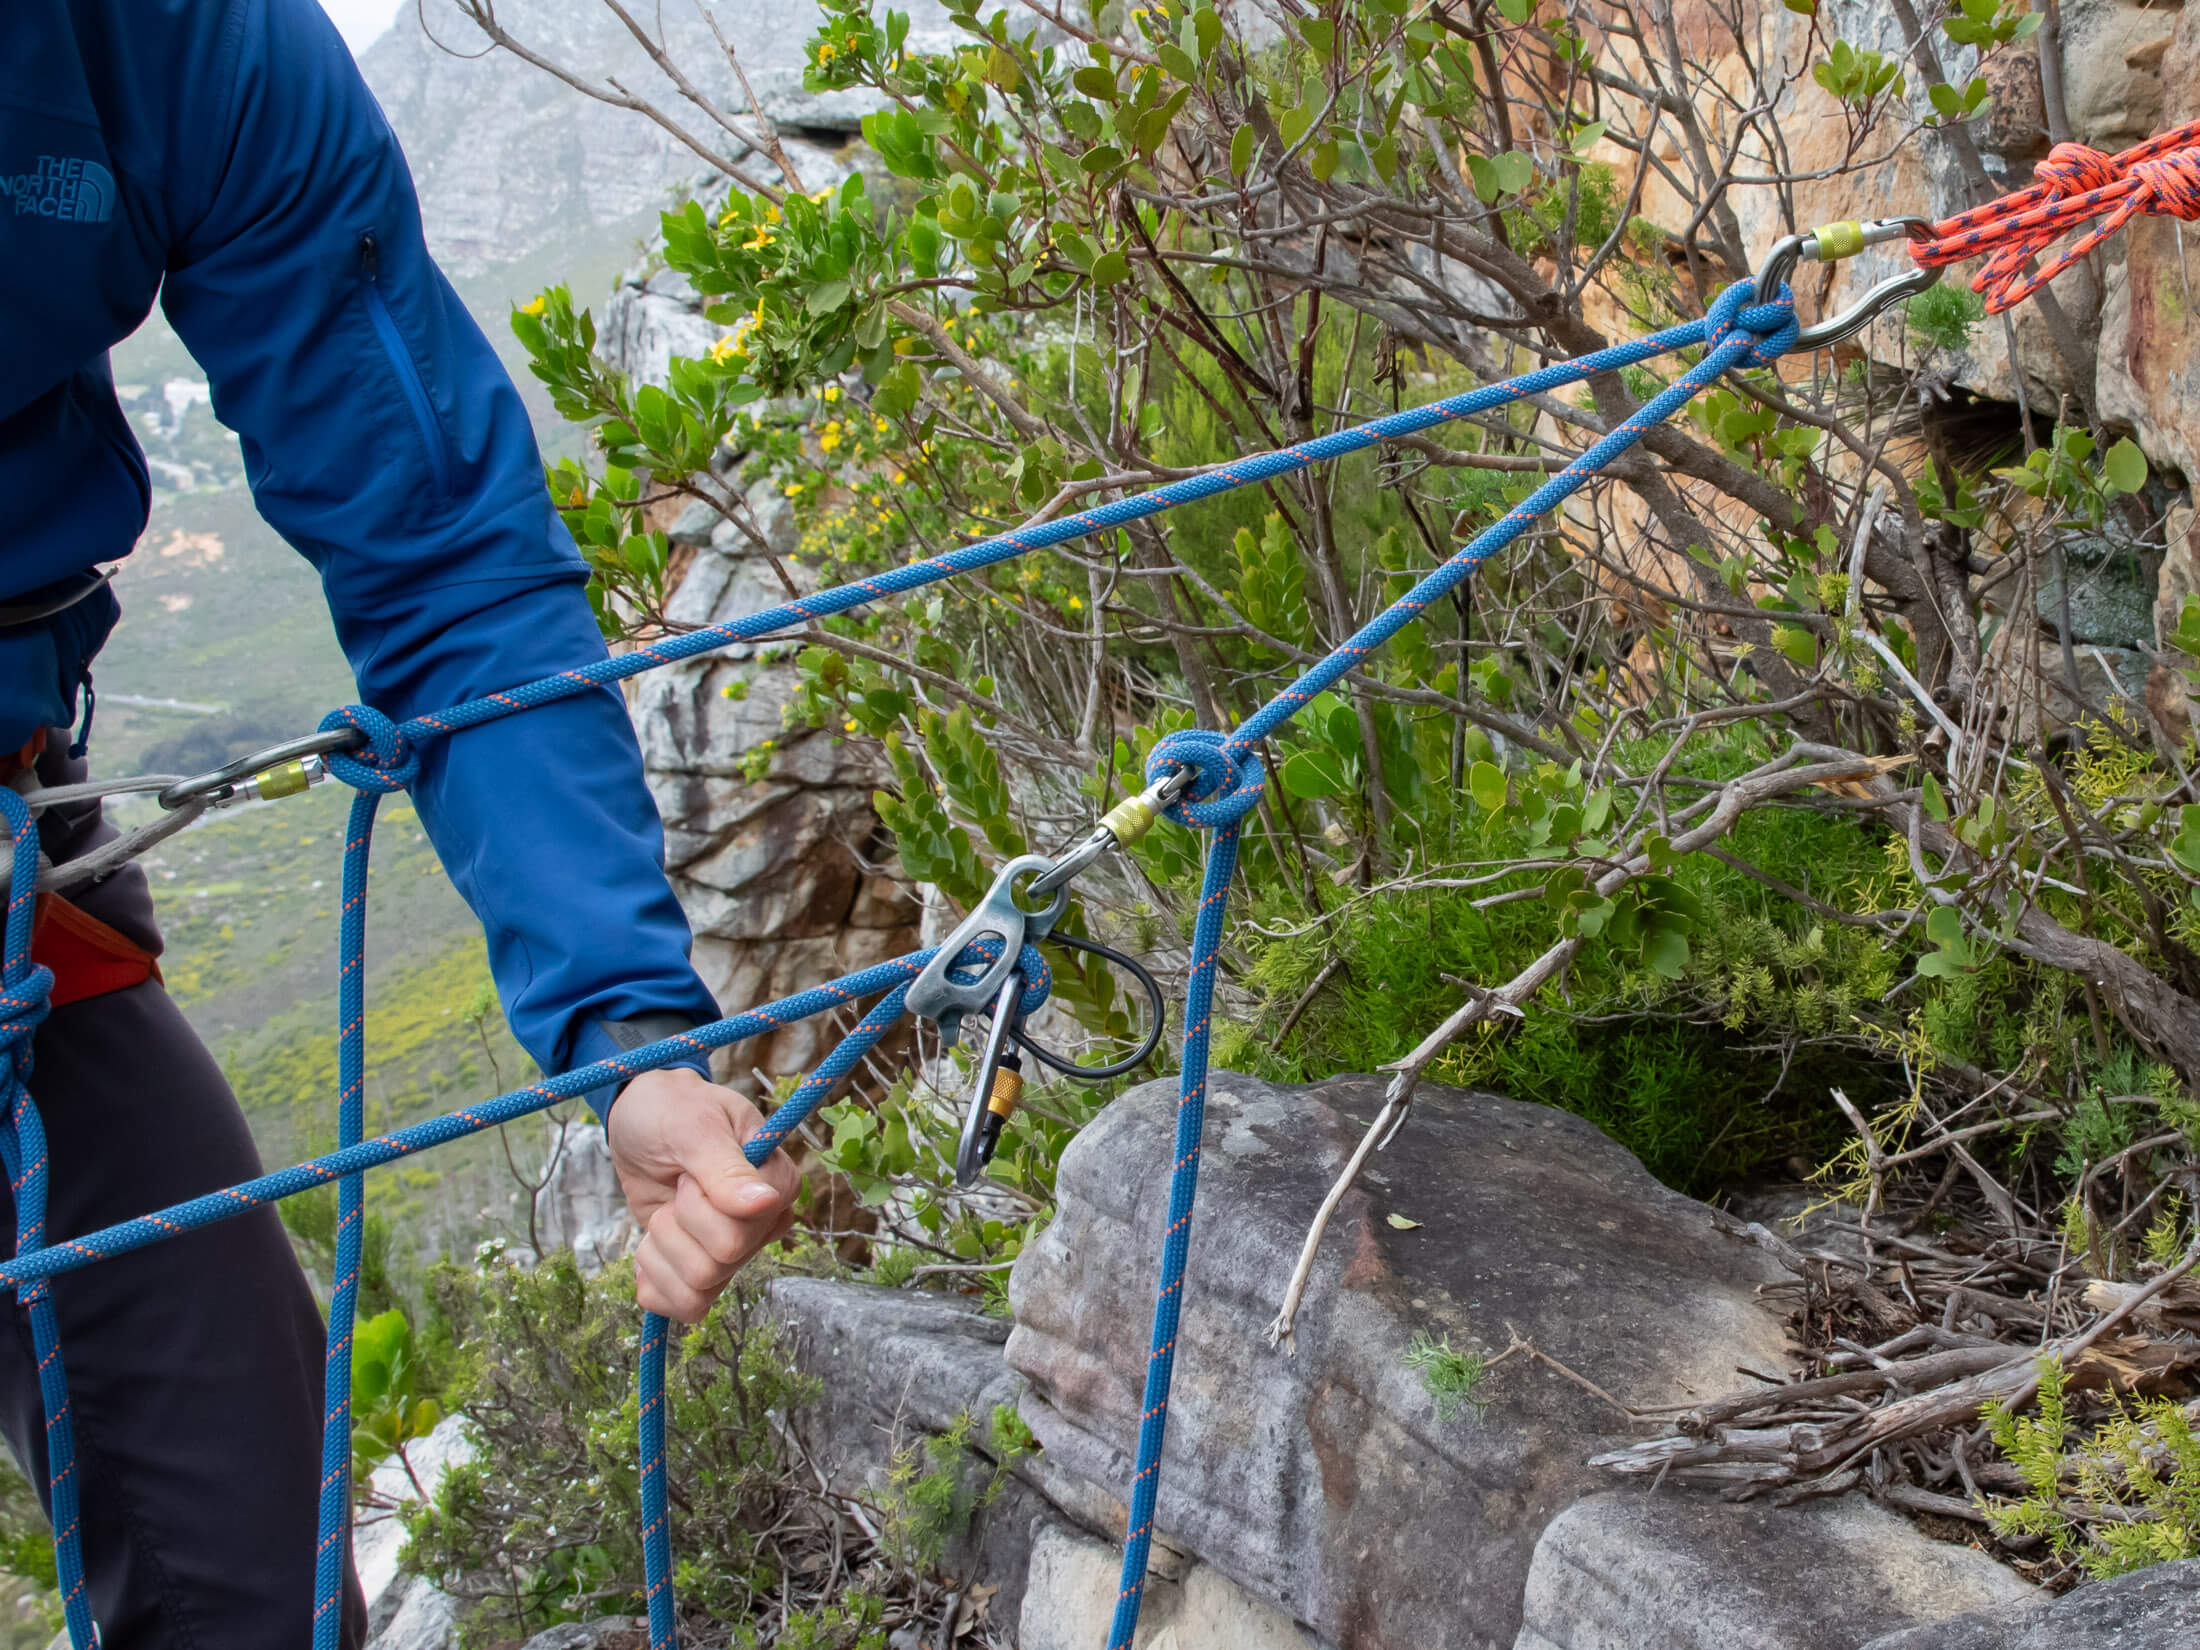
After you have pulled up the slack between yourself and your follower, clove-hitch the rope to the master point or shelf – but give yourself a few meters of slack to work with. Then, create another clove-hitch at a distance from the anchor that with make it easy to belay off. Finally, secure your belay device to this using a locking carabiner. As with the previous two setups, it’s best to use a guide-mode or auto-braking device with this arrangement.
Belaying very close to the anchor
It’s almost always better to position yourself a foot or two from the anchor using the rope or a PAS than it is to clip yourself directly into the anchor via your belay loop. However, there will be situations where it’s difficult to avoid the latter. When you find yourself in this situation, it’s usually best to attach the belay device to one your primary anchors, provided that these are bomber. Belaying directly off the master point or even the shelf makes things just too cramped or awkward when your harness is also clipped directly to the anchor.
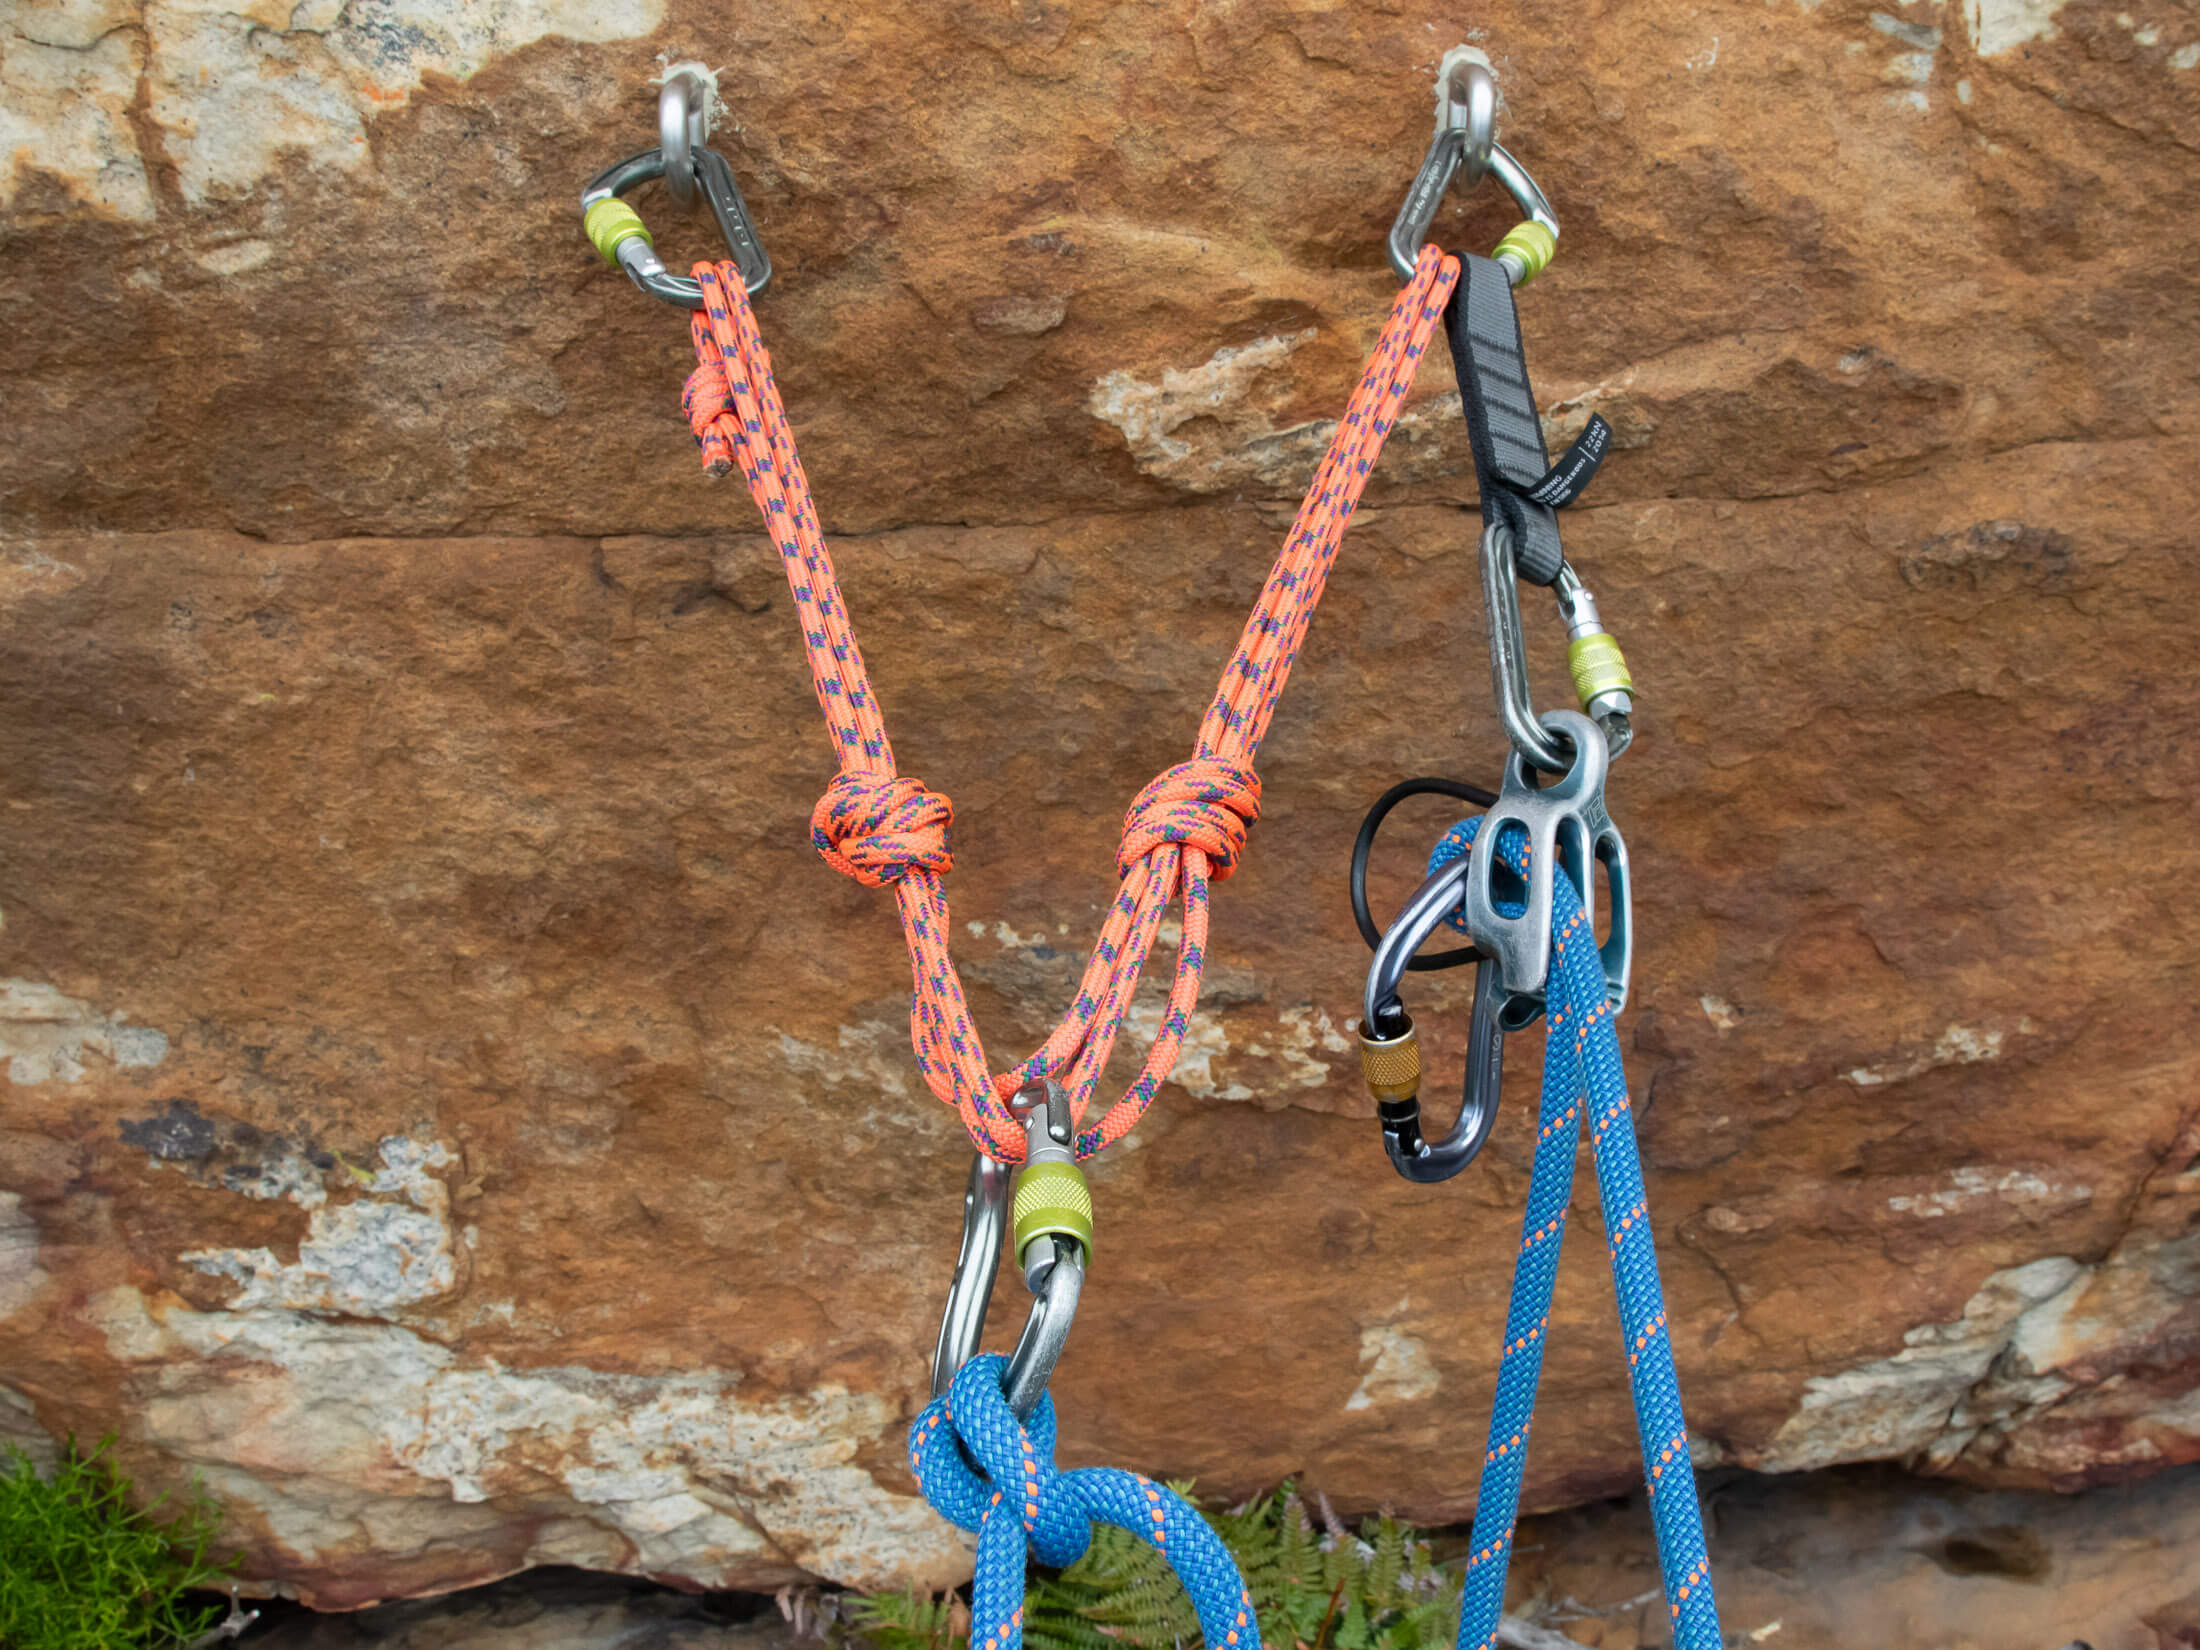
When attaching your belay device to a primary anchor, you need to make sure that the rock or bolt doesn’t interfere with the proper functioning of the device. The best way to ensure this is to put the device a short distance from the bolt (or piece of pro) using a quickdraw. I sometimes carry a quickdraw equipped with two locking carabiners for just this purpose. This modified quickdraw can also be used for holding the follower's pack when changing over on a multi-pitch climb and can be used to extend your device when rappelling.
Belaying with a redirect
Up until now I have only described methods that use a guide-mode device or auto-braking device. But now here’s one that works with a regular tubular device (one that doesn’t have guide mode). The main advantage of this setup is that it’s easier to lower the follower if you need to - much easier than would be possible with a guide-mode device. The disadvantage of this technique is that the device won’t automatically brake like a device in guide mode, so the belayer has to be even more attentive.
Secure yourself to the master point
It’s best to secure yourself to the anchor with the rope at a distance of around 1.5 m (5 ft). This will give you some space to work with and will reduce the risk of you getting pulled into the rock face if your follower falls. Again, you can use the one-handed clove hitch method or the ‘air clove’ method, but don’t try to secure the follower to the anchor using the one-handed method. A fall at the anchor could result in the device failing if you only managed to get a single loop into the master point carabiner. Always use an ‘air clove’ when securing the seconder to the anchor.
Rig the redirect
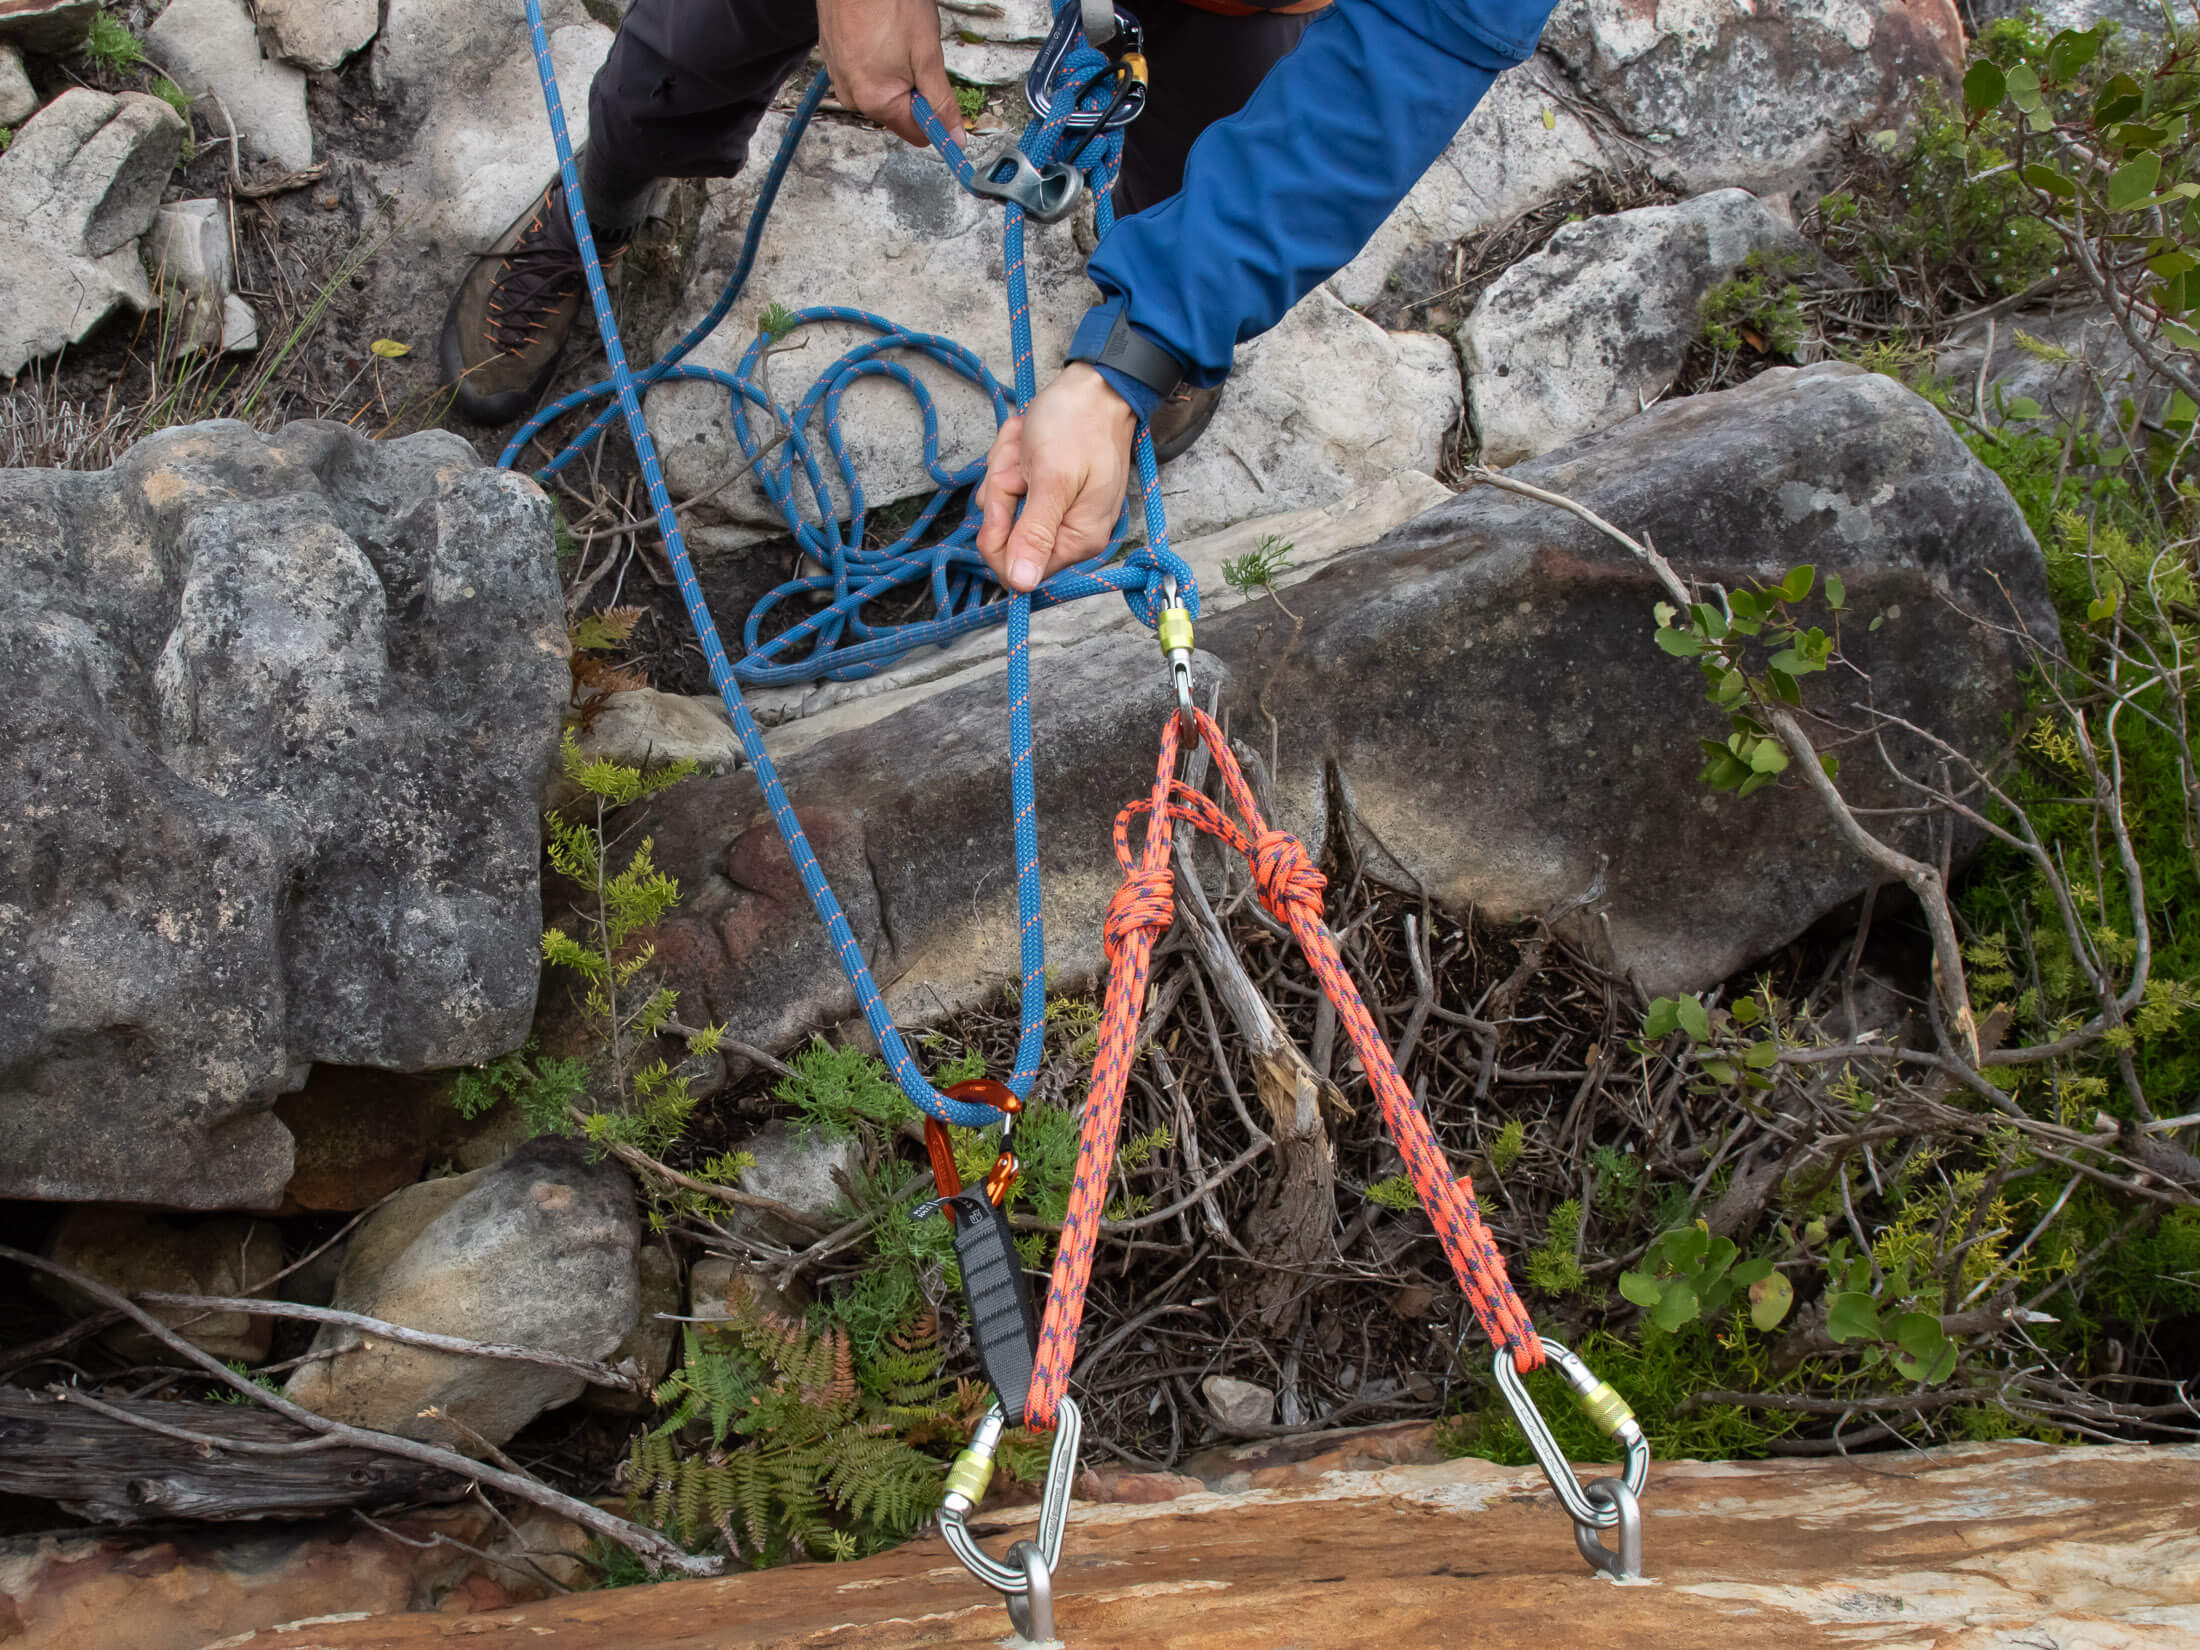
To create a redirected belay, load the device and secure it to your harness as you would for a lead belay, but then you clip the rope through a carabiner attached to the anchor. This carabiner can be clipped to the master point or the shelf, but you want to ensure that the rope doesn’t rub against the clove hitch securing your rope connection to the master point. If you have a bolted stance or a trad anchor with some really bomber pieces in it, you can attach your redirect to one of these components. And if you’re using double ropes it’s best for each rope to have its own redirect.
Belaying off your harness
Belaying a lead climber from a multi-pitch stance is not very different to belaying a leader from the ground. In most cases, the only difference is that you will be secured to the anchor with the rope or a PAS. The implication of this arrangement is that a lead fall could pull you into the wall. Whereas you’d normally be pulled up towards the first quickdraw, you would now be restricted by the anchor, which would put you in an arc that ends at the rock. To avoid this, it’s best to put at least a foot or two between you and the anchor. This will give you a larger arc and reduce the risk of a face-first interaction with the wall.
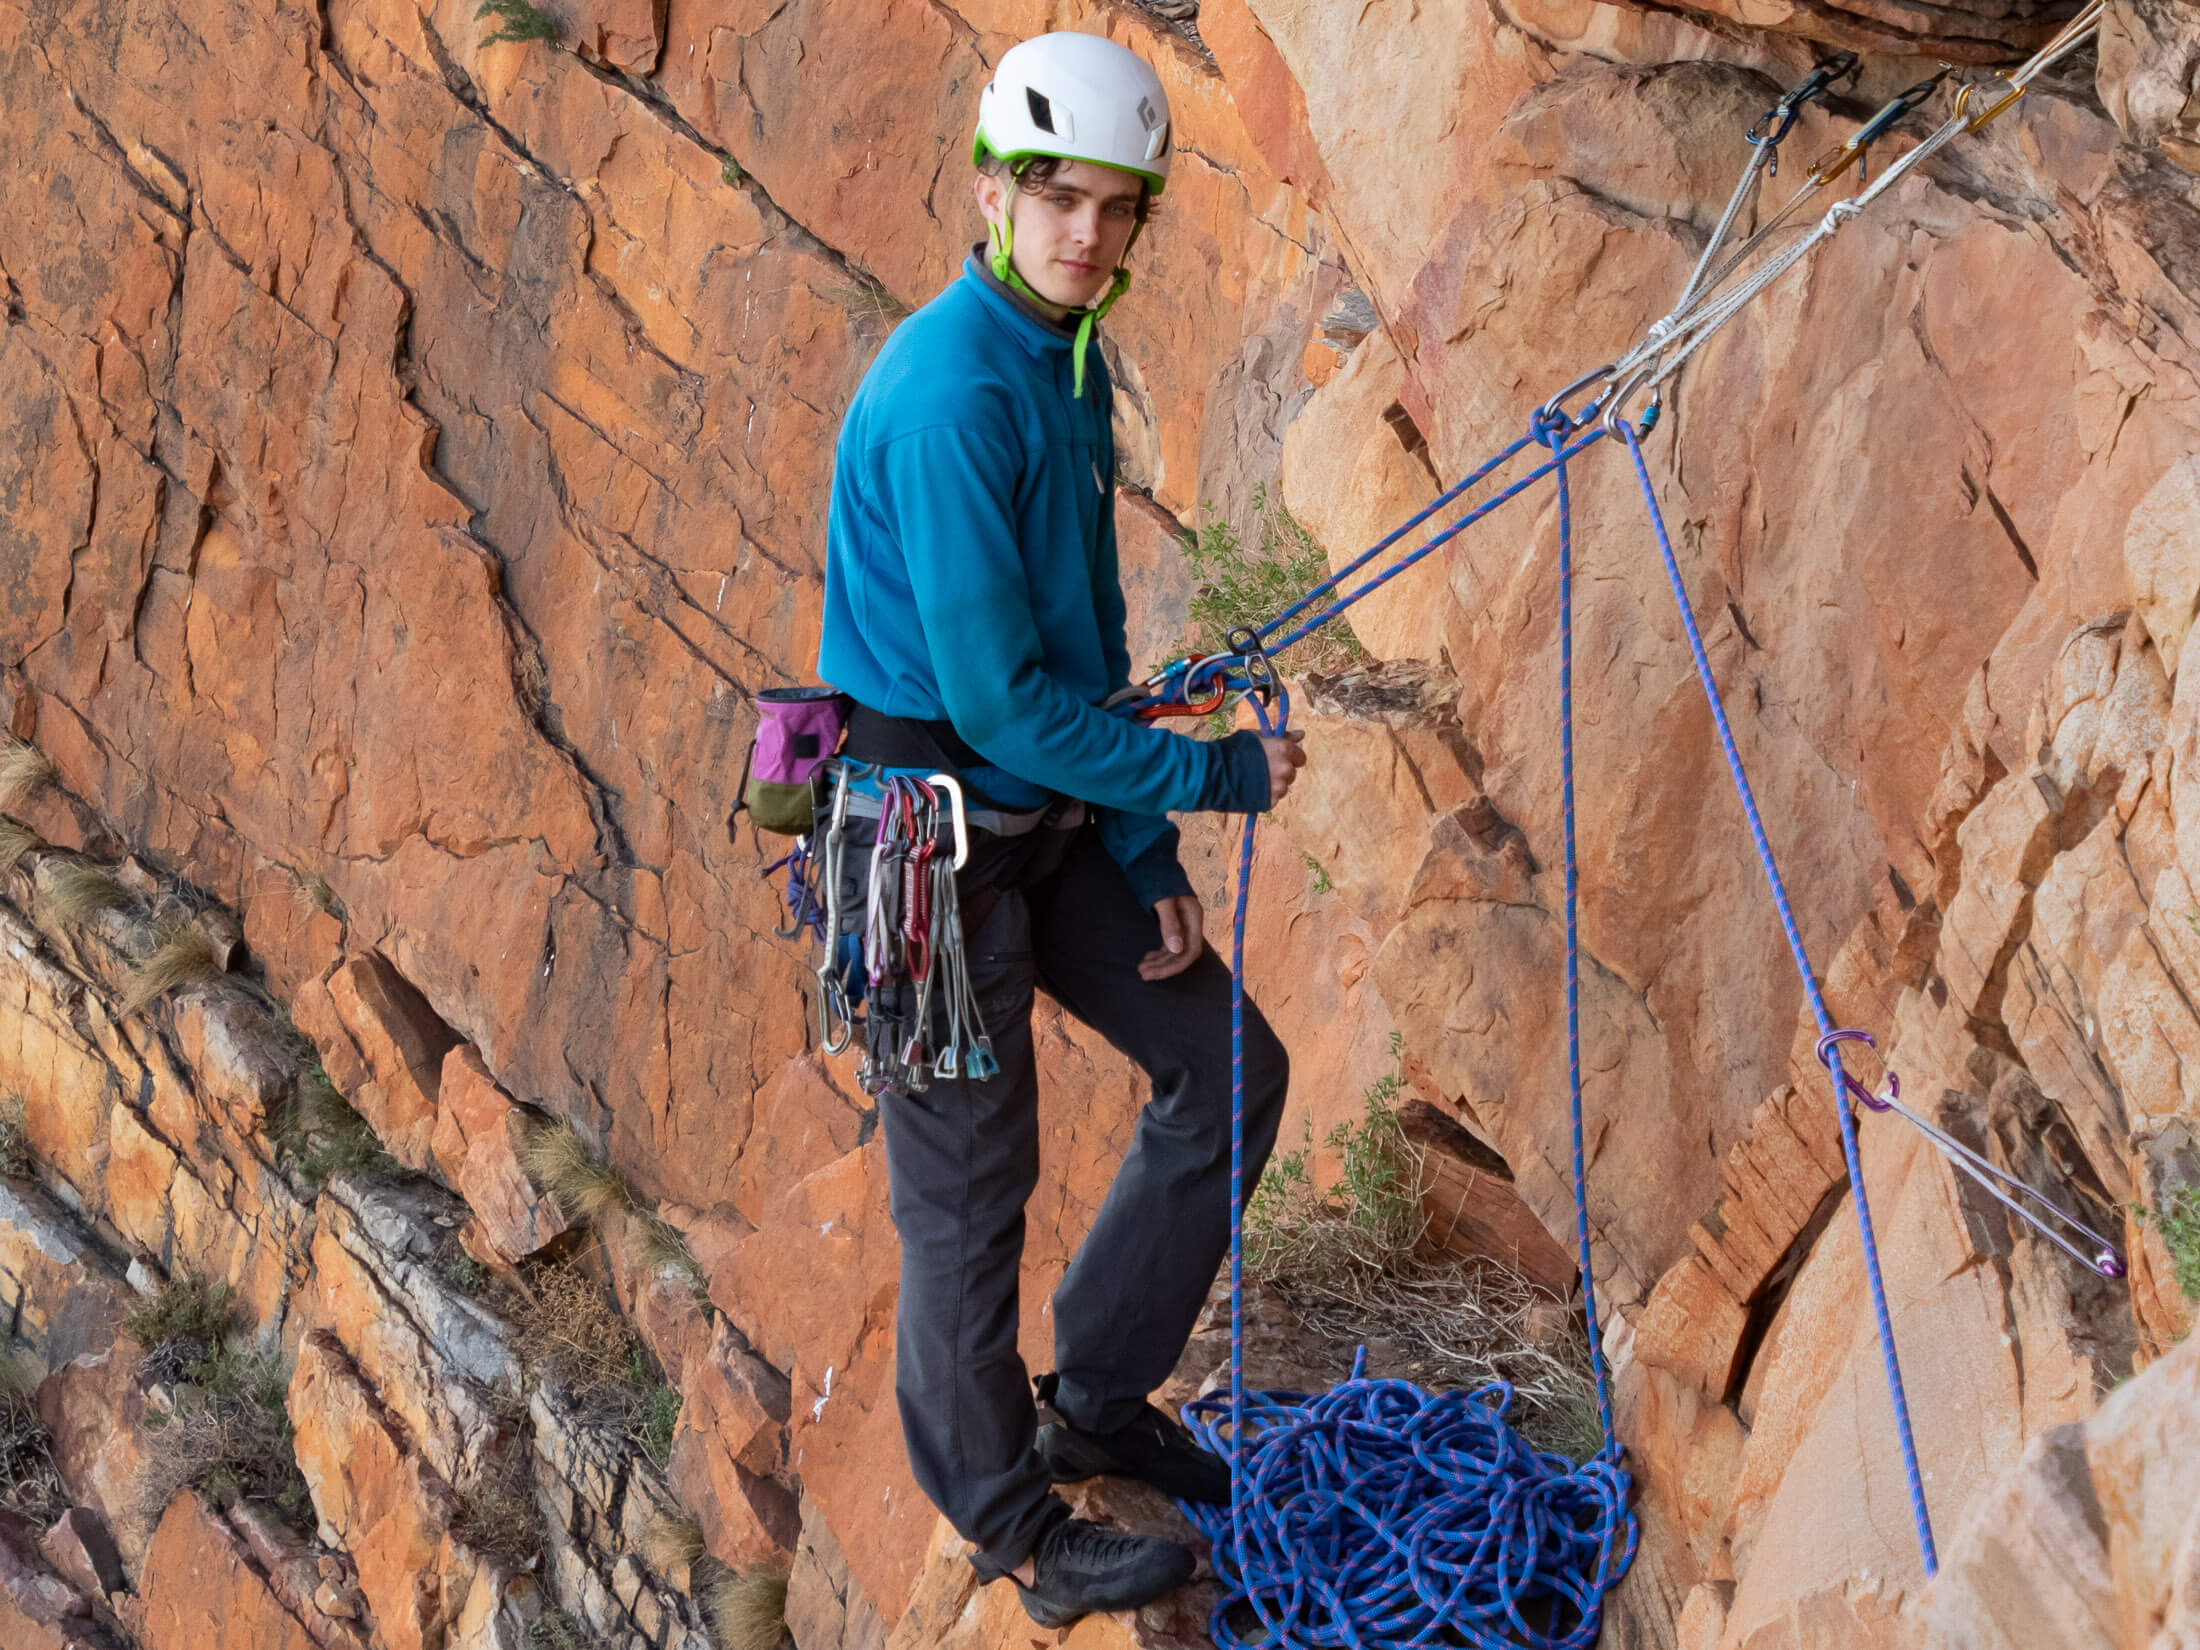
Your setup for belaying a follower up a pitch that ends in a traverse is very similar: you will secure the device to your belay loop as you would for a lead belay, but now the climber will approach you from side-on. While a lot less cumbersome than belaying directly off the anchor, this method does have a few disadvantages. The first is that the device is no longer auto-braking. The second is that it is harder to escape the belay if you have to. And a third consideration is that the direction of pull can change if the follower falls after unclipping the last piece of protection. In this scenario, you would have to resist a pull from below you as the follower swings below you. You can guard against this by clipping the rope into a redirect when the climber approaches the stance.
Rope management
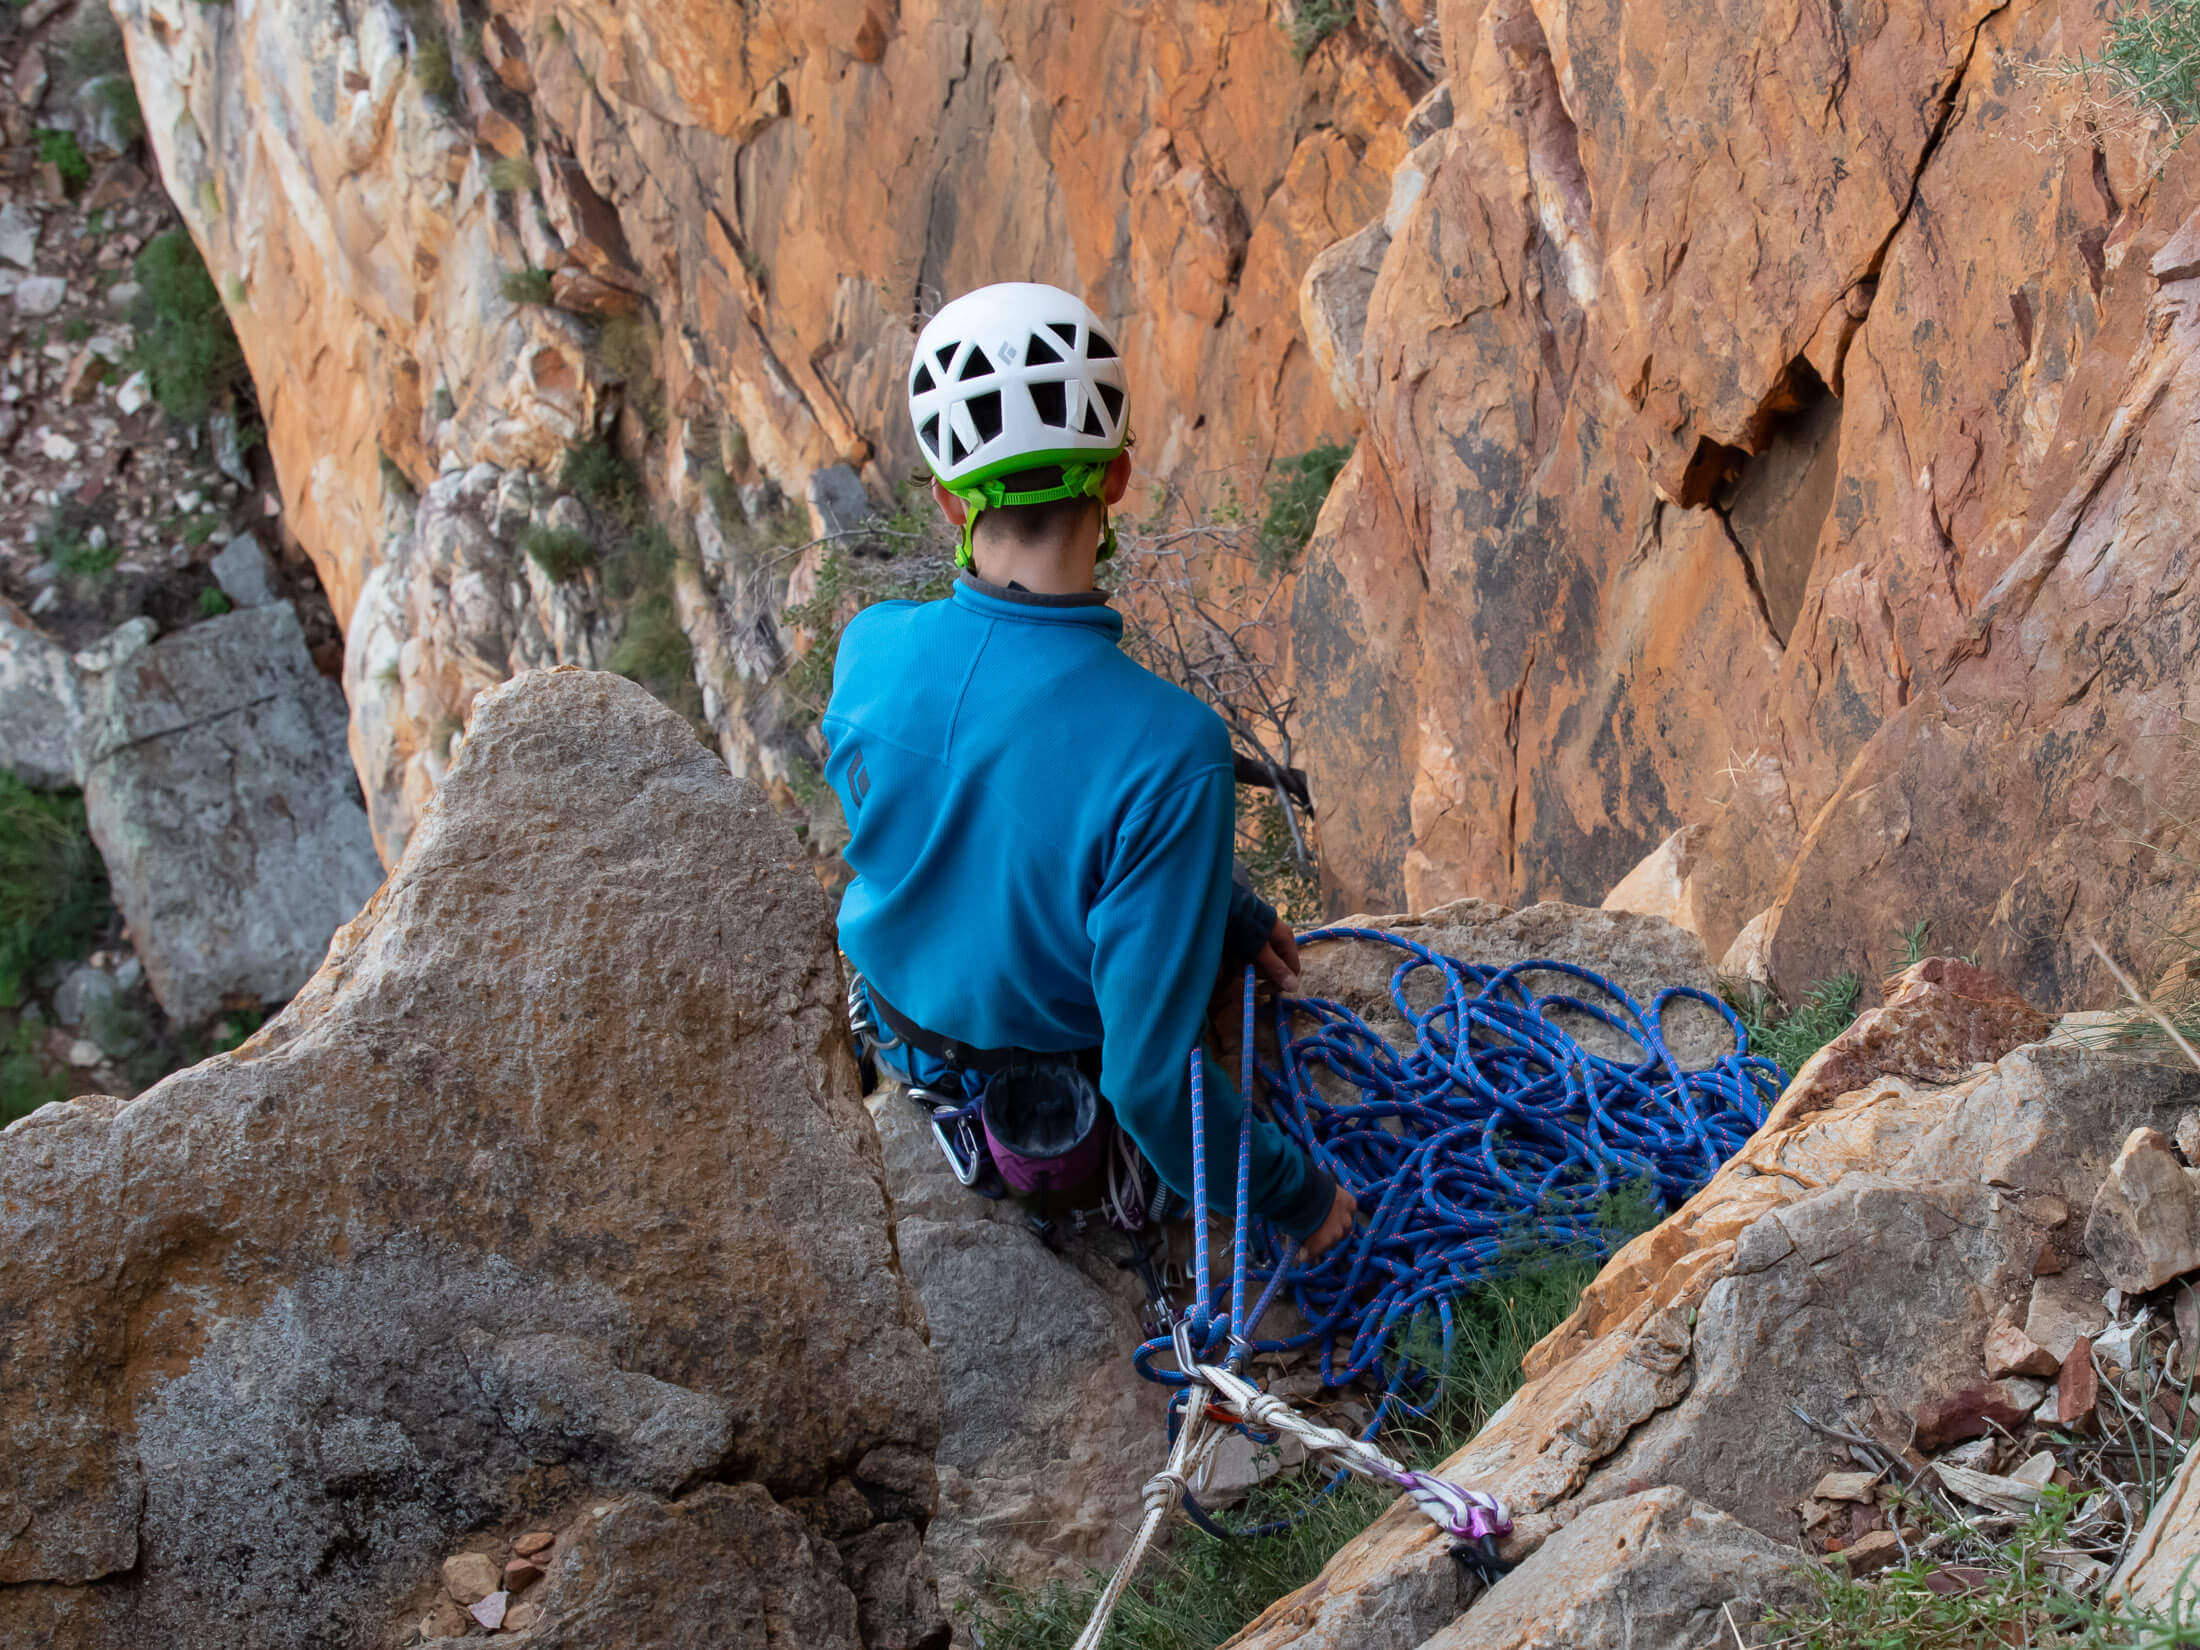
Proper rope management is key for fast and efficient change overs. Nothing can waste time quite like a spaghetti fest, and stacking your rope properly will help you avoid the worst tangles. The key to this is to stack your rope in a way that ensures that it comes off the stack in progressively larger loops – shortest loops first (on top), longest loops last (at the bottom). The reason for this is simple: when a loop of rope is shorter than all the loops underneath it, it’s a lot less likely to hook underneath another loop and cause a tangle.
Swinging leads
When you are swinging leads (swapping leads with your partner), you should start by making your longest loops first and then make your loops progressively shorter, two or three inches at a time. It helps to make your first loops longer than you think you need them to be – around 3 meters or 10 feet. This won’t be a problem unless they can get caught under with some rock feature below you.
Blocking leads
If, on the other hand, you are blocking leads (leading one pitch after another), you will need to start with your shortest loops first (about one and half feet on either side) and then make them progressively longer. Once your partner has reached the belay and you’ve stacked all the excess rope, you still have to transfer the stacked rope to your partner and then rotate it so that your end is on top. But I deal with that in the sections relevant to each method.
Stacking the rope over your anchor connection
The most common way to stack a rope is to fold it over your connection to the anchor. This could be the rope, your PAS, or even your belay loop if you have clipped in directly to the anchor. Clipping into your belay loop will require you to put the rope behind the belay device instead of in front of it, but this won’t be an issue once you have some experience belaying like this. If you are swinging leads, size your loops from longest to shortest as already described, and vice versa for blocked pitches.
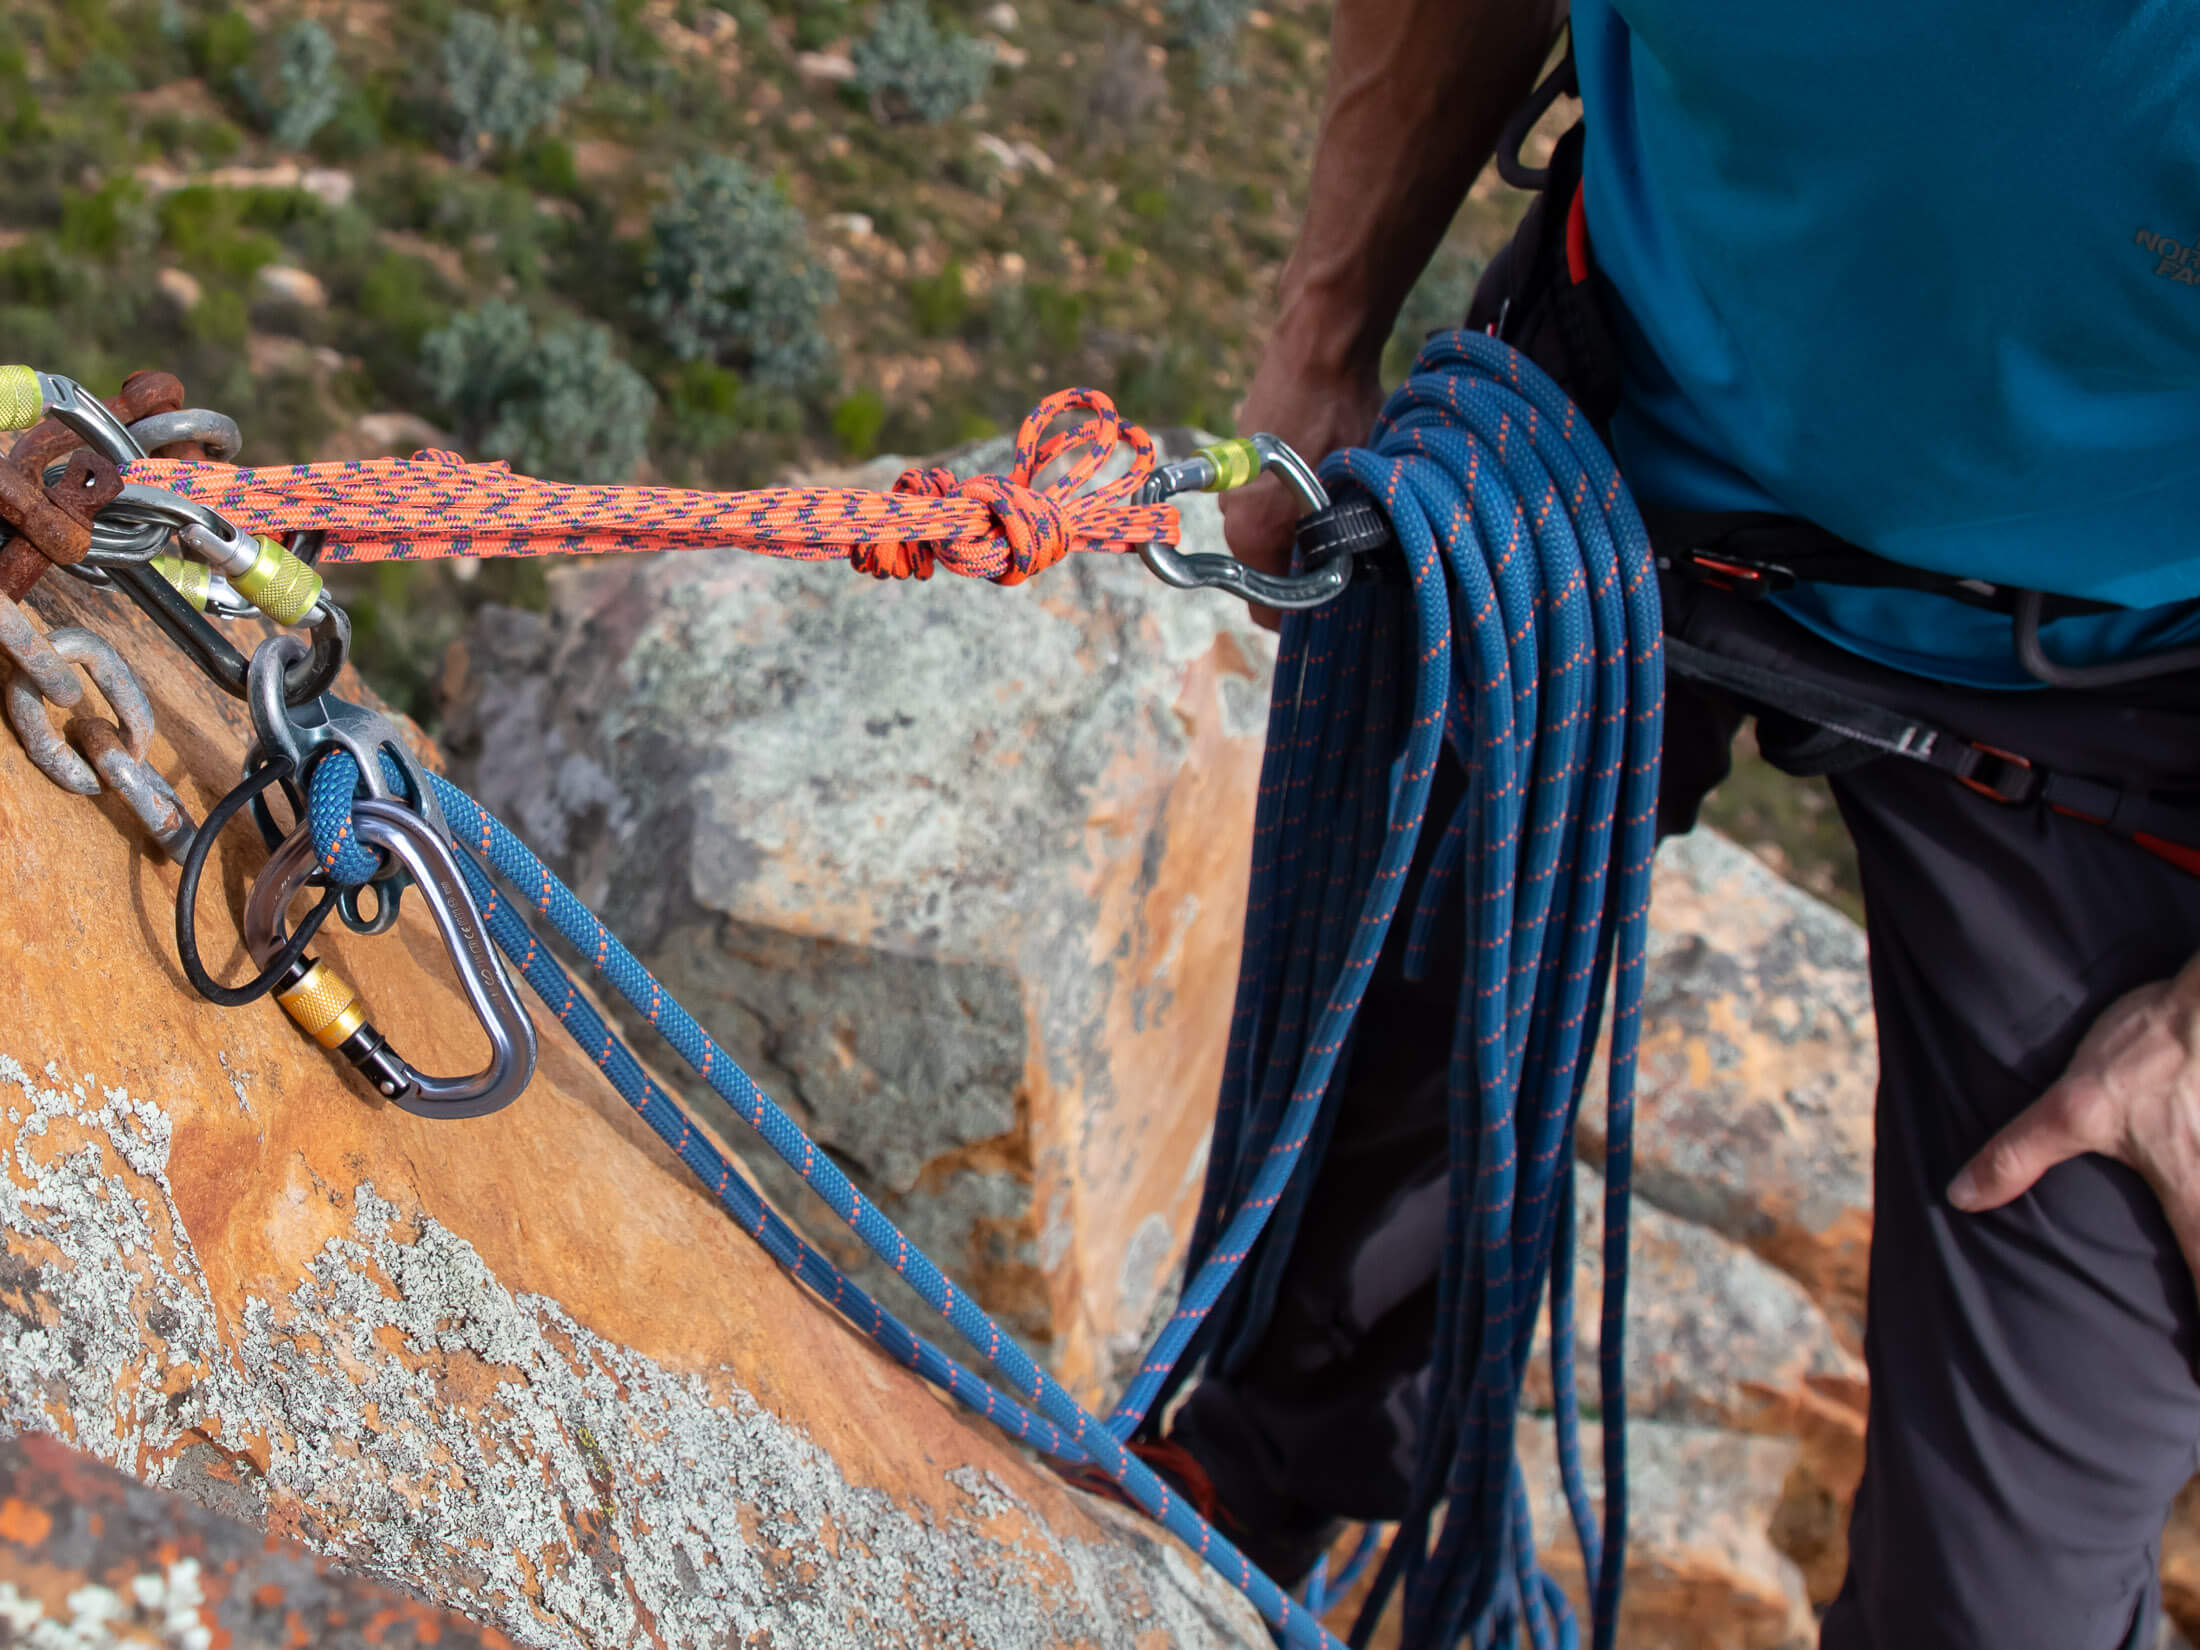
If you are blocking leads, you will then need to perform two more steps at the changeover. The first is to rotate the stack of rope so that the shortest loops are on top and you have access to the end of the rope you’ve tied into. And then you have to pass the whole stack to your partner very carefully to prevent any tangles. These steps don’t need to be performed in the order I’ve given them. It would be best to experiment and figure out what works for you.
Stacking the rope in a sling
If you find yourself in a crouched stance or one where you rest with your back to the wall, you probably won’t be able to stack the rope over your anchor connection as described above. The best alternative is to stack the rope in a sling suspended from the anchor. As for the previous method, you’d size your loops from long to small if swinging leads and vice versa if blocking leads.
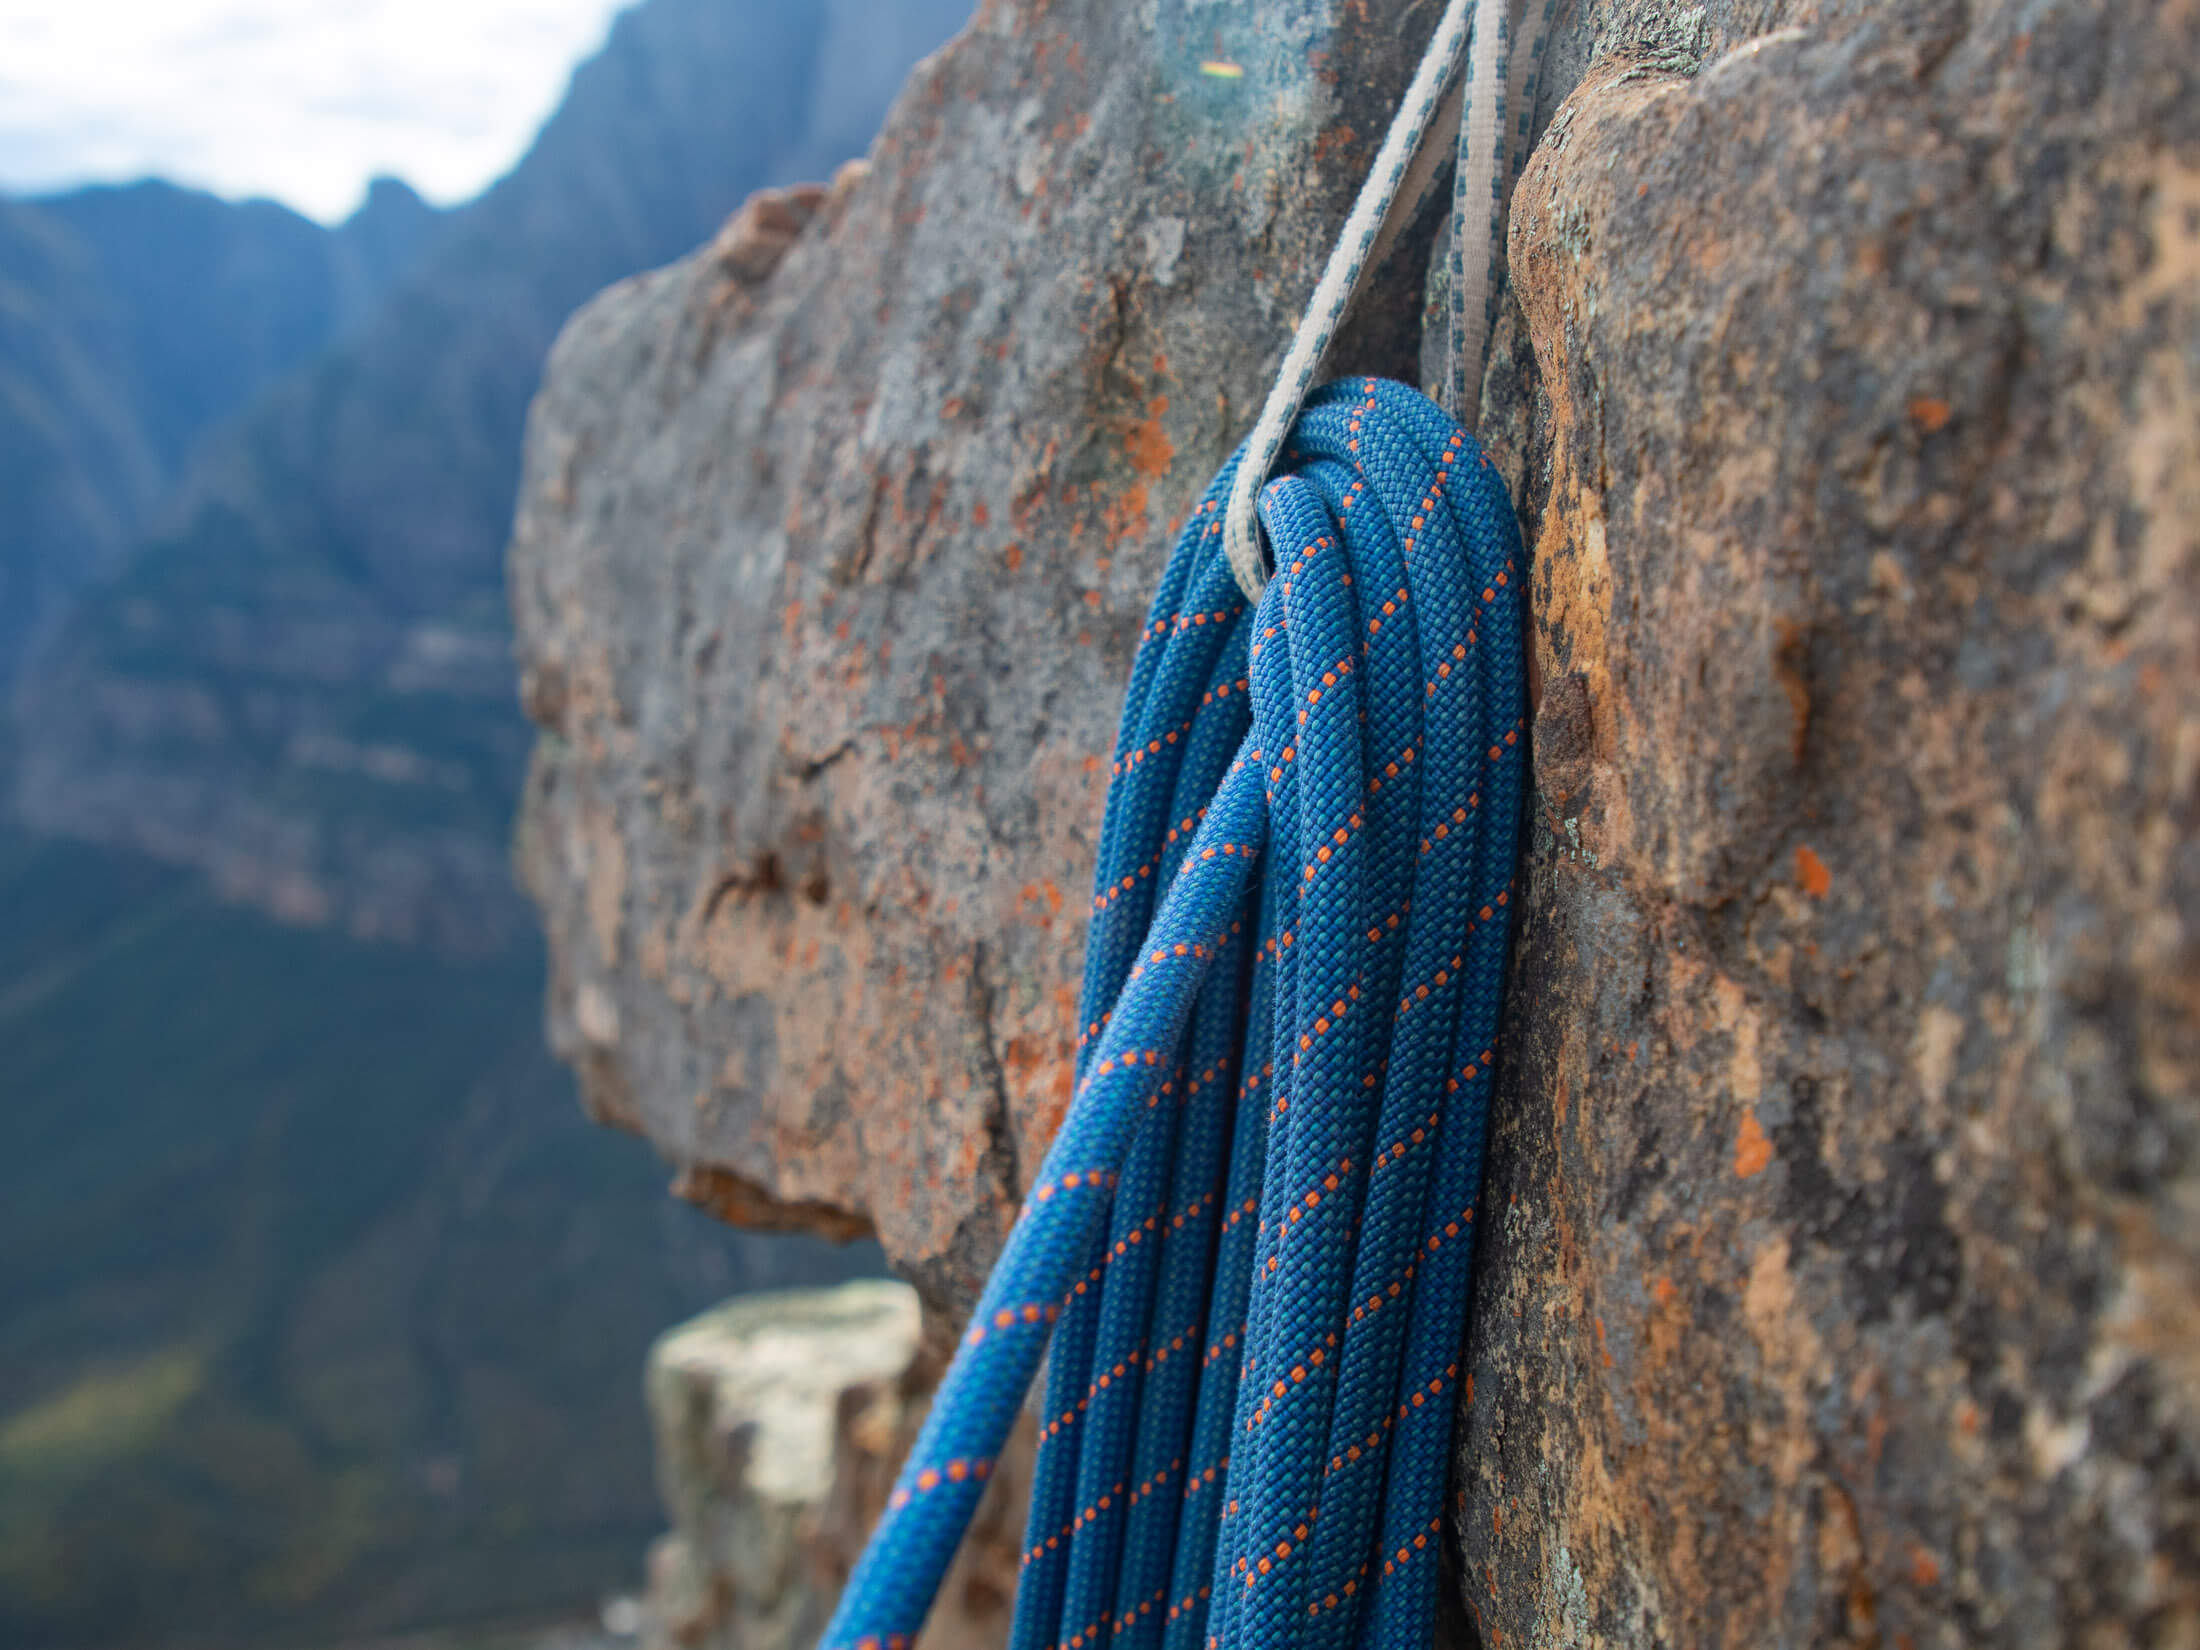
This method actually offers one more advantage for teams blocking leads, and that is that it’s easier to transfer the stacked rope to your partner when they take over the belay. Just remember to rotate the bundle of rope so that that your end is on top if you’re leading next.
Stacking rope on the ground
When stancing on a ledge, you can often stack the rope in a pile just as you would on the ground, but be careful of loose rocks you could knock down. If you’re swinging leads, the leaders end of the rope will already be on top of the pile at the start of the next pitch, but if you are blocking leads, you’ll need to get the leader’s end of the rope on top before she takes off. The standard way to do this is the “pancake flip”.
To employ the pancake flip, grab the whole stack of rope, one hand on bottom and one on top, and flip it just like you would a pancake. If you have a longer rope or smaller hands, you might want to stack your rope in two piles to make flipping it easier.
Protecting the anchor
How you use your belay stance is just as important as how you build it. Take the following two precautions to avoid any unnecessary risk to your anchor and your safety.
Don’t allow for any slack in your connection to the anchor
You can very easily shock load your anchor by generating slack in your connection to the anchor and then falling onto it. Don’t do this – make sure your PAS or rope connection is the right length when securing yourself to the anchor and then keep it weighted. Also, don’t climb above your anchor while clipped into it. A slip from a higher position can be catastrophic. Rather go on belay first if you need to reach for something.
Load the anchor on-axis
With most anchors, effective load distribution is only achieved when the anchor is pulled on-axis. This is particularly true of pre-distributed anchors like the overhand-knot anchor, but it’s also something to think about when using a hybrid anchor, like the standard 3-piece quad. If any of your primary anchors are anything less than bomber (rated to 10 kN and in good rock), you’ll want to keep the anchor as on-axis as possible to avoid putting a dangerously high load on a weaker component.
Learn more about anchor building
Having given this a good read, you now have a good idea of how to set up a belay stance in a variety of situations. That said, there is no substitute for in-person instruction, and I strongly recommend that you practise these techniques under the guidance of a more experienced climber before trusting your life to your ropework. With this fundamental skill set under your belt, you can then delve deeper into the more specialised aspects of anchor rigging.
